I home processed my first roll of color film this weekend, and scanned it using Negafix. I see there's a huge difference between images that are saved using the Negafix color profile in Silverfast vs images that are saved as raw DNG's, and inverted in Photoshop. The Negafix image is much better. If I had to pick out one thing, I'd say that using inversion doesn't seem to take into account the base tint of the film. How does one get the correct color curves for a specific film in Photoshop?


-
Welcome to Photrio!Registration is fast and free. Join today to unlock search, see fewer ads, and access all forum features.Click here to sign up
You are using an out of date browser. It may not display this or other websites correctly.
You should upgrade or use an alternative browser.
You should upgrade or use an alternative browser.
Color Scans - Negafix vs Photoshop Inversion
-
H
- Thread starter focus_on_infinity
- Start date


Recent Classifieds
-
Sold Hasselblad V Adapter To Linhof
- Started by Jessxi
-
Sold Niko28mm f3.5 PC-Nikkor
- Started by Rayt
-
Want to Buy Rapid Rectilinear lens for 8x10 or larger
- Started by blee1996
-
Free GONE French lens probably early XIXcentury
- Started by Gaston 012
-
Sold Ilford 4x5 FP4+ (Expired June 2023)
- Started by CreationBear
Forum statistics
The Photoshop inversion seems to be just that, inverting whatever the raw scan was (hitting Ctrl - I) and is definitely not a proper method getting a photo from a colour negative.
OP
OP
That's right. FWIW, Ctrl-I is the same thing as selecting "Color Negative" under Curves. It's just a raw inversion.
With Silverfast, it seems that there isn't any way to apply any processing when saving as a DNG. That's fine, as I think I'd rather my DNG to be as straight off the scanner with as little processing as possible. Still, I'd like to actually get a proper image through Photoshop somehow.
With Silverfast, it seems that there isn't any way to apply any processing when saving as a DNG. That's fine, as I think I'd rather my DNG to be as straight off the scanner with as little processing as possible. Still, I'd like to actually get a proper image through Photoshop somehow.
You can do a quick and easy conversion using the "levels" control in PhotoShop. Adjusting the white and black points of each of the RGB fields will usually get you fairly close. This technic won't work well for images shot in non-white light (sunset, etc.), but will usually get you fairly close.
This thread: https://www.photrio.com/forum/threa...c-41-reversal-and-orange-mask-removal.166696/
will likely tell you more than you want to know about this topic.
This thread: https://www.photrio.com/forum/threa...c-41-reversal-and-orange-mask-removal.166696/
will likely tell you more than you want to know about this topic.
Marameo
I was wondering if you can raw scan in Silverfast and use Negatfix later on just in case I change my mind about tone curves.
Anyway, I would suggest doing the inversion in Camera Raw rather then Photoshop; Curves in PS are Gamma 1.8 (if you use ProPhoto) while raw converters (Lightroom, Camera Raw) work at gamma 1.0 and you get to white balance out the film border also.
What film is that?
Anyway, I would suggest doing the inversion in Camera Raw rather then Photoshop; Curves in PS are Gamma 1.8 (if you use ProPhoto) while raw converters (Lightroom, Camera Raw) work at gamma 1.0 and you get to white balance out the film border also.
I home processed my first roll of color film this weekend
What film is that?
I was wondering if you can raw scan in Silverfast and use Negatfix later on just in case I change my mind about tone curves.
Yes, but I believe you still need Silverfast HDR to do that.
I was wondering if you can raw scan in Silverfast and use Negatfix later on just in case I change my mind about tone curves.
Anyway, I would suggest doing the inversion in Camera Raw rather then Photoshop; Curves in PS are Gamma 1.8 (if you use ProPhoto) while raw converters (Lightroom, Camera Raw) work at gamma 1.0 and you get to white balance out the film border also.
You might see if you can "borrow" a scan in Silverfast HDR file format (which if their literature is to believed is a TIFF file) and see if other HDR editing programs can unpack it properly.
RawTherepee and Darktable are two options to try. If it is a valid TIFF, without funky compression or proprietary metadata, it should work.
I found this explanation, it works well for me:
The key step is pretty simple to do in Photoshop: sample the colour of the un-inverted negative rebate, make a new layer, fill the layer with the sampled colour, set blend mode to divide, flatten the layers, invert the image, clip RGB black & white points using warnings. Then fine colour adjustments & tonal balancing. The divide blending mode is essential - the mask is not a global colour - it's a mask that's formed inversely proportional to exposure & must be removed as such. If you do so, you're well on your way to manually matching how an optical print responds.
It takes considerably more time to describe than do! Main area of trouble people tend to have is judging how far to clip the individual black/ white points in each of the RGB channels in curves. Best solution I've found is to clip the black point till the rebate has a good black, and the white until just before it starts to clip in the image area. Other important thing is that black points must be set first. Far too often, the preset driven programmes are excessively aggressive with bp/ wp settings when compared to manual controls. In comparison, the Fuji Frontier (for example) tends to clip 'white' to outright white, then adjust the output back to an L of 95 amongst a whole series of other oddities that rather stifle the range of many films. It makes sense in the context of that sort of minilab, but if you want something more akin to what an optical print might deliver, I've found manual clipping to be significantly better.
Far too often, the preset driven programmes are excessively aggressive with bp/ wp settings when compared to manual controls.
Have you tried the ColorPerfect software? www.colorperfect.com
What scanner are you using?
OP
OP
OK, cool. It should be easy enough to reverse the base tint. I'll give that a try and see how the colors turn out.
Epson V850
What scanner are you using?
Epson V850
Have you tried Epsonscan with your V850? Curious how it works since I plan on getting the V850 or V800 and I currently use Epsonscan on my V600.
OP
OP
Have you tried Epsonscan with your V850? Curious how it works since I plan on getting the V850 or V800 and I currently use Epsonscan on my V600.
No, just SilverFast. It's kind of clunky and not very intuitive, the manual explains nothing, and as far as I can tell, the support forum has been completely abandoned. But other than that it seems to do it's job.
If you are talking about Silverfast, for at least a year now, I have been trying to get a password reset, because I have been unable to log in to the forum. I get these various BS excuses, always polite. I have to wonder what is really going on there. There are multiple packages available for running a support forum, with migration/import capabilities. The Lightroomforums did a migration in a weekend, if I remember correctly.No, just SilverFast. It's kind of clunky and not very intuitive, the manual explains nothing, and as far as I can tell, the support forum has been completely abandoned. But other than that it seems to do it's job.
I have this very, very long-delayed project to scan roughly 20K Kodachromes, several thousand Ektachromes, about 5K B&W and some C-22 and C-41 color negatives. Enough to justify spending more for Silverfast, IF, IF, If it is superior to Nikonscan or Vuescan. I have been delayed in even starting the comparison of all this software, but I am reluctant to commit to Silverfast if the support forum is non-functional. The Silverfast website makes some bold claims, but I would like to get even read-only access to the forum to validate these claims.
I may just say, "Heck with it all, and go with Nikonscan," since I have a 5000 scanner.
Of course, web reviews of all these applications gives very contrary assessments from different reviewers.
Phil Burton
- Joined
- May 26, 2018
- Messages
- 366
I found this explanation, it works well for me:
The key step is pretty simple to do in Photoshop: sample the colour of the un-inverted negative rebate, make a new layer, fill the layer with the sampled colour, set blend mode to divide, flatten the layers, invert the image, clip RGB black & white points using warnings. Then fine colour adjustments & tonal balancing. The divide blending mode is essential - the mask is not a global colour - it's a mask that's formed inversely proportional to exposure & must be removed as such. If you do so, you're well on your way to manually matching how an optical print responds.
yes, that's the general idea, whatever tools are used. I typically did it since ever with Gimp. Alternatively, without sampling of the film mask, different softwares use different methods of evaluation for autobalancing and with different temperatures of white. That's an initial critical step.
For Photoshop users there's an "action" ie. a script file in .atn, that does a reasonably good job from negative to positive, requiring 2 manual inputs from the user: mask sampling, then black point sampling, this one from a german Dennis Gelner, with cristal clear explanation:
https://retro-pixel.com/converting-color-negatives-to-positives-without-plugins/
Last edited:
IS anyone using Epsonscan with their V800 or V850? What do you think?
OP
OP
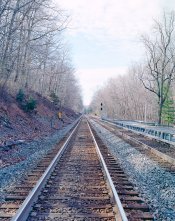
OK, interesting. Looks like there are crazy numbers of ways to skin this cat, starting with a simple divide by orange/invert/find light & dark colors. Negafix looks fine, although I really didn't want to apply color adjustement at the scanning stage.
However, it does look like ColorPerfect isn't removing the orange base tint. Is there some button or trick to that? Also, kind of strange - if I remove the base tint before I apply ColorPerfect, the result is the exact same. If I use Negafix directly, these pictures aren't so orange.


However, it does look like ColorPerfect isn't removing the orange base tint. Is there some button or trick to that? Also, kind of strange - if I remove the base tint before I apply ColorPerfect, the result is the exact same. If I use Negafix directly, these pictures aren't so orange.
Last edited:
Which rail line?
Also, kind of strange - if I remove the base tint before I apply ColorPerfect, the result is the exact same.
That is normal. I think the algorithms it uses know when the orange mask has been pre-neutralised or not. As to the orange cast in the above images, hard to know without seeing the file directly.
A couple of quick questions though:
a) are you cropping out all of the blank portions of the frame before doing the inversion?
b) are you selecting the correct film emulsion preset in the drop-down list?
If you want to send me a file I would be happy to try an inversion with ColorPerfect and post my results. I have had nothing but excellent results from it with my D810 raw files.
OP
OP
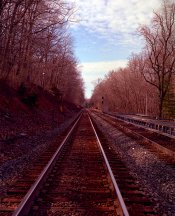
Here's an example. I've attached the scan, one that was done with a simple divide and find dark/light colors, and one using Colorperfect. The Colorperfect is using the Kodak Ektar profile.
Attachments

Last edited:
OP
OP
Ah, OK, I think I've got it now. The button that says 'L' means linear. And if you click it, it switches to 'G', which means gamma. I thought this was a linear scan, but apparently it was gamma.
Photoshop, or really any photo editing software with a curves style tool, will give you much more accurate results than any automated software. It's just a matter of learning how to use it. And don't worry about scanning with a purist intent, trying to do as little processing as possible. The way color film works, you can't avoid color adjustments without having a terrible looking photo. Even printing in a darkroom will require the printer to adjust the colors to match the desired output. There is no way to do it and get a good looking photo that doesn't involve manipulating the colors. The question is, do you want to take control of the color for your specific photo, or do you want a software engineer to take control for you by creating a generic profile that provides mediocre results at best, and even then, only under certain circumstances? It's control vs. convenience.
The easiest way to do it in photoshop, is to take the photo, invert it, and then open up the curves, or the levels tool. Then look at each of the Red, Green, and Blue layers, and place the outside markings at the point where the histogram just starts to show information. Do that for each of the three colors, and you should have a pretty decent start. That'll get you to about the same place most automated software does. You may need to tweak the end points a bit and occasionally, if necessary, tweak the curve itself (usually just start at a single point in the middle and make gentle curves. Making jagged curves will almost always lead to poor results). Once you find a setting you like, save it as a profile. I usually save mine with a name that indicates the scanning method and the type of film used. Then, when you scan a new negative using the same method and film, you can simply load up this profile, and have a pretty decent looking photo in seconds, with very little work. You may have to tweak the profile a bit early on, to get it to work with the most number of negatives, as some will be under exposed or over exposed, and need slight changes. But once you have a good profile saved, it'll get you 90% there in about 5 seconds. Best of all, you can create an automation that will allow you to invert and color correct thousands of negatives in a few minutes without you having to do anything. Go make some coffee and when you have your cup ready, you'll be ready to look at your photos! They might require some further tweaking to make them perfect, but this will easily get you 90% there and allow you to separate the great photos from the good photos from the ones that aren't worth sharing.
Now, what I'll do is scan a bunch of negatives. Then create that automation and use a profile that I've already created, and batch process the entire roll. From there, I'll go back and view each one to see which ones are worthy of further processing and refinement. If I find one that's worth printing, or posting or whatever, I'll go back to it, tweak the color further, remove any dust or scratches, sharpen as needed, and do any other edits that the photo needs. That way I'm not wasting my time working on photos that will never be seen by anyone but me. If a photo is just going to be uploaded to the internet, I won't spend near as much time on it as I will if it's going to be printed (because printing will reveal a lot more detail). It's the best of both worlds, once you've learned to master the software. You can have your convenience when you want it, and the control when you need it. You just have to invest the time and patience in overcoming the learning curve.
The curves tool can be intimidating at first, as it's not the easiest or most intuitive tool to use. But it is extremely powerful. And once you get good at it and get a feel for how it works, you can edit colors, and not just on negatives but any photo, very quickly and with an unprecedented degree of accuracy.
Marameo
When it comes to RAW/DNG there must be some "camera profile" tailored to specific lighting situations for ultimate color accuracy to render and prepare the file for editing.
Photoshop, or really any photo editing software with a curves style tool, will give you much more accurate results than any automated software. It's just a matter of learning how to use it.
This isn't true in my experience. ColorPerfect gives me way more accurate and easy inversions than manual inversion ever did in Photoshop, and believe me I tried all the common techniques, including curves manipulations. It's a recipe for frustration and endless tweaking. Ektar in particular is extremely difficult to manually invert properly. ColorPerfect gives excellent results every time with very minimal effort.
OP
OP
And here's the Colorperfect image with the corrected color space, but otherwise untouched. And of course it still needs further tweaking. I'm not really sure how I'd do that in CP at this point, but I'm not worried about it. My main goal at this point is just to not be making basic mistakes.

| Photrio.com contains affiliate links to products. We may receive a commission for purchases made through these links. To read our full affiliate disclosure statement please click Here. |
PHOTRIO PARTNERS EQUALLY FUNDING OUR COMMUNITY:  |