I had a jeweler roll out some pure silver to .003". I have a coil of it about 1cm wide. My process is actually quite labor intensive and fairly complex. It involves using a sewing needle, a pin vice, a somewhat polished anvil, a somewhat polished peen hammer, a set of gauges, and a 50x projection microscope. The gauges are cut from hardwood, sized to 50x the target dimensions so that looking at the image of the hole on the screen, I can see how close to the target dimension it is.
First, I poke a hole. Doesn't really matter how big it is, just so it isn't ridiculously far from the target and it should be a bit larger. Then, I pound the silver with the hole. That expands the metal, closing the hole somewhat, should make it smaller than desired. Then do this back and forth, too big, too small until I get it right. The microscope also helps me insure that the hole is clean. This can take a while, and sometimes I need to start over because it's easy to get a misshapen hole. If there is crud visible in the hole, delicate cleaning with the needle usually works. Maybe compressed air, but it would be easy to blow the whole job away in the wind.
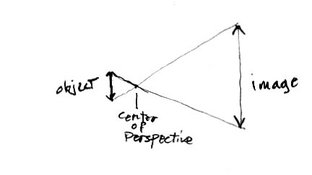
The hole is in the middle of a dome that is formed by the process, much like the jeweler's forming technique "repoussé". One very important result of this process is that the hole is in metal that is extremely thin, much thinner than the original .003". This is far superior to drilled holes, laser or otherwise, because a drilled hole is actually a tube. A short tube, but a tube. This affects the light on a wavelength level. These holes produce absolutely gorgeous diffraction rainbow effects.
The material the hole is made of should be blackened. I've heard of people using paint (!) or black marker, but the best way is to use pure or sterling silver, and then selenium toner. The silver will tarnish naturally over time if exposed to the air, but I don't want to wait so I use toner.
The holes that I make this way produce extremely high quality images. Unless enlarged, they can almost compete with lenses. Of course, a lot of pinhole users would find this objectionable. They think pinhole images should look (at worst) crude and fuzzy. But I love the quality of the drawing that I get with these.
Dominique Stroobant told me that he makes his pinholes by electro etching. We haven't compared our resolutions, but I'm pretty sure they'd match very closely.