Cleaning Tempor shutter

Mark's Workshop

H
Mark's Workshop

  • 0
  • 0
  • 4
Yosemite Valley.jpg

H
Yosemite Valley.jpg

  • 0
  • 0
  • 15
Three pillars.

D
Three pillars.

  • 1
  • 1
  • 42
Water from the Mountain

A
Water from the Mountain

  • 3
  • 0
  • 73
Rijksmuseum Amsterdam

A
Rijksmuseum Amsterdam

  • 0
  • 0
  • 63

Recent Classifieds

Forum statistics

Threads
197,522
Messages
2,760,577
Members
99,395
Latest member
Kurtschwabe
Recent bookmarks
0

SalveSlog

Subscriber
Joined
Sep 29, 2013
Messages
269
Location
Southern Norway
Format
Medium Format
My Tempor shutter (on a Weltax) is slow on all speeds, but the selftimer runs on quite exactly 10 seconds. Does that mean that the clock/escapement is ok and that it is other parts of the mecanism that will need cleaning?
I've cleaned the shutter and diaphragm leafes, and put some photoes here.

Salve
 

Nick Merritt

Member
Joined
Jan 6, 2007
Messages
433
Location
Hartford, Co
Format
Multi Format
I think that's correct. The self-timer escapement is essentially a self-contained unit, and whether it works or not doesn't affect the actual shutter speeds.
 
OP
OP
SalveSlog

SalveSlog

Subscriber
Joined
Sep 29, 2013
Messages
269
Location
Southern Norway
Format
Medium Format
Thanks Nick
(I wonder why that is...)
But:
Could the slightly greasy cocking rack be the main cause for slow speeds. Photo here.
 

shutterfinger

Member
Joined
Feb 25, 2013
Messages
5,020
Location
San Jose, Ca.
Format
4x5 Format
Remove the cocking lever.
Flush the gear train with degreaser or disassemble and clean the gear train. That blue painted screw bugs me, may be a void warranty seal.
Put a straight pin point size drop of oil on the shaft end of any shaft in the top and bottom plates of the gear train.
Apply a trace of light weight grease to the gear teeth of the gear train if possible.
Apply a light coat of grease to the cocking lever teeth, and a trace to the inside edge of the center where it fits over the shutter housing.
 
OP
OP
SalveSlog

SalveSlog

Subscriber
Joined
Sep 29, 2013
Messages
269
Location
Southern Norway
Format
Medium Format
Dear all
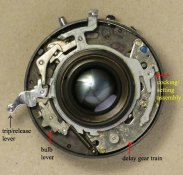
I'm rather new to all this, so I don't really know what and where things like "gear train" and "escapement" are. I hope you can use my photos (from my links above) to name the parts.
I think I have the manual dexterity to do the work. After all, I reassembled the diaphragm. But I lack knowledge on the function and names of most parts of these mechanisms.
 

shutterfinger

Member
Joined
Feb 25, 2013
Messages
5,020
Location
San Jose, Ca.
Format
4x5 Format
tempor.jpg

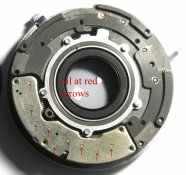
Your other link with 16 pictures will not allow copying so I cannot show you the 9 shaft ends that need the pinpoint drop of oil on the bottom side of the delay(-self timer?) gear train but they are visible in photo 10.

P.S. Being you are not familiar with shutters and their delay gearing, flush it only, do not disassemble the delay gearing unless you can find a service manual for the shutter.
 
Last edited by a moderator:

gone

Member
Joined
Jun 14, 2009
Messages
5,505
Location
gone
Format
Medium Format
Right, just give it a good flush w/ lighter fluid. That will usually bring most shutters back from the dead. Don't take anything apart and you'll be fine.

My philosophy on self timers is that they don't make them. They're particularly prone to locking up old leaf shutters, so I simply pretend every camera I've owned doesn't have one.
 

shutterfinger

Member
Joined
Feb 25, 2013
Messages
5,020
Location
San Jose, Ca.
Format
4x5 Format
just give it a good flush w/ lighter fluid
the worst stuff you can use on a shutter. leaves an oily residue on everything. naphtha, its main ingredient can damage plastics and rubber components used in some shutters and strip protective coatings from others.

Electrical contact cleaner works well, CRC QD Electronic Cleaner is one of the best. Any degreaser that 1. leaves no residue, 2. is safe on most/all plastics are the only ones to use on shutters. Great Grand Fathers top product of the day is at the bottom at the bottom of the list today.
 
OP
OP
SalveSlog

SalveSlog

Subscriber
Joined
Sep 29, 2013
Messages
269
Location
Southern Norway
Format
Medium Format
..
Your other link with 16 pictures will not allow copying so I cannot show you the 9 shaft ends that need the pinpoint drop of oil on the bottom side of the delay(-self timer?) gear train but they are visible in photo 10.
Good morning, and thank you! You can probably right click on the thumbnail and "Save link as" or "Open in new tab" or something similar, but here it is directly.
 

shutterfinger

Member
Joined
Feb 25, 2013
Messages
5,020
Location
San Jose, Ca.
Format
4x5 Format
and i'll even give up some of my tricks.
spray the degreaser/electrical contact cleaner into a shallow wide mouth glass jar. put the item(s) to be cleaned in the jar with cleaner. put on the lid and swish it around, let sit 5 to 10 minutes, remove and dry. rub off any residue that did not wash off, common with dried grease.

rub the shutter and aperture blades with extra fine powdered graphite paying special attention to their pivots.
 
OP
OP
SalveSlog

SalveSlog

Subscriber
Joined
Sep 29, 2013
Messages
269
Location
Southern Norway
Format
Medium Format
What I meant to ask was:
Can the delay unit or what ever it is called.. what's inside red line in photo below.. be removed from the shutter (from the front) as one unit to flush it. I would not like to flush while it is attached to the rest of the shutter.
(The shutter is now closed and on the camera, and when it was open quite some time ago I did not inspect it close enough to know now.)
Photo
 

shutterfinger

Member
Joined
Feb 25, 2013
Messages
5,020
Location
San Jose, Ca.
Format
4x5 Format
Once again, I have only seen your pictures of this make of shutter. I did not know they existed before your post. From the responses very few readers if any others have.
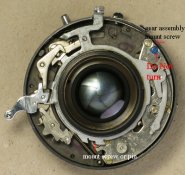
In your original photos, #6 shows 5 screws, 2 on each end, and 1 outside edge center of the gear assembly. I cannot tell if they hold the top and bottom plates together or if they hold them to the shutter case as well as together. Remove the cocking ring assembly. The outermost screw at the right holds the assembly to the case. The left inner is either a screw or guide pin. If two screws remove both and lift out, if a screw and pin remove the screw and lift out.
tempor 2.jpg
 
Last edited by a moderator:

half cog

Member
Joined
Jan 20, 2014
Messages
2
Format
Medium Format
tempor shutter

Hi.
I have been searching the net as I also have a problem with exactly the same shutter and lens when I found this thread.There seems to be very little info on these and as you guys seem to know what you are doing could you please explain something. My problem is that the front shutter plate( The black ring with the speeds and tempor written on it )is not fixed tight.It has about half a stop total side to side movement. This means that the focus stop moves with it resulting in an inability to get correct focus.Question is how do I tighten it.If I take the shutter assembly out of the camera body will I find screws at the back to do the job or will I have to dismantle the shutter from behind? Are there locating pins at the rear of the front plate ? Is this a common problem that someone else on here has had? Any tips and info much appreciated.Apologies for asking this on another members thread but as I said there is very little info and you all seem to have got this sorted
many thanks
Regards
Peter
 
OP
OP
SalveSlog

SalveSlog

Subscriber
Joined
Sep 29, 2013
Messages
269
Location
Southern Norway
Format
Medium Format
Thank you shutterfinger
I now need some courage to remove all those small parts and springs.
Comparing this shutter-inside to pictures of Prontors or Compurs etc., it seems relatively simple and straightforward, but I still don't understand it as well as i should.
Certo6 writes positively about the Tempor, while one person on the net has written scaringly negatively about it: Springs flying and thin parts difficult to assemble, so I dunno.. It's a pity there is so little information available. Hope my photos whill help a bit!

Peter,
I'm not shure I fully understand your question.
I may send to you larger versions of the photos I linked from post #1, if you think that may help. Just PM me. The black (face-)plate is not screwed in place. It's simply held in place by the ring that you can see on photo #4. Maybe this ring is out of position on your camera?
Here is a better photo of that detail.
I did not take good photos of the removed faceplate and ring, but you can just about see it here.
The small tab on the faceplate you see at the edge of the photo goes into the opening you may see at the previous photo.
(Now, good night.)
 

shutterfinger

Member
Joined
Feb 25, 2013
Messages
5,020
Location
San Jose, Ca.
Format
4x5 Format
Compur shutters use a spiral tension spring like a watch main spring. It is easy to release it when removing the delay gear assembly in Compur shutters and a pain to get tensioned correctly. Some Compur shutters have the delay assembly riveted together so there is no opening it.
I haven't worked on any Prontor shutters either so I can't comment about them. Open the delay gearing only as a last resort.
 

half cog

Member
Joined
Jan 20, 2014
Messages
2
Format
Medium Format
tempor shutter

Hi
Thanks for all the help.The second photo has clinched it.At some point someone has stripped this down and lost the clamping rings. The groove is there but no rings.Given that I probably wont find another ring the only way round this that I can think of is a bit of a bodge.Two very very small blobs or epoxy tucked in to the ring groove.This will pin the front plate to the fixed front focus ring mount. Not something I want to do but it will make the camera usable again and is a lot better than leaving it in the cabinet. The silver focus ring will cover the repair. I will use no more epoxy than I think I can remove at a later date should I need to.Many many thanks for all your help again
Regards
Peter
 

ebenostby

Member
Joined
Jan 15, 2007
Messages
5
Location
Bay Area
Format
Multi Format
To answer SalvSlog's question, yes, the escapement gear-train can come out as a unit. Shutterfinger's photo tells the story - if you remove the two screws he's identified with arrows (and no others) the unit comes out and can be cleaned easily. This shutter is fairly easy to work on, even with my clumsy fingers. Unlike some others, the hold-down screws do not allow you to adjust the position of the escapement unit relative to the shutter body, so if the speed of the escapement runout needs to be adjusted, I don't believe there's any choice but to tweak (very slightly bend) the position of the tab that actuates the brake - that's the tab at 4:30 in Shutterfinger's photo.

My copy of this shutter is from an Altissa Altix V and for those with one of these lovely cameras, the shutter is revealed by removing the lens mount. (Just remove the lens via the bayonet and the large central piece with two round notches unscrews).
 
Photrio.com contains affiliate links to products. We may receive a commission for purchases made through these links.
To read our full affiliate disclosure statement please click Here.

PHOTRIO PARTNERS EQUALLY FUNDING OUR COMMUNITY:


Ilford ADOX Freestyle Photographic Stearman Press Weldon Color Lab Blue Moon Camera & Machine
Top Bottom