Alan and Chuck,
In both your cases, I would first set up the camera level and plumb and frame the image with rise if needed.
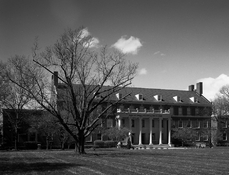
Chuck, in your case you mentioned you swung back and front standards parallel to the façade to prevent horizontal convergence, which is the same as setting up the camera parallel to the façade in the first place and using shift. I may have done that as well; your result is very nice. At any rate, that is also just framing the image, just like using rise only 90° transposed.
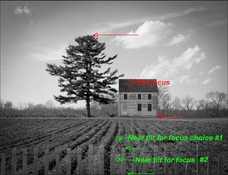
Now, if I felt I needed tilt to help get more things closer to the plane of sharp focus, I would have simply chosen the obvious "near" points for my tilt reference points for both your images. These would be for you Chuck, the closest grass at the very bottom of your image and the very top branches of the tree. For you, Alan, they would be the top of the tallest fence post in the foreground and, also, the top branches of the tree.
Then I would apply front tilt till both these reference points were sharp. (Alan, I know you love your asymmetrical rear tilt, but moving the back away from plumb when photographing architecture results in converging vertical lines that are parallel in the scene. That's fine if that's what you want, but if you don't, you have to use front tilt, which doesn't affect the rendering of the image.)
Using the obvious "near" points for setting the tilt combines the tilt with finding the near focus position (I'll talk more about focus spread later). Once you have the tilt reference points in focus, the camera is also focused on the "near." You can then note the position of focus on the camera bed/rail and then you just need to find the position for the "far."
This is where you need to be aware that something in the foreground that is farthest from the tilt reference point at the bottom of the image might end up being the "far" focus point, even though it is physically closer to the camera. Chuck, in your image, there's nothing below the lawn, so you'd look at the base of the building at it's greatest distance from you and the clouds at the right side of the image and see which one gave you the greatest focus spread (more later).
Alan, in your image there is a lot of distance between the top of the fence posts and the ground directly below it.
Therefore, the focus spread between the fence-post top and the surface of the ground might well end up being the greatest in the scene. Yes, I know that the ground below the fence posts is not, literally speaking, "far" from the camera, but, after you have tilted the plane of sharp and focused on the top of the fence post, the ground is now below it, making it, optically speaking, in the "far" category. (remember, when you tilt the PoSF, we often have to think in terms of "above = near" and "below = far"). And, since the depth of field is shallowest closer to the camera, there may be more difference in bellows draw between the top of the fence post and the ground below it than between any other two objects in the scene.
But, you need to check to make sure, so take a look at other things, like where the ground meets the far horizon, or the distant clouds and see which on actually gives you the greatest change in bellows draw. Once you've found that point, it's your "far" position.
So, after all this and in both your cases, you'd note the position of whichever point gave you the largest focus spread and then use that and your initial tilt position as the boundaries of your focus spread. Then you place focus at the halfway point and choose an aperture.
************************************************
Chuck, let me address in more detail the method I use to focus and select the optimum f-stop so that my references to "focus spread" become clearer. (Alan is familiar with my method already, since we've discussed about it in the past.)
I use a method for selecting the aperture that uses the distance of the focus spread to determine the optimum f-stop. I learned it from the LF home page article on "How to select the f-stop" here:
https://www.largeformatphotography.info/fstop.html . The object is to optimize the two variables of out-of-focus and diffraction degradation from using very small apertures. The article goes into circles of confusion and airy disks, etc., etc. It's well-worth the read, but you can get a quick start on the method by simply applying the method and using the table for focus spreads and corresponding f-stops that is provided. I'll summarize it quickly:
First, you determine the "nearest" and "farthest" things you want to be in sharp focus in the final print. (The above is all about finding those points when tilt is applied; when the camera is in zero position, it's rather straightforward.) Then you note the position on the camera bed/rail of these two points and determine the distance between them (in mm). This is your focus spread (i.e., nothing to do with distance between objects in the scene). You'll need a mm scale on your camera rail or bed for this. I use wooden folders with mm scales printed out on self-adhesive labels and applied to the camera bed along with a couple of lines on the moving part of the bed for reference marks.
After you have the focus spread, there are two more steps. You first position your reference mark halfway between the two extremes on the camera bed/rail. This is the proper focus point (you don't have to check ground glass at all, but you can if you like, just to see where the focus in the scene ends up). Then you select the optimum f-stop from a table. It's easy to use the table that the author of the above-mentioned article supplies. It's based on a 0.2mm circle of confusion/airy disk in the final print at about a 7x enlargement (8x10 from 35mm or 28x35-inch from 4x5, so it's really good for 16x20s and smaller from 4x5). Here's the table for convenience:
Table of optimal f-stops
This shows you the best value of the f-stop to use. for a given focus spread in mm.
D = focus spread in mm. F = f-stop given in decimal values (e.g., 16.6 = f/16 plus 2/3 more, or f/22 and 1/3 less)
D ---- F
1 --- 16.6
2 --- 22.6
3 --- 32.2
4 --- 32.6
5 --- 32.9
6 --- 45.2
7 --- 45.4
8 --- 45.6
9 --- 45.8
10 -- 64
So, to summarize:
1. Choose near and far focus points after composing the image and applying movements (when tilting or swinging, keep in mind that "near" and "far" are not always what they seem).
2. Note the positions on the camera bed/rail for the two focus points.
3. Position the bellows draw / camera focus (whatever you want to call it) at the halfway point on the camera bed/rail between the two extremes of near and far.
4. Choose the optimum f-stop from the table.
Note that you don't ever have to squint at a dark, stopped down image and try to guess if what you want is going to be in sharp focus.
Certainly, there's more than one way to do all of this. Vaughn has great success with his methods. I find this method to suit my needs really well. Often, it's quite difficult for me to get a good view of the entire ground glass, much less spend time with my loupe and a dark, stopped-down image trying to determine if this or that is in sharp enough focus. This method takes the guesswork out of it and has worked superbly for me for years.
Hope this helps,
Doremus


 But here it is again: