C-41 processing for neophytes

A window to art

D
A window to art

  • 0
  • 0
  • 25
Bushland Stairway

Bushland Stairway

  • 4
  • 1
  • 72
Rouse st

A
Rouse st

  • 6
  • 3
  • 110
Do-Over Decor

A
Do-Over Decor

  • 1
  • 1
  • 117

Recent Classifieds

Forum statistics

Threads
199,241
Messages
2,788,416
Members
99,840
Latest member
roshanm
Recent bookmarks
0

StoneNYC

Member
Joined
Aug 5, 2012
Messages
8,345
Location
Antarctica
Format
8x10 Format
I mix up a 5L kit and it lasts me for months in a sealed bottle with no air. Used, I have kept chemistry for 2 - 3 months and fresh up to 6 months, but the key is NO AIR EXPOSURE.

Actually, I use Nitrogen gas as the 5 L bottle is used, and I store odds and ends in 1L or 1/2L bottles filled to the top.

PE

Ok so if I don't have access to nitrogen gas, and only store in the brown glass chemistry bottles (because the owner insists they don't feel comfortable with plastic bottle storage in the basement) then how do you keep it air tight? I've seen marbles mentioned so I tried this, but this only meant spilled marbles into my paterson tank and cracked glass chips in the developer. not putting the marbles in the developer, but when they spilled out while I was filing the paterson tank, some went down the garbage disposal too, it was a disaster...

That's why I'm trying for smaller bottles of concentrate.

And you say no air exposure, so this means period right? So how can I mix the powder and water without exposure? Or do you just mean constant air exposure, so if I fill the bottle to the brim and there is just a tiny air bubble, is that good enough for a few months do you think?

Or is there some tool I'm missing that does this?


~Stone

Mamiya: 7 II, RZ67 Pro II / Canon: 1V, AE-1, 5DmkII / Kodak: No 1 Pocket Autographic, No 1A Pocket Autographic | Sent w/ iPhone using Tapatalk
 

Photo Engineer

Subscriber
Joined
Apr 19, 2005
Messages
29,018
Location
Rochester, NY
Format
Multi Format
Brown bottles are not needed! Clear glass or plastic which prevents air from entering are OK. There are many threads on this subject here on APUG. Either fill the bottles to the top, use marbles or use Nitrogen.

Your biggest problem is mixing powder with water. This involves a lot of air. Liquid kits involve more air entrainment. I suggest that you look into them. A larger liquid kit with less air is probably better than a solid powder kit with more air during mixing. IDK for sure.

So, I mix, fill to the top, screw shut and done! In fact, some bottles have concave tops to force tight fits.

PE
 

macandal

Member
Joined
Mar 6, 2009
Messages
145
Location
San Francisco, CA
Format
4x5 Format
...or you can use them several times by increasing the development times according to the chart on the Kodak web site.
Ok, PE. I'm not one to want everything delivered to him on a platter but I HAVE LOOKED and cannot find this chart on the Kodak site you are referring to. Could you please send me a link to it? Thank you so very much.
 

cepwin

Member
Joined
May 26, 2012
Messages
336
Format
35mm
Yeah, there are some excellent videos on YouTube where it's demonstrated properly....I believe the one I saw was done by an APUGer.
 

StoneNYC

Member
Joined
Aug 5, 2012
Messages
8,345
Location
Antarctica
Format
8x10 Format
Brown bottles are not needed! Clear glass or plastic which prevents air from entering are OK. There are many threads on this subject here on APUG. Either fill the bottles to the top, use marbles or use Nitrogen.

Your biggest problem is mixing powder with water. This involves a lot of air. Liquid kits involve more air entrainment. I suggest that you look into them. A larger liquid kit with less air is probably better than a solid powder kit with more air during mixing. IDK for sure.

So, I mix, fill to the top, screw shut and done! In fact, some bottles have concave tops to force tight fits.

PE

Thanks, I was only looking to confirm that the fill to the top method was acceptable :smile: thanks!


~Stone

Mamiya: 7 II, RZ67 Pro II / Canon: 1V, AE-1, 5DmkII / Kodak: No 1 Pocket Autographic, No 1A Pocket Autographic | Sent w/ iPhone using Tapatalk
 

wogster

Member
Joined
Nov 10, 2008
Messages
1,272
Location
Bruce Penins
Format
35mm
Ok so if I don't have access to nitrogen gas, and only store in the brown glass chemistry bottles (because the owner insists they don't feel comfortable with plastic bottle storage in the basement) then how do you keep it air tight? I've seen marbles mentioned so I tried this, but this only meant spilled marbles into my paterson tank and cracked glass chips in the developer. not putting the marbles in the developer, but when they spilled out while I was filing the paterson tank, some went down the garbage disposal too, it was a disaster...

That's why I'm trying for smaller bottles of concentrate.

And you say no air exposure, so this means period right? So how can I mix the powder and water without exposure? Or do you just mean constant air exposure, so if I fill the bottle to the brim and there is just a tiny air bubble, is that good enough for a few months do you think?

Or is there some tool I'm missing that does this?


~Stone

Mamiya: 7 II, RZ67 Pro II / Canon: 1V, AE-1, 5DmkII / Kodak: No 1 Pocket Autographic, No 1A Pocket Autographic | Sent w/ iPhone using Tapatalk

The best thing to do, determine how much you need, say you use a steel tank that holds 250ml, you buy a case of 24 250ml bottles, you need 4 per Litre, so 20 for 5L, you have 4 spares in case some get broken. Get a B&W print tray, and put the first empty bottle in it, and fill to the brim and add the cap, keep doing this until you run out of developer, pour from the tray back into the container and continue on, until all the developer is in bottles. Wash the bottles off and let them dry. Get some plastic wrap or aluminium foil, cut into 6" squares, put this over each cap and seal with electrical tape. Although glass bottles are air tight, they often use plastic lids that are not, so the plastic wrap is an extra air seal. Many developers can live in those bottles air tight for months. The seal is also an indicator to you, that the bottle has not been used. So you should have one or more sealed ones, and one unsealed one. When the developer in a bottle is all used up, you dump it, wash out the bottle, put it with the clean ones and unseal another. One note, a 250ml bottle filled to the brim is probably closer to 275ml, as the bottles are designed to be only partly filled.

Bleach needs some air, so it can go in a single bottle. Fixer and final rinse don't really care one way or the other. Although you can often just mix it as you need it. So if your using 250ml at a time, and there is 1L of concentrate to make 5L you can mix 50ml of concentrate with 200ml of water to make 250ml, and that reduces contamination, in that if it gets skunky you can toss the working solution and mix fresh. One key trick, get one of those multi-colour packs of electrical tape, use one colour for developer, another for bleach, another for fixer, another for rinse, if developer is green, and you going to pour in the developer and your reaching for a bottle that has a red band, you should be going ...:confused:
 

StoneNYC

Member
Joined
Aug 5, 2012
Messages
8,345
Location
Antarctica
Format
8x10 Format
The best thing to do, determine how much you need, say you use a steel tank that holds 250ml, you buy a case of 24 250ml bottles, you need 4 per Litre, so 20 for 5L, you have 4 spares in case some get broken. Get a B&W print tray, and put the first empty bottle in it, and fill to the brim and add the cap, keep doing this until you run out of developer, pour from the tray back into the container and continue on, until all the developer is in bottles. Wash the bottles off and let them dry. Get some plastic wrap or aluminium foil, cut into 6" squares, put this over each cap and seal with electrical tape. Although glass bottles are air tight, they often use plastic lids that are not, so the plastic wrap is an extra air seal. Many developers can live in those bottles air tight for months. The seal is also an indicator to you, that the bottle has not been used. So you should have one or more sealed ones, and one unsealed one. When the developer in a bottle is all used up, you dump it, wash out the bottle, put it with the clean ones and unseal another. One note, a 250ml bottle filled to the brim is probably closer to 275ml, as the bottles are designed to be only partly filled.

Bleach needs some air, so it can go in a single bottle. Fixer and final rinse don't really care one way or the other. Although you can often just mix it as you need it. So if your using 250ml at a time, and there is 1L of concentrate to make 5L you can mix 50ml of concentrate with 200ml of water to make 250ml, and that reduces contamination, in that if it gets skunky you can toss the working solution and mix fresh. One key trick, get one of those multi-colour packs of electrical tape, use one colour for developer, another for bleach, another for fixer, another for rinse, if developer is green, and you going to pour in the developer and your reaching for a bottle that has a red band, you should be going ...:confused:

Haha yea I color label mine according to ilford bottle colors (Red Green blue).

Thanks, though tray mixing would expose the developer to a lot of air during this process. But I think I've figured it out, looks like its B&H bottle ordering time again!


~Stone

Mamiya: 7 II, RZ67 Pro II / Canon: 1V, AE-1, 5DmkII / Kodak: No 1 Pocket Autographic, No 1A Pocket Autographic | Sent w/ iPhone using Tapatalk
 

Photo Engineer

Subscriber
Joined
Apr 19, 2005
Messages
29,018
Location
Rochester, NY
Format
Multi Format
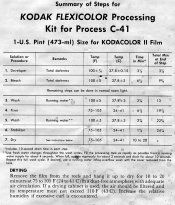
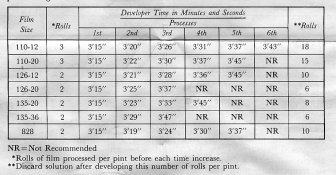
OFFICIAL C41 process cycle and capacity

I've posted this many many times. It is also on the Kodak web site in the instructions for small tank and rotary processing. This information was packaged with my C41 developer as the box stuffer.

It should be part of the toolkit of every C41 processor.

Happy New Year guys.

PE
 

Attachments

  • C41 process.jpg
    C41 process.jpg
    286.3 KB · Views: 163
  • C41 capacity.jpg
    C41 capacity.jpg
    128.9 KB · Views: 147

macandal

Member
Joined
Mar 6, 2009
Messages
145
Location
San Francisco, CA
Format
4x5 Format
I've posted this many many times. It is also on the Kodak web site in the instructions for small tank and rotary processing. This information was packaged with my C41 developer as the box stuffer.

It should be part of the toolkit of every C41 processor.

Happy New Year guys.

PE
Thanks PE. Happy new year to you too.
 

wogster

Member
Joined
Nov 10, 2008
Messages
1,272
Location
Bruce Penins
Format
35mm
Haha yea I color label mine according to ilford bottle colors (Red Green blue).

Thanks, though tray mixing would expose the developer to a lot of air during this process. But I think I've figured it out, looks like its B&H bottle ordering time again!


~Stone

Mamiya: 7 II, RZ67 Pro II / Canon: 1V, AE-1, 5DmkII / Kodak: No 1 Pocket Autographic, No 1A Pocket Autographic | Sent w/ iPhone using Tapatalk

I didn't say to mix in the tray, your using the tray as you fill the bottles to make sure you don't lose any of the developer as you over pour the bottles.
 

StoneNYC

Member
Joined
Aug 5, 2012
Messages
8,345
Location
Antarctica
Format
8x10 Format
I didn't say to mix in the tray, your using the tray as you fill the bottles to make sure you don't lose any of the developer as you over pour the bottles.

OH haha!!! Thanks :smile:


~Stone

Mamiya: 7 II, RZ67 Pro II / Canon: 1V, AE-1, 5DmkII / Kodak: No 1 Pocket Autographic, No 1A Pocket Autographic | Sent w/ iPhone using Tapatalk
 

Rudeofus

Member
Joined
Aug 13, 2009
Messages
5,081
Location
EU
Format
Medium Format
Bleach needs some air, so it can go in a single bottle. Fixer and final rinse don't really care one way or the other. Although you can often just mix it as you need it.
I agree about the bleach and the final rinse but would advise caution with the fixer. The fixer is mostly Ammonium Thiosulfate which will go bad eventually, especially when mixed into a working solution. Unless you plan on using the kit within a few months, I recommend a procedure where unused concentrate is kept in a tightly sealed bottle (or several of them, depending on use), and working solution is only mixed as needed and used within a few weeks.

And yes, I have had fixer concentrate sulfur out on me in less than a year.
 

wogster

Member
Joined
Nov 10, 2008
Messages
1,272
Location
Bruce Penins
Format
35mm
I agree about the bleach and the final rinse but would advise caution with the fixer. The fixer is mostly Ammonium Thiosulfate which will go bad eventually, especially when mixed into a working solution. Unless you plan on using the kit within a few months, I recommend a procedure where unused concentrate is kept in a tightly sealed bottle (or several of them, depending on use), and working solution is only mixed as needed and used within a few weeks.

And yes, I have had fixer concentrate sulfur out on me in less than a year.

I usually keep fixer in concentrate and mix as needed. Generally though you want to buy in small enough quantities that you will use it up before it expires, this is tough when the smallest jug you can buy makes up 50 gallons, but for a 5L kit, you should be OK.
 

Rudeofus

Member
Joined
Aug 13, 2009
Messages
5,081
Location
EU
Format
Medium Format
this is tough when the smallest jug you can buy makes up 50 gallons, but for a 5L kit, you should be OK.
It was a 5l kit that failed on me because I didn't fill the opened container with inert gas after taking out fixer concentrate. A 5l kit develops 60-80 rolls of film, which is more than I shoot within a year.

All I wanted to point out was that fixer is less stable than bleach and STAB and that one should be careful when storing it over a long time frame.
 

StoneNYC

Member
Joined
Aug 5, 2012
Messages
8,345
Location
Antarctica
Format
8x10 Format
It was a 5l kit that failed on me because I didn't fill the opened container with inert gas after taking out fixer concentrate. A 5l kit develops 60-80 rolls of film, which is more than I shoot within a year.

All I wanted to point out was that fixer is less stable than bleach and STAB and that one should be careful when storing it over a long time frame.

Thanks I'm ordering a bunch of smaller bottles when I get back from the Grand Canyon on the 15th


~Stone

Mamiya: 7 II, RZ67 Pro II / Canon: 1V, AE-1, 5DmkII / Kodak: No 1 Pocket Autographic, No 1A Pocket Autographic | Sent w/ iPhone using Tapatalk
 

macandal

Member
Joined
Mar 6, 2009
Messages
145
Location
San Francisco, CA
Format
4x5 Format
I did it. I finally did it. I developed my first roll of color.

(there was a url link here which no longer exists)
 

macandal

Member
Joined
Mar 6, 2009
Messages
145
Location
San Francisco, CA
Format
4x5 Format
Okay, I may have spoken too soon. I developed my first roll of color. I got images. However, my negatives look brownish/redish. According to Henry Horenstein (Color Photography: A Working Manual) my "Negatives [are] too magenta, with density highest on edges near sprocket holes". My negatives are simply too magenta, nothing is really happening on the edges. He says that the probable causes are "1) Developer temperature too high; 2) Overagitation developer; 3) Development time too long". I can't really agree that any of this happened to me. I kept the temperature of my chemicals at around 100 F. I didn't overagitate. I kept my developing time according to the instructions on my kit. Hmmmm..?

My kit says that the "color of the mask [is] brownish". The cause is that my "bleach and fixing time [was] too short". I also can't agree with this. Like I said, I followed the instructions to the letter. However, after consulting with the people at Rayko, we decided that perhaps it was a good idea to re-bleach and re-fix my negatives. They suggested that I do this at room temperature. However, room temperature at this time of year in San Francisco is about 50F. At 77F bleaching and fixing must be done for 6 and 7 minutes respectively. So, if I do it at room temp., at 50F, I was going to double the times. I was going to bleach and fix for 12 minutes. Their instructions are not the best either. For agitation, they say, "Agitate once every 30 seconds." So, every 30 seconds you turn it once and that's it? I didn't know what to do, so, every 30 seconds, I would agitate for 5 seconds (turning) and let it be until my next agitation cycle.

Anyway, that's what happened and that's what I'm going to do. If anyone has any experience with the Rollei kit, please, help me out here. Also, if anyone has any suggestions, they're welcome. Thanks.
 

StoneNYC

Member
Joined
Aug 5, 2012
Messages
8,345
Location
Antarctica
Format
8x10 Format
Okay, I may have spoken too soon. I developed my first roll of color. I got images. However, my negatives look brownish/redish. According to Henry Horenstein (Color Photography: A Working Manual) my "Negatives [are] too magenta, with density highest on edges near sprocket holes". My negatives are simply too magenta, nothing is really happening on the edges. He says that the probable causes are "1) Developer temperature too high; 2) Overagitation developer; 3) Development time too long". I can't really agree that any of this happened to me. I kept the temperature of my chemicals at around 100 F. I didn't overagitate. I kept my developing time according to the instructions on my kit. Hmmmm..?

My kit says that the "color of the mask [is] brownish". The cause is that my "bleach and fixing time [was] too short". I also can't agree with this. Like I said, I followed the instructions to the letter. However, after consulting with the people at Rayko, we decided that perhaps it was a good idea to re-bleach and re-fix my negatives. They suggested that I do this at room temperature. However, room temperature at this time of year in San Francisco is about 50F. At 77F bleaching and fixing must be done for 6 and 7 minutes respectively. So, if I do it at room temp., at 50F, I was going to double the times. I was going to bleach and fix for 12 minutes. Their instructions are not the best either. For agitation, they say, "Agitate once every 30 seconds." So, every 30 seconds you turn it once and that's it? I didn't know what to do, so, every 30 seconds, I would agitate for 5 seconds (turning) and let it be until my next agitation cycle.

Anyway, that's what happened and that's what I'm going to do. If anyone has any experience with the Rollei kit, please, help me out here. Also, if anyone has any suggestions, they're welcome. Thanks.

Did you also heat your blix to the 100 mark or leave that at 50f? That might be your problem? If your temp is that low in the house (you're crazy) then you might have had temperature drop in the developer bath. Heck even Holdong the tank for the proper development time during agitation would cause a severe drop in temp in such a cold environment....

You might want to cook it at 105 next time so as the temp drops it won't be so low at the end?


~Stone

Mamiya: 7 II, RZ67 Pro II / Canon: 1V, AE-1, 5DmkII / Kodak: No 1 Pocket Autographic, No 1A Pocket Autographic | Sent w/ iPhone using Tapatalk
 

macandal

Member
Joined
Mar 6, 2009
Messages
145
Location
San Francisco, CA
Format
4x5 Format
Did you also heat your blix to the 100 mark or leave that at 50f? That might be your problem? If your temp is that low in the house (you're crazy) then you might have had temperature drop in the developer bath. Heck even Holdong the tank for the proper development time during agitation would cause a severe drop in temp in such a cold environment....

You might want to cook it at 105 next time so as the temp drops it won't be so low at the end?


~Stone

Mamiya: 7 II, RZ67 Pro II / Canon: 1V, AE-1, 5DmkII / Kodak: No 1 Pocket Autographic, No 1A Pocket Autographic | Sent w/ iPhone using Tapatalk
I didn't develop at home. I did it at Rayko (a facility here in San Francisco). I don't use blix, I use bleach and fixer separately. Neither was at 50F. They were both at 100F (I kept checking).
 

polyglot

Member
Joined
Jun 12, 2009
Messages
3,467
Location
South Australia
Format
Medium Format
You can fix (or introduce) nearly any error in scanning C41. So for us to get a good idea of what the negs look like, please also post a simple digital photo of the negs. If you have access to RA4 materials in that facility to make a colour print, that would also be enlightening.
 
Photrio.com contains affiliate links to products. We may receive a commission for purchases made through these links.
To read our full affiliate disclosure statement please click Here.

PHOTRIO PARTNERS EQUALLY FUNDING OUR COMMUNITY:


Ilford ADOX Freestyle Photographic Stearman Press Weldon Color Lab Blue Moon Camera & Machine
Top Bottom