Budget/DIY darkroom sink options?

20250427_154237.jpg

D
20250427_154237.jpg

  • 1
  • 0
  • 29
Genbaku Dome

D
Genbaku Dome

  • 4
  • 1
  • 44
City Park Pond

H
City Park Pond

  • 0
  • 1
  • 51
Icy Slough.jpg

H
Icy Slough.jpg

  • 1
  • 0
  • 47
Roses

A
Roses

  • 8
  • 0
  • 128

Recent Classifieds

Forum statistics

Threads
197,503
Messages
2,759,998
Members
99,519
Latest member
PJL1
Recent bookmarks
0
Joined
May 3, 2020
Messages
279
Location
Washington, DC
Format
Large Format
I'm moving to a new space next month and can finally start thinking about building my first "real" darkroom that's not also my kitchen. :angel:

I'd like to keep the build as budget-friendly as possible since I'll also have a lot of general moving-related and renovation expenses, but I'm excited to start making large prints ASAP after moving in. So I'm wondering what's a good quick and dirty / DIY option for a darkroom sink? Buying new seems cost prohibitive (would really like to stay under $300-400 including plumbing parts), and I've been looking around for a used one locally without any luck.

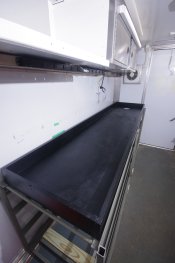
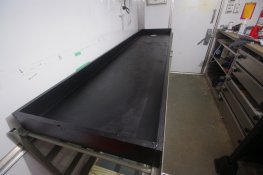
I should at least have room for a 60" wide sink, and I'm just handy enough to build a frame out of 2x4's. But I'm wondering what my options are for the basin itself... could I get by with a reinforced plastic tub if I can find one in the right size? Or perhaps build something out of wood and coat with epoxy or resin?

There are also plastic drain tables made for camping/fishing but I doubt they'd be sturdy enough, like this: https://www.amazon.com/Outsunny-Portable-Folding-Cleaning-Camping/dp/B07PJVBDWY

And finally there are the 40" wide, single basin plastic utility sinks, which are too deep (but I suppose I could add a wire rack), and I wouldn't quite be able to fit three 12x16 trays side by side.

Any thoughts or suggestions would be very welcome!
 
Joined
Sep 10, 2002
Messages
3,569
Location
Eugene, Oregon
Format
4x5 Format
My current darkroom sink I built five years ago. It started as a simple 1x12 box with a 2x2 frame inside to hold the sink bed. The frame was designed to provide drainage to the middle, but one could slope it to a back corner as well. The bed is half-inch marine plywood. The corners between bed and wall were fared with marine epoxy. The whole thing was primed and painted with marine paint. I'm more than happy with it.

Here's a picture of it during installation (minus faring, drain and final topcoats of paint):

20DkrmWS-Snk1.JPG


It sits on 2x4s lagged to the wall studs and on the supports used to make under-sink storage.

I've got plans somewhere still in pdf form. Just PM me if you're interested; I'd be happy to share them.

Best,

Doremus
 

Donald Qualls

Subscriber
Joined
Jan 19, 2005
Messages
12,073
Location
North Carolina
Format
Multi Format
The sink I installed in my darkroom is a laundry tub. Plastic (= light and inexpensive), stands at counter height, and mine has a lift-out perforated shelf, which isn't very deep below the rim, but will work well for things like three 8x10 trays and is sturdy enough to hold a dishpan with 3-4 gallons of tempering bath plus four bottles of C-41 chemicals. If I need to use larger trays than 8x10, I'll have to either put them on the counter (which slopes down a half inch over three feet to the sink and is caulked to it) or build/find a rack to mount one above the other. There's also an amusing washboard surface molded into the front of the tub, a lift-out soap tray that can go in either rear corner (a nice place to stand my 1L graduate to dry), and it was predrilled for a standard swivel faucet head. For the size of my darkroom, I'm very happy with it.
 

wyofilm

Member
Joined
Nov 12, 2017
Messages
1,158
Location
Wyoming
Format
Multi Format
under $300-400 including plumbing parts
Seems to me that this is perhaps a slightly unrealistic limit with plumbing included. Depending on your wood working skills an option would be buy two or three kitchen cabinets as a base then build a top sink to mount on top. In this case you need a table saw for long plywood cuts or a circular saw with a nice straight edge. How deep do you want the sink to be? Most darkroom sinks that I see have walls that seem deeper than necessary. It seems to me that you can get your 60" sink built with a single sheet of plywood. Add in epoxy paint, caulking, screws, and you would about have it.
 

Pentode

Member
Joined
Feb 14, 2017
Messages
959
Location
Brooklyn, NY
Format
Multi Format
I’m about halfway through building a plywood sink similar to what Doremus describes. It would have been finished months ago were it not for my gift of procrastination.

I used regular 1/2” plywood as opposed to marine grade and it will be treated just as he treated his; epoxy faring in the corners and several coats of epoxy paint. The epoxy products were actually the most expensive component.

For mine I ordered surplus laboratory faucets from the auction site but that is far from necessary - any inexpensive plumbing fixtures would have worked just fine.
 

John Koehrer

Subscriber
Joined
Apr 3, 2004
Messages
8,280
Location
Aurora, Il
Format
Multi Format
There are several threads here on the site: search for "darkroom sink plans"
 

albada

Subscriber
Joined
Apr 10, 2008
Messages
2,175
Location
Escondido, C
Format
35mm RF
What is "faring"?
Two posters above used that word, but the online dictionary I consulted didn't have a definition fitting that usage.
Mark Overton
 

awty

Subscriber
Joined
Jul 24, 2016
Messages
3,643
Location
Australia
Format
Multi Format
I just used structural ply and pond paint with a few slats to sit the tray on. Around $100.
Its 600mm wide and 1800 long 100mm deep. With a 100 mm trough made from the ply and a 50mm drain down streem. No legs, just fixed to the wall on three sides. Lots of storage underneath.
Just have a hot and cold mixer tap with a diverter to run a laundry spout and a shower hose. Had them lying around.
 

Deleted member 88956

Building the box out of plywood is the way to go, but a layer of fiberglass cloth on the working side is really the way to go. it will not only protect that wood underneath, but will put strength where it is needed most ... corners. To take if further, making a mold out of plywood and then using it as form for actual fiberglass sink to come out of it is the way to go. Either way all inside corners, both vertical and horizontal, should be filled in to a sizeable nice concave profile to make cleaning later a lot easier. Sharp corners are a trap that only get more difficult to cope with. When one takes it into fiberglass construction, no actual paint is needed, unless looks are that critical.

I'll add here that fiberglass allows for a neat embedding of a background of choice, so you can have your favorite image encased within fiberglass, or some darkroom reminders, or whatever clicks your fancy. Options are limitless, end result ... priceless.

Having said all that, I agree your budget, given overall size expectations and plumbing within it, is not really realistic. Double that and you can have a sink that will outdo any commercial unit as it can be designed for exact space available and have features nobody in the industry seems to give a damn about.
 
Last edited by a moderator:
OP
OP
Joined
May 3, 2020
Messages
279
Location
Washington, DC
Format
Large Format
Thanks all. Point taken that my budget may not be realistic. I was hoping for a just-good-enough solution for now to get me up and running, while building out a more robust installation (as I have similar powers of project procrastination as noted above!) which is why I posted a new thread, though I did note all of the plans posted here previously and that is absolutely the direction I'll go for a longer-term solution. For now I may just go with one of those plastic drain tables and a couple of laundry and save up to build a "real" sink as I get a better idea of my needs in the new space. Appreciate the feedback!
 

Nokton48

Member
Joined
Oct 8, 2006
Messages
2,950
Format
Multi Format
Darkroom Renovation Phase 2 No 10 by Nokton48, on Flickr

After searching all over the internet (and reading) I opted for this scratched up old Delta Darkroom sink. It was filthy and in the garage of a guy in our camera club. I bought it for $50 and it hung out the back end of my car as I drove home clear across the city, holding onto it from the front seat. Back home I scrubbed and blasted it out, and it looked just fine. Then I built a 2x4 "skeleton" to support it's odd dimensions, bracing it strongly from below in every way I could think of. Finally I added the legs and a shelf underneath. It's sort of a one of a kind stand, but it's strong and functional. I added a Delta Darkroom Faucet Kit from B&H, and my handyman contactor plumbed it in and squared it up with the leveling feet.

I think I have about $200 in it not counting the faucet which was another hundred plus.
 

Paul Howell

Subscriber
Joined
Dec 23, 2004
Messages
9,501
Location
Scottsdale Az
Format
Multi Format
How large are you planning on printing, 16X20 or larger. I have very small darkroom built into an odd bath, double sinks but a shower instead of the a bath. I removed one of the double sinks and put a layer of plywood cut to size and took out the round bath skin and replaced with a deep kitchen sink at one end. I've enough room for 3 11X14 trays, and I can wash prints in the shower in a tub or on my patio. Although I have not printed 16X20 in a very long time when I do print that large I use a 16X20 paper drum and motor base and wash in kiddy wading pool on my patio. Although far from perfect it is workable. In the past 4 months lumber price have gone up as much 110%, building a sink for less that $300 might be a challenge. What you might to think about is finding a couple of salvaged vanities for the base, butted up against each other for the length you need. Sometimes you can find them for free on the free stuff thread on Craigslist. Then marine plywood for the sink, 60 inches is way too wide, you only need enough from 16X20 trays, then fiber glass cloth. Do you have a water supply for the sink or have in plumbed in?

Even with a large skin, a paper drum and motor base works, takes a lot less chemistry.
 

wyofilm

Member
Joined
Nov 12, 2017
Messages
1,158
Location
Wyoming
Format
Multi Format
To get up and going quickly you might even consider speedbraces by fast cap. Very stout wall mounted brackets. I have a collection of them that I have used to set up temporary benches before I build permanent ones. My quaint darkroom is a bathroom off a garage with a vanity. I noticed yesterday that the sink drain sprung a leak and the water has degraded the old bath vanity. I will rip out the vanity, fix the plumbing and reinstall my 'wet counter' on these brackets. I can be up and running before I figure out what I want to do permanently. A pair of speed braces anchored into studs are rated to support 1000 pounds. I have had very heavy loads on braces I've installed in the past.

https://www.fastcap.com/product/speedbrace?cat=325
 

Fujicaman1957

Member
Joined
Jan 1, 2016
Messages
187
Format
35mm
Professor, if you go over to Large Format Photography Forum and go to Darkroom Equipment and then look up the thread "Let's see your darkroom", check out page 83. I post there under "Mr Fujicaman". On that page, you'll see my homemade sink. It's 3/4 plywood with high grade 1" X 4" sides and painted with 3 coats of Rhinoliner truckbed liner. It's 2' by 8' and with the base. I have about $150 invested.
 

btaylor

Subscriber
Joined
Dec 28, 2010
Messages
2,223
Location
Los Angeles
Format
Large Format
Also shower base liner from Home Depot or similar. This is the stuff you lay down before the concrete. A simple base attached to the wall and a 2x4 running the length for a lip, and cheap plywood because it will never get wet. Very inexpensive, absolutely works, it can hold 20x24 trays easily. My construction guy came up with the idea.
 

radiant

Member
Joined
Aug 18, 2019
Messages
2,135
Location
Europe
Format
Hybrid

removed account4

Subscriber
Joined
Jun 21, 2003
Messages
29,844
Format
Hybrid
carriage bolt some 4x4's and put 2x4s across them to strap them in place.
get some marine plywood 1/4stuff and screw them together in the shape of the sink you want
then take fiberglass and do the corners and edges where you screwed with both the cloth and resin
then put 2 coats of fiberglass resin on the sink to give it a nice skin. I can't tell you about the plumbing parts
depending on what you want they cost different amounts.. just make sure yo have a slope on your skink or use the 2nd of the
the pair of windshield wipers you use to squeegee off your prints to squeegee your sink when you're done. under the sink you can make shelves &c
wood and resin and glass and bolts will cost much less than 30o$
 
Last edited:

wyofilm

Member
Joined
Nov 12, 2017
Messages
1,158
Location
Wyoming
Format
Multi Format
under the sink you can make shelves &c
wood and resin and glass and bolts will cost much less than 30$

I need to shop in your neck of the woods. It would cost much more than that ... I doubt I could get a single sheet of marine ply (1/4") for 30 bucks.
 

Fujicaman1957

Member
Joined
Jan 1, 2016
Messages
187
Format
35mm
Professor, I've posted some pictures to give an idea of what I'm talking about. I can't take credit for the idea-Gordon Hutchings (The Book of Pyro) had an article in Darkroom Photography about building a new darkroom. He built his sink and hauled it to Rhino Liner and had them coat it for him.

As the nearest Rhino Liner never answered 9-10 phone calls, I went looking for some other way to coat the sink. I found the Rustolum bed liner at Walmart and figured it'd work. Walmart doesn't seem to carry it any more, but Harbor Freight Tools has pretty much the same thing in their stores.

Any questions-PM me. Be glad to help.
 

Attachments

  • IMGP8827.JPG
    IMGP8827.JPG
    813.6 KB · Views: 681
  • IMGP8829.JPG
    IMGP8829.JPG
    942.7 KB · Views: 894
  • IMGP8841.JPG
    IMGP8841.JPG
    929.3 KB · Views: 1,134

Dave Ludwig

Member
Joined
Apr 13, 2010
Messages
101
Location
Wisconsin
Format
Multi Format
Nicely done Fujicaman. I agree, spray on truck bed liner, minimum 3 coats, is simply the best coating, dries hard, wont chip, easy to recoat down the road. I used Dupli-Color Bed Armor from an auto parts store, read instructions carefully, never thought about Wally World, might be cheaper. Professor you should be able to accomplish something that will work for your budget, design it, price out materials list, shop around, make adjustments if needed & check out Habitat Rehab stores regularly. Built my sink 15 years ago (33”x 8’) have never had a problem and recoated once for cosmetics.
 
Photrio.com contains affiliate links to products. We may receive a commission for purchases made through these links.
To read our full affiliate disclosure statement please click Here.

PHOTRIO PARTNERS EQUALLY FUNDING OUR COMMUNITY:


Ilford ADOX Freestyle Photographic Stearman Press Weldon Color Lab Blue Moon Camera & Machine
Top Bottom