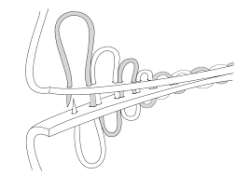
Box stitching old leather.

3 Columns

A
3 Columns

  • 6
  • 6
  • 107
Couples

A
Couples

  • 4
  • 0
  • 90
Exhibition Card

A
Exhibition Card

  • 6
  • 4
  • 131
Flying Lady

A
Flying Lady

  • 7
  • 2
  • 142

Recent Classifieds

Forum statistics

Threads
199,053
Messages
2,785,445
Members
99,791
Latest member
nsoll
Recent bookmarks
1

awty

Subscriber
Joined
Jul 24, 2016
Messages
3,654
Location
Australia
Format
Multi Format
Hi all
Any one have any tips on redoing box stitching on old camera cases?
I have a few that need redoing.
Whats a suitable needle and thread and what type of stitching.
I assume you remove the old thread and reuse the existing holes.
Dont need perfection, just to make the case functional again.

623291415.jpg
 

removed account4

Subscriber
Joined
Jun 21, 2003
Messages
29,832
Format
Hybrid
I sometimes use upholstery needles for bookbinding. there are blunt ones and pointy ones and some are curved. they might be useful for this sort of situation I think the ones I use are "Dritz repair needles ( it is a 7 needle pack). but maybe there are others if you just google Dritz...
about the thread, not sure maybe some sort of sturdy linen or hemp thread and make sure you wax it in beeswax.. great project Paul!
John
 
Last edited:

DWThomas

Subscriber
Joined
Jun 13, 2006
Messages
4,605
Location
SE Pennsylvania
Format
Multi Format
Here's a link to something I made a copy of for myself a few years back. Unfortunately the intended project (restitching an Argus C-3 never-ready case) is so far down the do-list it hasn't yet happened, so I have no firsthand tips to add. There are some little kits of leather stitching tools out on Amazon.
 

Kodachromeguy

Subscriber
Joined
Nov 3, 2016
Messages
2,056
Location
Olympia, Washington
Format
Multi Format
I have re-stitched several old Rolleiflex cases and part of a Leica case. I used a regular needle (size unknown) and standard ply-cotton thread. Definitely use the existing holes and carefully align the pieces so that you are using the same holes as the original. Some people suggest waxed thread, but you do not need to sweat it; use what you have at home. Don't pull too tight because you might saw through the old leather, especially if it is dry. That case in your photo looks pretty dry, but some neatsfoot oil, mink oil, another traditional leather dressing might help.
 

AgX

Member
Joined
Apr 5, 2007
Messages
29,973
Location
Germany
Format
Multi Format
Basically there are 3 ways of hand stitching:

-) with 1 thread, going in a sine waveform through the 2 sheets

-) with 2 threads as above, but the two waveforms opposing each other
upload_2020-10-3_13-30-19.png


-) with 2 threads in opposing waveforms, but with threads intertwined at each hole

this video also shows the different waveforms and twining applied by sewing machine vs. hand stitching, and the different stability of the result:


The intertwinung one could train at sheets of foam rubber.
As material for the thread I would use Nylon, as the threads lie on the leather and typically at a case/bag are swinging at ones body and are thus under constant rubbing stress.

The problem though I see is that in our cases... the cases are typically from stiff leather with no room inside for manipulations, e.g. folder cases.
 

Attachments

  • upload_2020-10-3_13-25-7.png
    upload_2020-10-3_13-25-7.png
    5.6 KB · Views: 100
Last edited:

russell_w_b

Member
Joined
Aug 30, 2018
Messages
92
Location
Penrith
Format
Multi Format
Basically there are 3 ways of hand stitching:

-) with 1 thread, going in a sine waveform through the 2 sheets

-) with 2 threads as above, but the two waveforms opposing each other
View attachment 256228


-) with 2 threads in opposing waveforms, but with threads intertwined at each hole

this video also shows the different waveforms and twining applied by sewing machine vs. hand stitching, and the different stability of the result:


The intertwinung one could train at sheets of foam rubber.
As material for the thread I would use Nylon, as the threads lie on the leather and typically at a case/bag are swinging at ones body and are thus under constant rubbing stress.

The problem though I see is that in our cases... the cases are typically from stiff leather with no room inside for manipulations, e.g. folder cases.
 

russell_w_b

Member
Joined
Aug 30, 2018
Messages
92
Location
Penrith
Format
Multi Format
I re-stiched a couple of camera cases during lockdown: my Yashica D case and a Balda-Baldix 6x6 case. I used a fat, blunt needle (sorry about the lack of terminology) and black polysester thread, a little thinner than the original thread: just what I found in the house. I stiched it one way then, when I got to the end, went back on myself taking the thread down the same hole it had previously come up. I managed to cut through the dry leather in a couple of places but think I got away with it. :smile:

I aligned the holes carefully at first after removing all bits of the tatty old thread, and secured the pieces aligned by looping the thread initially around a couple of holes. At the other end of the camera case I pinned the pieces together through the stitch-holes with mapping pins. When I got back to where I started I knotted the thread and sealed it with a tiny drop of superglue, then melted the thread with a soldering iron.

So far, so good...
 

Donald Qualls

Subscriber
Joined
Jan 19, 2005
Messages
12,310
Location
North Carolina
Format
Multi Format
I'm watching this -- the case for my Daiichi Zenobia (nice 6x4.5 folder with an excellent lens) is in good shape, except that the thread that holds the heavy bottom in place has failed over most of the joint -- and there's nothing else holding the camera up (no strap lugs on the camera, only on the case). I bought a leather stitching kit on Amazon, and picked up another kit of leather working needles (in case the ones in the cheap Chinese kit sucked), but haven't had time or space to do the actual work.
 

russell_w_b

Member
Joined
Aug 30, 2018
Messages
92
Location
Penrith
Format
Multi Format
'...but haven't had time or space to do the actual work'.

I did it in the confines of my 'playroom', Donald, surrounded by computery, radio stuff and paperwork. I cleared about a couple of square feet but mostly the case was supported on my knees. It was a challenge not to get the thread caught up in stuff! You need to be able to stretch your sewing arm to full length comfortably, and have room on your lap to allow dexterity. I came out of doing the Yashica case with a sore finger, so I used a thimble after that and it helped greatly, especially when pushing the needle through a stubborn hole alignment (there were one or two).

A needle threading tool is useful too for the odd time the thread becomes detached. I found starting off the hardest as it's necessary to keep the thread taut and so the leather parts tight against each other. After a dozen or so stitches, the case parts supported themselves and it became easier. Remove any extraneous buckles and fittings and tape any catches back out of the way so they don't flap about. I didn't do it all in a 'one-er' either: just leave room to set your work down undisturbed.

Apart from fixing the odd button on, I've never sewn anything for fifty years!
 

Sirius Glass

Subscriber
Joined
Jan 18, 2007
Messages
50,397
Location
Southern California
Format
Multi Format
I sometimes use upholstery needles for bookbinding. there are blunt ones and pointy ones and some are curved. they might be useful for this sort of situation I think the ones I use are "Dritz repair needles ( it is a 7 needle pack). but maybe there are others if you just google Dritz...
about the thread, not sure maybe some sort of sturdy linen or hemp thread and make sure you wax it in beeswax.. great project Paul!
John

Basically there are 3 ways of hand stitching:

-) with 1 thread, going in a sine waveform through the 2 sheets

-) with 2 threads as above, but the two waveforms opposing each other
View attachment 256228


-) with 2 threads in opposing waveforms, but with threads intertwined at each hole

this video also shows the different waveforms and twining applied by sewing machine vs. hand stitching, and the different stability of the result:


The intertwinung one could train at sheets of foam rubber.
As material for the thread I would use Nylon, as the threads lie on the leather and typically at a case/bag are swinging at ones body and are thus under constant rubbing stress.

The problem though I see is that in our cases... the cases are typically from stiff leather with no room inside for manipulations, e.g. folder cases.


I have used and recommend curved needles but I also recommend switching back and forth with straight needles.
 
OP
OP
awty

awty

Subscriber
Joined
Jul 24, 2016
Messages
3,654
Location
Australia
Format
Multi Format
Thanks.
Need to talk to the resident seamstress and see what she has and maybe get it started for me.
The first one I like to fix is an old 1938 Rolleicord, been rubbing in neatsfoot for a couple of weeks, leather was really dry. Biggest problem with this one is folding bits are starting to tear and will need reinforcing. Any tips on that?
20201004_115227.jpg

The stitching looks quite fine, will need to find a strong slender needle.
20201004_115123.jpg


20201004_115200.jpg
 

Donald Qualls

Subscriber
Joined
Jan 19, 2005
Messages
12,310
Location
North Carolina
Format
Multi Format

grat

Member
Joined
May 8, 2020
Messages
2,044
Location
Gainesville, FL
Format
Multi Format
I know it's a dying art, but in my town we still have a couple of real live cobblers. Might be worth talking to one in your area.
 
OP
OP
awty

awty

Subscriber
Joined
Jul 24, 2016
Messages
3,654
Location
Australia
Format
Multi Format
I know it's a dying art, but in my town we still have a couple of real live cobblers. Might be worth talking to one in your area.
I think it's a sad indictment of todays society that too few people these days are willing to learn to fix and make things for themselves. Once I finish making and fitting a window awning, put some draw fronts on some cupboards I built for the new sewing room, the seamstress might have time to find some needle and thread for me........hmmm maybe I got it wrong, if I got someone else to do it I might actually get enough time to take some pictures.
Think the case is too far gone for a professional to try and repair, but I will have a crack at it.
 

Deleted member 88956

I think it's a sad indictment of todays society that too few people these days are willing to learn to fix and make things for themselves. Once I finish making and fitting a window awning, put some draw fronts on some cupboards I built for the new sewing room, the seamstress might have time to find some needle and thread for me........hmmm maybe I got it wrong, if I got someone else to do it I might actually get enough time to take some pictures.
Think the case is too far gone for a professional to try and repair, but I will have a crack at it.
IN the end I had a closer look at photos of your case and it will be a very difficult job it appears, even for a pro to address without imparting visible damage to the case, and the leather looks pretty good. I'm now speaking from own experience doing some work on leather stitching years back. The one thing that makes re-stitching easier is the fact that it is already holed up to take the needle where it needs to go.

The first problem is clearing the old thread with minimal scars to the leather, and that is not going to be easy. It requires meticulous slow poking at each one between holes and pulling it out. As you can see thread is lead through the side of the leather which is what, 3mm thick? Bending of the leather as this is being done MAY help, but it may crack leather too. You may be able to get under each piece of thread from top side, slowly free it up first, then continue until it comes out. Some may need help from the side, so they are pushed out from side to top with the dull end of the needle. This will be a long process as the same applies to every single one. They may come out easier than it looks, but still, in order to preserve leather condition it is a one-at-a-time job. This has to be done before any re-stitching is attempted no matter what.

Stitching itself is not that difficult, except to get it right it will take time as each part of the stitch between each and every hole needs to pulled tight AND even. Again, one ting that makes this easier is the "preconditioned" holes and grooves old thread will leave behind. But to get the evenness of each vs. the others is not a simple task at all.

Thirdly, waxed thread is to me a requirement. Not only that wax prevents drying out of the thread itself over time, but it helps holding the thread without slacking as stitching process proceeds from one hole to the next.

So the stitching technique itself is just like what is described in the link I provided earlier, but to make this look like a skilled job is not as simple as one might think.
 

Donald Qualls

Subscriber
Joined
Jan 19, 2005
Messages
12,310
Location
North Carolina
Format
Multi Format
I know it's a dying art, but in my town we still have a couple of real live cobblers. Might be worth talking to one in your area.

There aren't many real cobblers left, the ones who can actually make shoes. Shoe repair shops aren't the same at all. I took my Zenobia case to one of the latter, who also does custom leather work like belts, and repairs leather handbags -- and he wouldn't even touch it.

Not to say it isn't worth asking, but few if any modern shoes use actual stitching for the leather, or at most only semi-decorative stitching in the upper (with the sole glued together/on).
 

grat

Member
Joined
May 8, 2020
Messages
2,044
Location
Gainesville, FL
Format
Multi Format
I think it's a sad indictment of todays society that too few people these days are willing to learn to fix and make things for themselves.

I'm in favor of learning new things-- But not so much in favor of "learning" on a decades old difficult-to-replace item that would benefit from an expert's touch.
 

Kodachromeguy

Subscriber
Joined
Nov 3, 2016
Messages
2,056
Location
Olympia, Washington
Format
Multi Format
I'm in favor of learning new things-- But not so much in favor of "learning" on a decades old difficult-to-replace item that would benefit from an expert's touch.
There is really almost nothing to learn. Clean out the old thread. Line up the pieces. Then pull new thread through the old holes. It is bordering on trivial.
 

grat

Member
Joined
May 8, 2020
Messages
2,044
Location
Gainesville, FL
Format
Multi Format
There is really almost nothing to learn. Clean out the old thread. Line up the pieces. Then pull new thread through the old holes. It is bordering on trivial.

I don't have anything to stitch. I was just offering a suggestion to someone else. Apparently they didn't care for it. *shrug*
 

Donald Qualls

Subscriber
Joined
Jan 19, 2005
Messages
12,310
Location
North Carolina
Format
Multi Format
I'm in favor of learning new things-- But not so much in favor of "learning" on a decades old difficult-to-replace item that would benefit from an expert's touch.

And if there are no more experts? Or the people who ought to be experts won't touch your decades old, difficult-to-replace item? Same question applies equally to certain classes of cameras, shutters, etc.
 

grat

Member
Joined
May 8, 2020
Messages
2,044
Location
Gainesville, FL
Format
Multi Format
And if there are no more experts? Or the people who ought to be experts won't touch your decades old, difficult-to-replace item? Same question applies equally to certain classes of cameras, shutters, etc.

Then they probably went out of business because people would rather do it themselves.
 

Deleted member 88956

There is really almost nothing to learn. Clean out the old thread. Line up the pieces. Then pull new thread through the old holes. It is bordering on trivial.
Looks like you have never done it. I tried to explain the pitfalls of dong this, it isn't trivial at all, if it is to look right. Crappy job? Yes, most people with basic motoric skills can do it, and it will show. To make this right and all sections of stitching look identical? Not a chance.
 
Photrio.com contains affiliate links to products. We may receive a commission for purchases made through these links.
To read our full affiliate disclosure statement please click Here.

PHOTRIO PARTNERS EQUALLY FUNDING OUR COMMUNITY:


Ilford ADOX Freestyle Photographic Stearman Press Weldon Color Lab Blue Moon Camera & Machine
Top Bottom