Blotch? Visual distortions at stop bath

West coast Vancouver Island

D
West coast Vancouver Island

  • 0
  • 0
  • 19
Under the Pier

H
Under the Pier

  • 0
  • 0
  • 27
evancanoe.JPG

A
evancanoe.JPG

  • 4
  • 0
  • 71
Ilya

A
Ilya

  • 3
  • 1
  • 72

Recent Classifieds

Forum statistics

Threads
197,680
Messages
2,762,841
Members
99,439
Latest member
May68
Recent bookmarks
0

mshchem

Subscriber
Joined
Nov 26, 2007
Messages
14,311
Location
Iowa City, Iowa USA
Format
Medium Format
This might help. For film, which will go on developing far beyond the ideal contrast, the stop bath does indeed stop development swiftly and cleanly. But for prints, ‘stop bath’ is arguably a misleading term, because - as others have said above - if you have correctly exposed the print, not much will change as a result of prolonged development. Instead the greater importance of the stop bath for prints is to protect your fixer by preventing developer carry-over.

Absolutely agree! 😁
 

mshchem

Subscriber
Joined
Nov 26, 2007
Messages
14,311
Location
Iowa City, Iowa USA
Format
Medium Format
All of your answers are in the posts above.

#1 problem - not developing fully. 1'30" in the developer will solve the swirlies.

#2 problem - short exposure time.
  • Enlarger bulb too bright.
    • Find the correct bulb if it's not
    • Use an inline dimmer
    • Stop down more
  • Negatives too thin. Under exposed and/or under developed
    • Use better exposed negatives
    • Check your film developing process to be sure you're developing for the right time
    • Check your camera and metering to be sure exposure is correct
#3 problem - Consistency.
  • Only change one variable at a time.
    • First, don't use fingers and keep your tongs separate. Wash and dry hands if you get developer or fixer on them before handling any paper.
    • Second, solve the swirlies. You don't need to use full sheets of paper for this, cut one into fourths
    • Third, work with the exposure time.
    • Etc....

Everyone here is brilliant , totally agree!!
 

Brendan Quirk

Subscriber
Joined
Dec 3, 2018
Messages
228
Location
Mayville, WI USA
Format
Medium Format
I routinely use neutral density filters to get reasonable exposure times for small enlargments at reasonable f stops (Beseler 23CII, PH140 bulb). I also rigidly control development times (2 1/2 minutes for fiber based, although other times can work). The key there is to control print darkness through exposure, not development time. I went through the "snatch from the developer" phase long ago - it didn't work then, and doesn't work now. I think others have had similar experiences. Don't worry - you'll figure it all out! That's the fun!
 

Anon Ymous

Member
Joined
Feb 7, 2008
Messages
3,660
Location
Greece
Format
35mm
There's a useful rule of thumb for print development time. Temperature, developer dilution and type, but also age will affect development time. So, assuming that you have a test strip that has been exposed enough to produce blacks, measure the time it takes for the darkest tones to emerge (appear, not fully develop). Multiply this time by 6-7 and you have a reasonable, approximate development time. Extending this time a bit isn't problematic, but don't go too far.
 
OP
OP

RWJgr

Member
Joined
Jan 27, 2023
Messages
16
Location
Netherlands
Format
35mm
Hi all,

First of all, thank you again for all your support and help. While I’m super excited about the analogue & darkroom journey ahead, I’m in awe for finding such a supportive and collaborative community here 🙏

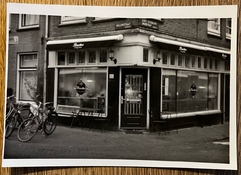
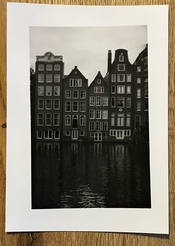
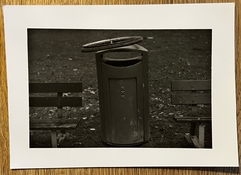
I applied some changes into my processing:

- Realised that I had thin negatives - underdeveloped my film rolls
- Distanced the trays to avoid potential splashing/contamination from stopbath to developer
- Simulated two stops ND filter with my enlarger’s CMY filters
- Increased to f11 when printing
- Did not pull the print from the developer until it was really done
- Were more careful handing my papers (avoiding fingerprints etc)

The results? Printing for 10 seconds and developing for ~1min 20 sec, no distortions & “visuals” at all!!

Still a ton to learn but as I like to think…progress over perfection. Thank you all once again. Have an awesome day!
 

Attachments

  • 07F88C1C-3281-4657-BE96-5A5E17EBA69A.jpeg
    07F88C1C-3281-4657-BE96-5A5E17EBA69A.jpeg
    331.6 KB · Views: 114
  • 04215573-D15B-4B91-939D-5842387FEAC5.jpeg
    04215573-D15B-4B91-939D-5842387FEAC5.jpeg
    269.7 KB · Views: 118
  • E90F722F-7159-4BD7-B63E-A1C80842594C.jpeg
    E90F722F-7159-4BD7-B63E-A1C80842594C.jpeg
    271.1 KB · Views: 121

snusmumriken

Subscriber
Joined
Jul 22, 2021
Messages
2,372
Location
Salisbury, UK
Format
35mm
Fantastic! What a satisfyingly positive outcome! (Pun intended.)

About tray spacing… it isn’t fixed. I keep my trays an inch or two apart to allow rocking, but while I am holding up the print to drain off excess chemical (which for example can take 20 sec for a 12x16 sheet) I shift the current tray and the next tray close alongside so that any drips from the print during transfer fall into a tray rather than onto the bench. Helps to keep the darkroom un-contaminated. I’ve seen folk in online videos splashing chemical about gaily, but that’s not cool.
 
Last edited:

cramej

Member
Joined
Dec 29, 2009
Messages
1,235
Format
Multi Format
Excellent! Lots of progress in one session. Nice prints!
 
Photrio.com contains affiliate links to products. We may receive a commission for purchases made through these links.
To read our full affiliate disclosure statement please click Here.

PHOTRIO PARTNERS EQUALLY FUNDING OUR COMMUNITY:


Ilford ADOX Freestyle Photographic Stearman Press Weldon Color Lab Blue Moon Camera & Machine
Top Bottom