I got my first Belplasca in 2013. It was a bit battered and the knobs were hard to turn but it worked. I've long lost count of how many rolls of Provia 100 or Agfa CT100 I've put through it. I've carried it over most of England and to Europe by motorcycle and it has it HAS NEVER FAILED! The frame spacing on the developed film is always spot on and the shutter cock and release perfect. Well, there is one slight niggle. If I very slowly press the shutter release part way down, then change my mind and release it, the shutter doesn't not fire (that's okay) but the double exposure prevention operates so I have to wind the film on before I can take the picture. I just get one blank pair of frames. The quality of the slides is outstanding.
Anyway,on with the viewfinder clean. I suppose I have to say that these instructions are all my own creation. I am in no way a professional and I cannot ensure that you will have the same success that I did. During my many years I have successfully worked on Zeiss Contaflex, Voigtländer Vito, Iloca, Canon, Hasselblad 500C (lenses and film backs, not bodies) but this was only because I found I needed to. I don't know if I do it for fun; I just find I need do. I work as an electronic engineering consultant, so that's not exactly the same line of work, but it is loosely related - perhaps?
DISMANTLING
First thing is to unscrew the frame counter knob. It is just a regular right hand thread, but of course you can't unscrew it because the dial just turns anti-clockwise. Having said that, try it! See if you can un-screw the knurled knob, you might be lucky. If it won't loosen, this is what I do:
With the camera still fully assembled, release the shutter if it is cocked.
With the back removed, advance the sprocket to the point where the frame counter starts to advance.
Just at this point, the knurled knob will offer some resistance to anti-clockwise rotation. This is just enough to loosen the thread.
If you can't 'catch' the point where you can loosen the knob, then an easier way is to put a test film in the camera.
With the camera on a bench, slowly advance the film with your right hand while turning the frame counter knob anti-clockwise. You will eventually find the point where you can loosen the knob. You may have to have several goes at this!
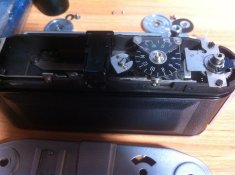
That's the only tricky bit! The rest is straight-forward, but before removing the top cover I suggest you mark the two dust covers that are behind the shutter-cock and rewind knobs with a CD writer pen (or pencil) so that you know which way round they go back. See the attached photo BelpClean2.jpg of how I've done this.
Remove the shutter-cock and rewind knobs. They simply un-screw, regular right-hand thread. I can generally unscrew these by hand, but if they're a bit tight you could use soft-jaw pliers.
Remove the rewind and advance knobs. Also regular right-hand thread. Use as larger screwdriver as will fit in the chrome screws. It's very easy to damage the shallow slots in these screws, so make sure the screwdriver is a good fit. HOLD THE KNOB with one hand. Don't turn the screw against the camera's mechanism. (That only applies to the V knob, of course.)
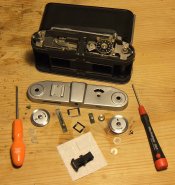
The knobs are an assembly; there's the knob itself, the screw, the disc with the R or V and an arrow cut in in, a piece of black paper! ...a thing like a circlip and a washer with a flat on its hole. Make a note of the order all this lot comes off in. In my photo, I've left the V and R discs and the pieces of paper in the knobs. I positioned them in the photos as per the assembly order. Ask me if this is not clear.
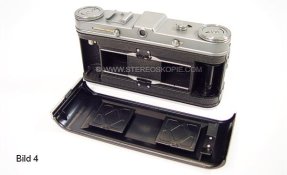
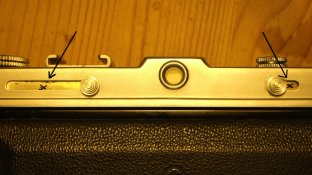
You can now remove the two small screws at each end of the top cover and gently remove the cover. You do not have to remove the flash shoe.
As you lift up the top cover, the following parts will fall out:
1. The front plain viewfinder glass and its retaining spring.
2. The rear plain viewfinder glass and its retaining spring.
3. The two dust covers that sit behind the shutter-cock and rewind knobs (with your marks on them.)
Gather these bits up. It's fairly easy to figure out how they go back as long as you've marked those two dust covers. You should have all the same parts that are in my photograph.
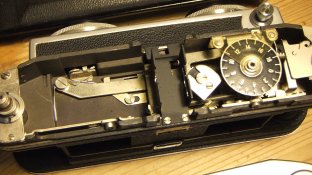
Now you can simply lift out the viewfinder itself. It's sits on a centre pivot and rocks back and forth to provide the parallax correction. You'll see it at the bottom of my first photograph. It is 'open' in as much as you can get to the inside and outside surface of both lenses to clean. (Reverse Galilean) A cotton bud easily fits in the viewfinder assembly so you don't have to take it apart any further. I use cotton bud and IPA. You can look through the viewfinder when you've cleaned it to make sure you've got it nice and clear!
While you're at it, I suggest cleaning the two pieces of plain glass too.
At this stage you can place the viewfinder assembly back in its correct position, and as you turn the focusing dial (around the right lens, of course) you should see the viewfinder assembly tilting back and forth for parallax correction. I don't believe there is any adjustment here that can be upset by the steps I have so-far described. The spring on top of the viewfinder assembly presses against the inside of the camera's top cover to keep the viewfinder in place.
One more thing, on my camera the frame counter knob, shutter-cock knob and rewind knob all had thread-locking compound on them. I really don't think you need to use thread-locking compound when you re-assemble. As I said above, mine has travelled much since I first did this and everything has stayed put. You can apply thread-lock if you wish.
REASSEMBLY!
You might want to leave the camera apart to address the film advance problem, but I will describe the re-assembly process for future reference and in case there is anyone else reading this!
Place the viewfinder assembly back in its slot. If you've just checked the parallax mech. as described above then just leave it in place.
Now you have to position the front and rear plain glasses and their retaining springs and the two dust covers before lowing the top cover. If you had three hands, and seven fingers on each hand this would be easy! The way I do is is to tape the two dust covers and the rear glass and spring with magic tape just covering the lower 2mm or so of these parts. With the tape holding them in place, use fingers to hold the front plain glass and spring while lowering to top cover to withing a couple of millimetres of home. Then you can remove the pieces of tape and lower the cover the rest of the way. I hope this is clear? You may work out your own way of doing this.
Once the cover is all the way down check that the front a rear glasses are correctly in place; they shouldn't rattle if the springs are in place, and you shouldn't be able to actually see the springs either. If they're okay, screw in the two small knobs; (cock and rewind) you will have to move the dust covers around to make the holes line up.
If everything looks okay you can put back the two small screws at each end of the top cover a replace the two winding knob assemblies.
Last of all is that frame counter knob! The first time I did this job I just tightened the knob against the natural resistance of the dial and it stayed put. Now I use the same technique as described above to find the point where there is a little clockwise resistance and get the knob a little tighter.
My Bleplasca is back together again now so I can't show you any more photos, but if you're brave enough to try this yourself and get stuck I'll try and help. Let me know how you get on.
Regarding your camera, what exactly do you mean by 'stops advancing film'? Does the V knob turn? (and the R knob as well if there's film) or is the knob jammed? Can you cycle the camera by moving the sprocket by hand? As you know, with no film in the camera and the shutter fired, the V knob will just turn freely anti-clockwise forever. Does yours do that?
I plan to take my second Belplasca apart again soon because its viewfinder needs cleaning again, but also because I would so like to wire the flash contacts to the top of the camera! Maybe even fit a hot shoe. I don't mind drilling the top cover of one of mine. I'll have to take the front cover off to do this and expose the advance mechanism. The mechanism works fine on both of mine so I can describe the correct operation. From there we can find out what is wrong with yours. This should be during the next few weeks. (March/April 2017) Would that be a help?
Incidentally, I'm told that V and R may stand for Vorwörts and Rückwörts which was the German of three generations ago.
Good luck,
Jack