Anyone using LED lights for contact printing?

Diner

A
Diner

  • 1
  • 0
  • 31
Gulf Nonox

A
Gulf Nonox

  • 4
  • 0
  • 31
Druidstone

A
Druidstone

  • 6
  • 3
  • 81
On The Mound.

A
On The Mound.

  • 1
  • 0
  • 52
Ancient Camphor

D
Ancient Camphor

  • 6
  • 1
  • 62

Forum statistics

Threads
197,799
Messages
2,764,613
Members
99,479
Latest member
presetpedia
Recent bookmarks
2

John Dean

Member
Joined
Apr 1, 2017
Messages
9
Location
Atlanta Ga.
Format
4x5 Format
Hello, I am going to be building a contact printing box to expose OHP negatives for Platinum/Palladium and Gum printing, as well as some silver contact printing.

Is anyone using LED lights in such a lightbox and if so can you comment on how the compare to uv fluorecet in regard to fluorescents in terms of exposure time. Also since there are so many types of led lights on the market, which work best for this sort of application?

Any help would be appreciated.

John
 

Brindaloo

Member
Joined
Jun 4, 2017
Messages
2
Location
NYC
Format
35mm
Hi John, it's been a while since you asked your question, but I'll take a whack at it, as I'm currently experimenting with building my own exposure units based on UV LEDs.

My first exposure unit was a massive 2'X4' fluorescent tube construction that used 10x T12 40-Watt black light bulbs. (I believe they were GE 10526.) I found that, at a distance of about five inches, my standard printing time for full exposure of cyanotypes was around 45 minutes. This was with digital negatives printed on Pictorico OHP, the "original" cyanotype chemistry, and 3/32"-thick glass for my contact printing frame.

Last year, I moved to NYC and couldn't take my fluorescent monstrosity with me, so I decided to build a much smaller unit based around UV LEDs. Lots of people have used cheap LED strip lighting from Amazon to build exposure units, so I tried the same. A 16ft length of "3528 SMD" blacklight LEDs cost me something like $20. They claimed to emit in the 395nm-405nm range. I made sure to buy a non-waterproof version, which came free of any silicone encasing. (I figured that the silicone encapsulant, though clear, would absorb a lot of the UV light, reducing the effectiveness of the unit. I also thought the encapsulant might yellow or become brittle with age.) I cut the long LED string into shorter strings, soldered wires to them, connected them in parallel, and attached them to an aluminum plate roughly 8"x10". The resulting array was quite dense. I only conducted a few tests with the finished unit, but found that my printing times had reduced to about 20 minutes. I think the key here (compared to my fluorescent unit) is that I was able to bring my prints much closer to the UV source. I designed my wooden box so that my prints were about 1" away from the LED grid. It was not possible to bring my prints this close to the UV source in my fluorescent unit--the light fixtures I used left big gaps between bulbs.

In the end, despite the shorter printing time, I wasn't satisfied with my strip-lighting LED approach. My construction was a bit crude, and my LEDs never seemed to illuminate evenly. (Just by looking at them you could see that they weren't all the same brightness.) So, now I'm working on developing my own tileable LED circuit boards and a driver board to keep them at a constant current (and brightness).

You might have better luck with the strip-lighting. I think it's certainly a valid way to go.
 
Last edited by a moderator:

Brindaloo

Member
Joined
Jun 4, 2017
Messages
2
Location
NYC
Format
35mm
Hi John, it's been a while since you asked your question, but I'll take a whack at it, as I'm currently experimenting with building my own exposure units based on UV LEDs.

My first exposure unit was a massive 2'X4' fluorescent tube construction that used 10x T12 40-Watt black light bulbs. (I believe they were GE 10526.) I found that, at a distance of about five inches, my standard printing time for full exposure of cyanotypes was around 45 minutes. This was with digital negatives printed on Pictorico OHP, the "original" cyanotype chemistry, and 3/32"-thick glass for my contact printing frame.

Last year, I moved to NYC and couldn't take my fluorescent monstrosity with me, so I decided to build a much smaller unit based around UV LEDs. Lots of people have used cheap LED strip lighting from Amazon to build exposure units, so I tried the same. A 16ft length of "3528 SMD" blacklight LEDs cost me something like $20. They claimed to emit in the 395nm-405nm range. I made sure to buy a non-waterproof version, which came free of any silicone encasing. (I figured that the silicone encapsulant, though clear, would absorb a lot of the UV light, reducing the effectiveness of the unit. I also thought the encapsulant might yellow or become brittle with age.) I cut the long LED string into shorter strings, soldered wires to them, connected them in parallel, and attached them to an aluminum plate roughly 8"x10". The resulting array was quite dense. I only conducted a few tests with the finished unit, but found that my printing times had reduced to about 20 minutes. I think the key here (compared to my fluorescent unit) is that I was able to bring my prints much closer to the UV source. I designed a wooden box around the aluminum plate so that my prints were about 1" away from the LED grid. It was not possible to bring my prints this close to the UV source in my fluorescent unit--the light fixtures had big gaps between bulbs.

In the end, despite the shorter printing times, I wasn't satisfied with my strip-lighting approach. My construction was a bit crude, and my LEDs never seemed to illuminate evenly. (Just by looking at them you could see that they weren't all the same brightness.) So, now I'm working on developing my own tileable LED boards and a driver board to keep them at a constant current (and brightness).

You might have better luck with the strip-lighting. I think it's certainly a valid way to go. I think I gave up on it too soon.
 
Last edited by a moderator:

tnp651

Subscriber
Joined
Jan 9, 2017
Messages
177
Location
St. Paul, Minnesota, USA
Format
4x5 Format
This is my exposure setup. The UV light is suspended from a Lowell Scissor-clamp on the suspended ceiling, and a Lowell Pole.
Exposure-setup-sm.jpg
 

dlmorel

Member
Joined
Apr 2, 2018
Messages
2
Location
Nashville, TN
Format
Digital
With the light 30 inches from the contact frame, my times are 10-18 minutes, depending on developer and toner.
Tom
Thank you! I am considering purchasing one. How large of a print can you make at 30 inches? Can you go closer and expose for a shorter time with say an 8x10?

Thanks again!
 

tnp651

Subscriber
Joined
Jan 9, 2017
Messages
177
Location
St. Paul, Minnesota, USA
Format
4x5 Format
There's no reason not to come closer for a smaller print, and of course your exposure time will be less. You'd need to test for that, of course. I'm standardized on 9x12" prints and coverage seems fine. You might see some vignetting at 16x20 based on the longer distance to the edges. You could use two lights to get a more even coverage.
 

tnp651

Subscriber
Joined
Jan 9, 2017
Messages
177
Location
St. Paul, Minnesota, USA
Format
4x5 Format
I did some testing using an exposure meter. Photographic exposure meters aren't sensitive to UV but their response should be analogous.

Here's what I found with my Quans light:
9x12" print: 0.5 stop difference between center and edge of print
11x14": 0.7 stop difference
16x20": 1.5 stop difference

Tom
 

Bob Carnie

Subscriber
Joined
Apr 18, 2004
Messages
7,731
Location
toronto
Format
Med. Format RF
I did some testing using an exposure meter. Photographic exposure meters aren't sensitive to UV but their response should be analogous.

Here's what I found with my Quans light:
9x12" print: 0.5 stop difference between center and edge of print
11x14": 0.7 stop difference
16x20": 1.5 stop difference

Tom
Quans Light - is there a larger unit more powerful??.. I love the concept of what you are doing
 

tnp651

Subscriber
Joined
Jan 9, 2017
Messages
177
Location
St. Paul, Minnesota, USA
Format
4x5 Format
Quans Light - is there a larger unit more powerful??.. I love the concept of what you are doing
My 20W light is the biggest self-contained unit I found. There's this bulb Dead Link Removed but a) it takes a special socket and b) it's 254 NM wavelength. Kallitypes (and perhaps other alternative processes too) are most sensitive around 400 NM.
Tom
 

Bob Carnie

Subscriber
Joined
Apr 18, 2004
Messages
7,731
Location
toronto
Format
Med. Format RF
My 20W light is the biggest self-contained unit I found. There's this bulb Dead Link Removed but a) it takes a special socket and b) it's 254 NM wavelength. Kallitypes (and perhaps other alternative processes too) are most sensitive around 400 NM.
Tom
thanks for the info-
 

DennyS

Member
Joined
Oct 5, 2010
Messages
77
Format
Hybrid
Bob, Amazon is listing a QUANS 50W UV Ultra Violet LED Light for $85, but I think it would be important to contain the light, all that UV isn't good for your eyes.
 

SasquatchQB

Member
Joined
Oct 19, 2016
Messages
30
Location
Connecticut, USA
Format
Multi Format
Last year, I moved to NYC and couldn't take my fluorescent monstrosity with me, so I decided to build a much smaller unit based around UV LEDs. Lots of people have used cheap LED strip lighting from Amazon to build exposure units, so I tried the same. A 16ft length of "3528 SMD" blacklight LEDs cost me something like $20. They claimed to emit in the 395nm-405nm range. I made sure to buy a non-waterproof version, which came free of any silicone encasing. (I figured that the silicone encapsulant, though clear, would absorb a lot of the UV light, reducing the effectiveness of the unit. I also thought the encapsulant might yellow or become brittle with age.) I cut the long LED string into shorter strings, soldered wires to them, connected them in parallel, and attached them to an aluminum plate roughly 8"x10". The resulting array was quite dense. I only conducted a few tests with the finished unit, but found that my printing times had reduced to about 20 minutes. I think the key here (compared to my fluorescent unit) is that I was able to bring my prints much closer to the UV source. I designed a wooden box around the aluminum plate so that my prints were about 1" away from the LED grid. It was not possible to bring my prints this close to the UV source in my fluorescent unit--the light fixtures had big gaps between bulbs.

In the end, despite the shorter printing times, I wasn't satisfied with my strip-lighting approach. My construction was a bit crude, and my LEDs never seemed to illuminate evenly. (Just by looking at them you could see that they weren't all the same brightness.) So, now I'm working on developing my own tileable LED boards and a driver board to keep them at a constant current (and brightness).

You might have better luck with the strip-lighting. I think it's certainly a valid way to go. I think I gave up on it too soon.
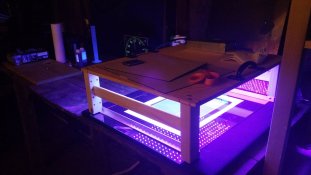
I built my own similar setup, using two 5m strips of non-waterproof SMD5050 UV Led strip lighting hot-glued to a plywood board and wired in two sections through a 180W power supply. For gum bichromate, I ended up having print times of about 7 minutes, with the lights about 4 inches above the negative. Generally, it worked pretty well for the project I was using it for, but if I continue to do alt-process work seriously, I'll probably build something more robust.

33365472_10155436045777927_7008677296043196416_n.jpg 33379061_10155436050247927_7913400676498014208_n.jpg
 
Joined
Apr 1, 2022
Messages
1
Location
Tromsø
Format
Large Format
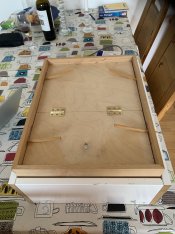
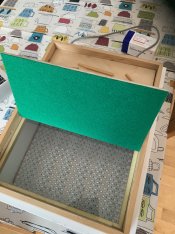
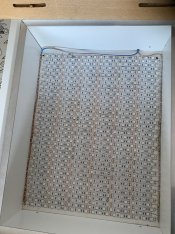
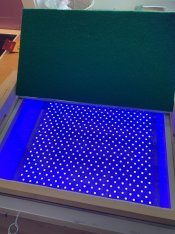
I built a box for a 30x40cm contact printing frame, using almost three 5m rolls non-waterproof SMD5050 UV Led strips, mainly to make gum prints, but until now only used it for cyanotypes. Normal negatives gives 15 min exposure.

IMG_7623.JPG IMG_7624.JPG IMG_7625.JPG IMG_7626.JPG
 

Andrew O'Neill

Moderator
Moderator
Joined
Jan 16, 2004
Messages
11,799
Location
Coquitlam,BC Canada
Format
Multi Format
I started using LED's a few months ago. Smartest thing I ever did. I'm using eight, 2' bars, spaced out a couple of inches. These bars can all be plugged into a series. My kallitype have gone down from 8 minutes (with BLB tubes) exposure to 2:30. Carbon exposures (1000W halogen lamp) down from 15:30 to 4:30. Zero heat generated. I still have to test cyanotype. That was a 25 minute exposure on the BLB table. Should be a considerable reduction in time...I'm guessing around seven or eight minutes.
 

Rolleiflexible

Subscriber
Joined
Mar 22, 2005
Messages
2,193
Location
Mars Hill, NC
Format
Multi Format
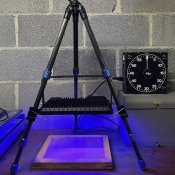
As an inexpensive way into printing, the self-contained lights are great — you can get a 100w UV LED fixture at Amazon for about $60. I’ve hung one from the center column of a tripod, and control it through a Gralab. Works great. Re eye damage, they sell these things as party lights — can’t imagine ravers wearing protective eyewear around them but maybe I lack imagination.

Image attached.
 

Attachments

  • 370BE03B-B110-4149-884E-3B12C699A645.jpeg
    370BE03B-B110-4149-884E-3B12C699A645.jpeg
    1.5 MB · Views: 139

nmp

Member
Joined
Jan 20, 2005
Messages
1,995
Location
Maryland USA
Format
35mm
As an inexpensive way into printing, the self-contained lights are great — you can get a 100w UV LED fixture at Amazon for about $60. I’ve hung one from the center column of a tripod, and control it through a Gralab. Works great. Re eye damage, they sell these things as party lights — can’t imagine ravers wearing protective eyewear around them but maybe I lack imagination.

Image attached.

I bought something similar recently from Amazon as well, a 100W 365 nm unit. I returned it after seeing that the radiation dminished (measuring with a UVA/B meter) drastically by over 50% within minutes and continued doing so until I yanked it. The casing was getting really hot too. Rather than wasting more time with it, I decided to bail. This was the third strike for me trying to top my ancient box using BLB spirals.

:Niranjan.
 
Last edited:

Rolleiflexible

Subscriber
Joined
Mar 22, 2005
Messages
2,193
Location
Mars Hill, NC
Format
Multi Format
Since my last post, the maker of my light (Onforu, on Amazon) now sells a pair of 96w UV LED fixtures that are perfect for this application -- they are oblong, 6x15 inches, with pairs of UV LED lights in a 4x12 grid. I hung them from the bottom of a 2x2-foot sheet of plywood, with 9-inch legs at the corners to hold it up -- that leaves 5 inches of space for the print frame. They are incredible! My exposure time for kallitypes went from 8 minutes with my old light to 30 seconds.

Apart from saving me hours of staring at concrete block, the light appear to have resolved one of my nagging doubts about this exercise. With my old light, I was not seeing the crispness in my prints that I would have expected in silver gelatin. WELL! The new light seems to give me back a good measure of the crispness that I thought was beyond this process.

I am curious as to whether others have found that the sharpness of their images is affected by exposure lengths -- I assume the increased resolution is a function of reduced exposure time, but if I am mistaken, someone please speak up. Here's a link to the lights, if anyone wants to investigate:


Sanders McNew
www.instagram.com/sandersnyc
www.flickr.com/sandersnyc
 

Rolleiflexible

Subscriber
Joined
Mar 22, 2005
Messages
2,193
Location
Mars Hill, NC
Format
Multi Format
Wow...30 seconds is almost too short. Do you need to warm up the lights for any amount of time before exposing the print?

;Niranjan.

Nope. Instant on. I agree about the time. My first test strip tested one-minute intervals up to 10 minutes and I knew I wasn’t in the ballpark when my one-minute exposure was the darkest on the strip. Imagine the hours I will reclaim with a 30-second exposure. Almost feels like cheating.
 
Photrio.com contains affiliate links to products. We may receive a commission for purchases made through these links.
To read our full affiliate disclosure statement please click Here.

PHOTRIO PARTNERS EQUALLY FUNDING OUR COMMUNITY:


Ilford ADOX Freestyle Photographic Stearman Press Weldon Color Lab Blue Moon Camera & Machine
Top Bottom