All About Argyrotypes

about to extinct

D
about to extinct

  • 0
  • 0
  • 17
Fantasyland!

D
Fantasyland!

  • 9
  • 2
  • 94
perfect cirkel

D
perfect cirkel

  • 2
  • 1
  • 121
Thomas J Walls cafe.

A
Thomas J Walls cafe.

  • 4
  • 6
  • 277

Recent Classifieds

Forum statistics

Threads
198,745
Messages
2,780,268
Members
99,692
Latest member
jglong
Recent bookmarks
0

MurrayMinchin

Membership Council
Subscriber
Joined
Jan 9, 2005
Messages
5,481
Location
North Coast BC Canada
Format
Hybrid
Anybody else messing around with Mike Ware's Argyrotype process? Seems to be a bit of a rare breed in the siderotype, ferric-silver world.

Do you have any you want to share? Any discoveries of note? Process and/or paper findings?

I first tried salt prints, kallitypes next, then found there was something about argyrotypes which is fuelling the necessary resolve to try and wrangle things into control. Just placed my first order for palladium, so that has to be some kind of positive sign! Have been dabbling at it for a couple months, so still making test prints...nothing even close to a finished print yet.

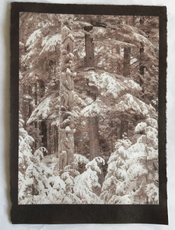
To get the ball rolling, here are some early tests:

Straight print on Kozo compared to the same print heat treated after drying for about 5 minutes at 150F...
0-2 (2).jpeg 0-4.jpeg

...and the first one on Kozo with the second on Clearprint 1000H cotton vellum from the same negative, same # of drops, and same exposure...

IMG_0417.jpeg


I'm investing minimal time on copying these test prints (obviously) just posting them here as examples of the wild variations found so far. The Kozo used here is wrong for the process (blotchy) and have another Kozo on order. Don't think the Clearprint cotton Vellum will be used again...just doesn't have the transparent when wet, fabric like feel when dry, or mystique of Kozo.
 
Last edited:
OP
OP
MurrayMinchin

MurrayMinchin

Membership Council
Subscriber
Joined
Jan 9, 2005
Messages
5,481
Location
North Coast BC Canada
Format
Hybrid
Last edited:
OP
OP
MurrayMinchin

MurrayMinchin

Membership Council
Subscriber
Joined
Jan 9, 2005
Messages
5,481
Location
North Coast BC Canada
Format
Hybrid
OP
OP
MurrayMinchin

MurrayMinchin

Membership Council
Subscriber
Joined
Jan 9, 2005
Messages
5,481
Location
North Coast BC Canada
Format
Hybrid

FotoD

Member
Joined
Dec 15, 2020
Messages
390
Location
EU
Format
Analog
I like the process, but found it quite picky with papers. The verso of HPR gave me the least problems. Brushing a paper with 0.25% sulfamic acid before coating can help if the prints are grainy or full of white dots.
 
OP
OP
MurrayMinchin

MurrayMinchin

Membership Council
Subscriber
Joined
Jan 9, 2005
Messages
5,481
Location
North Coast BC Canada
Format
Hybrid
I like the process, but found it quite picky with papers. The verso of HPR gave me the least problems. Brushing a paper with 0.25% sulfamic acid before coating can help if the prints are grainy or full of white dots.
Good tips.

I had burned through my supply of Hahnemuhle Platinum Rag before starting Argyrotypes. I see it comes in a 24 inch by 33 foot roll which would cut down on cost by ripping/cutting to size myself.

If the Kozo thing doesn't end up working, I'll probably start with HPR and try the verso tip mentioned 👍
 
OP
OP
MurrayMinchin

MurrayMinchin

Membership Council
Subscriber
Joined
Jan 9, 2005
Messages
5,481
Location
North Coast BC Canada
Format
Hybrid
Had a couple days in the dimroom to play. First image is straight from Capture One and the second via an old iPhone, printed on 30gsm Kozo. Pretty happy with the low to mid tones...high tones need some tweaking.

Dec14_MXT6808.jpg Unknown.jpeg

Also discovered that I was printing on the wrong side of the machine made 100% mulberry bark Kozo I have. Read that painters paint on the smooth side and use the 'rough' side for glueing to heavier papers or silk. Sensitizing the smooth side has resulted in much crisper fine lines/details and a deeper max 'black'.

Still a ways to go.......
 
OP
OP
MurrayMinchin

MurrayMinchin

Membership Council
Subscriber
Joined
Jan 9, 2005
Messages
5,481
Location
North Coast BC Canada
Format
Hybrid
Looking past the extreme yuckiness of this iPhone shot...

Played with the curve a bit more by lowering high tones (while still getting a max white) and lifting shadows in the bottom print at a max black exposure time. Still trying this manually which is helping in one respect; I'm starting to pre-visualize what will happen to the negative and print while changing the curve shape. Hoping this will pay dividends later when serious printing commences.

IMG_0431.jpeg
 
Last edited:

MattKing

Moderator
Moderator
Joined
Apr 24, 2005
Messages
52,873
Location
Delta, BC Canada
Format
Medium Format
You might want to try taking digital snaps of the results accompanied by a print-out of the corresponding curve shape. That could serve as a useful reference going forward.
 
OP
OP
MurrayMinchin

MurrayMinchin

Membership Council
Subscriber
Joined
Jan 9, 2005
Messages
5,481
Location
North Coast BC Canada
Format
Hybrid
You might want to try taking digital snaps of the results accompanied by a print-out of the corresponding curve shape. That could serve as a useful reference going forward.
Will do, once a bit closer to a bullseye.

My curve would probably only be useful to someone else as a low quality starting point at best...too many moving parts!
 
OP
OP
MurrayMinchin

MurrayMinchin

Membership Council
Subscriber
Joined
Jan 9, 2005
Messages
5,481
Location
North Coast BC Canada
Format
Hybrid
Also...this paper is super thin (the white areas are transparent when in solutions) and quite rippled when dry. Because it's so thin, whites in the print are dependant on white paper underneath to reflect light back up through the print.

As soon as they get good enough, I'll start glueing them (Asian hanging scroll techniques?) to a white paper base layer which will flatten them out and improve quality. That's when I'll start spending some effort on better reproductions.
 
Last edited:
OP
OP
MurrayMinchin

MurrayMinchin

Membership Council
Subscriber
Joined
Jan 9, 2005
Messages
5,481
Location
North Coast BC Canada
Format
Hybrid
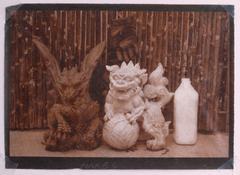
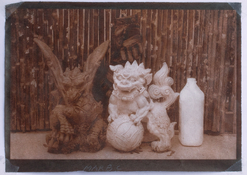
Managed to get some "me time" for another manual tweak to the correction curve.

Last one was flat in the high tones, so looking for a more 'sculptural' feel in the white Dragon's muscles. Second photo is the new one.

3C77395F-46FF-45D2-A74D-4A6B57C892DB_1_105_c.jpeg 6C527854-1D59-46EC-B0DD-086487D75FA0_1_105_c.jpeg
 
OP
OP
MurrayMinchin

MurrayMinchin

Membership Council
Subscriber
Joined
Jan 9, 2005
Messages
5,481
Location
North Coast BC Canada
Format
Hybrid
You might want to try taking digital snaps of the results accompanied by a print-out of the corresponding curve shape. That could serve as a useful reference going forward.
The photos above are from RAW digital camera files, then emailed in jpeg form to my MacBook. The only adjustments were to crop and add .10 to the exposure before emailing. Haven't started wheat starch glueing them to a support paper yet.

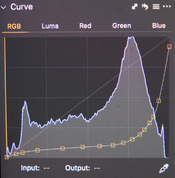
I am a hack. Not even a mere glimmer of anything distantly approaching expert status. Doing this manually, by feel (no densitometer, etc) so consider yourself forewarned if using this curve. Here's the shape of it in Capture One...

83DF6355-892D-4D76-B8DC-A0F714095139_1_105_c.jpeg

...and here it is by the input/output numbers:

0............2
15..........8
25..........12
49..........16
88..........20
120........23
146........25
167........28
184........32
198........40
209........50
217........60
225........75
231........87
239........121
225........234
 
Last edited:

MattKing

Moderator
Moderator
Joined
Apr 24, 2005
Messages
52,873
Location
Delta, BC Canada
Format
Medium Format
If you put the curves and the results side by side in the same stored digital image, that can serve as a reference for yourself in the future.
 
OP
OP
MurrayMinchin

MurrayMinchin

Membership Council
Subscriber
Joined
Jan 9, 2005
Messages
5,481
Location
North Coast BC Canada
Format
Hybrid
If you put the curves and the results side by side in the same stored digital image, that can serve as a reference for yourself in the future.
I have a large leather bound book with blank pages containing notes/thoughts and a file system for negatives & prints. Prefer to spend as little time as possible in the computery realm! (Well, with camera stuff, not talking Photrio photo friends bonding time).
 
Last edited:

koraks

Moderator
Moderator
Joined
Nov 29, 2018
Messages
22,701
Location
Europe
Format
Multi Format
Doing this manually, by feel (no densitometer, etc) so consider yourself forewarned if using this curve.
When I first started messing with inkjet negatives, I did it that way. I never entirely recovered from the mental damage this did.
Prefer to spend as little time as possible in the computery realm!

That's a compelling argument to chuck a test strip onto the bed of your scanner or simply photograph it, plot a curve, invert it in excel and then head back into the darkroom to get some actual printing done!
 
OP
OP
MurrayMinchin

MurrayMinchin

Membership Council
Subscriber
Joined
Jan 9, 2005
Messages
5,481
Location
North Coast BC Canada
Format
Hybrid
When I first started messing with inkjet negatives, I did it that way. I never entirely recovered from the mental damage this did.


That's a compelling argument to chuck a test strip onto the bed of your scanner or simply photograph it, plot a curve, invert it in excel and then head back into the darkroom to get some actual printing done!
The race is long and I'm having fun earning an intuitive-ish understanding of process & materials.

The sensitizer is comparatively inexpensive and lasts a year. Using low cost OHP film and bought a roll of machine made 100% mulberry bark paper that's thin and not thirsty at all. Getting two 6.5"x4.25" negatives on 8.5"x11" OHP to print on 5x7 pieces of paper. Chemicals needed for Argyrotypes are few & cheap as well, because I'm not toning yet.

Once our daughters holiday visit is over I'll breakdown the costs involved.

Todays goal is to keep the high tones where they are (nice sculptural white Dragon arm muscles in the last print) increase contrast in the mid tones, and improve contrast at the very low end.

You can call me crazy, it's okay 👍
 

koraks

Moderator
Moderator
Joined
Nov 29, 2018
Messages
22,701
Location
Europe
Format
Multi Format
I'm not calling you crazy; not at all. I think the path you went down is plausible. I just concluded for myself, as did many others, that it's a path that leads deep into woods where it's not particularly pleasant to hang out.
 
OP
OP
MurrayMinchin

MurrayMinchin

Membership Council
Subscriber
Joined
Jan 9, 2005
Messages
5,481
Location
North Coast BC Canada
Format
Hybrid
I'm not calling you crazy; not at all. I think the path you went down is plausible. I just concluded for myself, as did many others, that it's a path that leads deep into woods where it's not particularly pleasant to hang out.
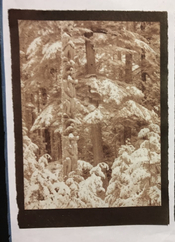
Well, I do love to rummage around off-trail in our local fully mature temperate rainforest, especially when its bucketing down rain or snowing like crazy. Not particularly pleasant, but worth it!
 
OP
OP
MurrayMinchin

MurrayMinchin

Membership Council
Subscriber
Joined
Jan 9, 2005
Messages
5,481
Location
North Coast BC Canada
Format
Hybrid
Japanese handmade Gampi has landed. Got sample sheets of 21gsm, 29gsm, and 43gsm. Trying the 21gsm first.

Didn't do any test strips, just jumped right in where I'd left off with the Chinese machine made Kozo. Had to lengthen the exposure by 1 minute 30 seconds to get a solid black.

Initial observations are that higher values are subtler with much more detail. This is probably from Gampi having a smoother surface...lots of detail was getting lost in the Kozo fibres. Blacks are about the same, but lose some resonance(?) because of the natural reflective sheen of Gampi. This Gampi has none of the machine made Kozo's tonal blotchy weirdness.

No problem at all with wet handling. Very thin, but very strong!

One big change over Kozo was how light the coating brushwork has to be. First one went straight into the garbage because of all the paper fibres which got peeled off the surface. Another difference is the natural warm colour of the paper itself compared to the Kozo I'd been using.

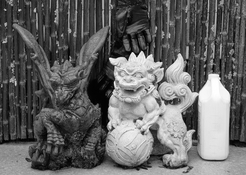
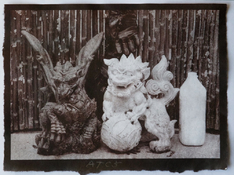
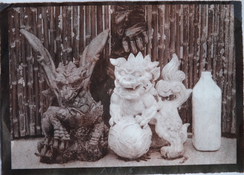
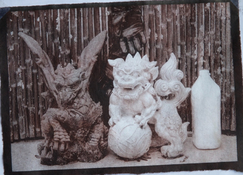
Here are a couple untoned examples. (Basic max black exposures...no editing heroics). The second one picked up some reflective sheen from a window. Tried to show how pivotal the support surface is by placing it on Rising museum board (warm) and plain paper (cold) to show how that affects higher values as light passes through the image, and is reflected back through the print. Tried to get the colours close (and failed) so treat the colour casts as mere approximations. (These didn't get the wood stove heat treatment).

For reference, the only pure white is supposed to be on top of the plastic jug handle, and the only pure black is below the glove behind & between the Dragon and Foo Dog heads. The lighter Dragon values are supposed to be Zone V.

_MXT6955.jpg

_MXT6959.jpg
 
Last edited:
OP
OP
MurrayMinchin

MurrayMinchin

Membership Council
Subscriber
Joined
Jan 9, 2005
Messages
5,481
Location
North Coast BC Canada
Format
Hybrid
Anybody else out there playing with Argyrotypes?
 

CreationBear

Subscriber
Joined
Jan 29, 2020
Messages
95
Location
Knoxville, Tennessee
Format
Large Format
Not yet, but I’m following your exploration with interest! I’ve got a B&S order ready to go, but can’t decide if I just want to try Vandyke as a kind of recce or just get an argyrotype kit from Freestyle.

Otherwise, I’m also very interested in “alternative“ presentation methods—the hanging scroll idea you mention certainly seems to fit my aesthetic more than the whole mat/gallery frame scene. I will look forward to seeing what that looks like if you care to share.
 
Photrio.com contains affiliate links to products. We may receive a commission for purchases made through these links.
To read our full affiliate disclosure statement please click Here.

PHOTRIO PARTNERS EQUALLY FUNDING OUR COMMUNITY:


Ilford ADOX Freestyle Photographic Stearman Press Weldon Color Lab Blue Moon Camera & Machine
Top Bottom