8x10 Camera Build.

Matthew

A
Matthew

  • 1
  • 1
  • 175
Sonatas XII-54 (Life)

A
Sonatas XII-54 (Life)

  • 2
  • 3
  • 210
Zakynthos Town

H
Zakynthos Town

  • 0
  • 1
  • 1K
Driftwood

A
Driftwood

  • 12
  • 2
  • 1K
Trees

D
Trees

  • 4
  • 3
  • 2K

Recent Classifieds

Forum statistics

Threads
199,787
Messages
2,796,717
Members
100,034
Latest member
Thelongdark
Recent bookmarks
0

eyesage

Member
Joined
Oct 13, 2010
Messages
49
Location
Niagara, Can
Format
Multi Format
I'm currently in the middle of an 8x10 pinhole camera build. I thought might be of interest to some. I also have a few ideas about how I'm going to complete the project I'm not sure of, one of which I'll lay out here, so I also welcome input from the peanut gallery.

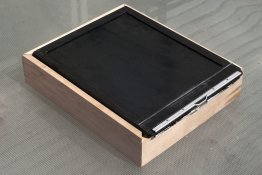
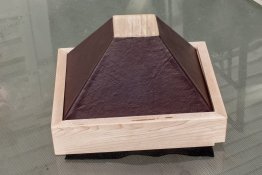
Here's what it looks like right now:
810sf.jpg

If you're interested in seeing how I got to this point I'm keeping a bit of a running diary of the build at my blog so you can find details on the start of the project here, and get an idea of where things stand as of the time I'm writing these words here.

As you can see the camera incorporates a cone ala the Ilford-Harman Titan and I'm hoping to likewise make the cone interchangeable. For pure vanity reasons I'm also hoping to keep this as clean looking a possible. Currently there is a lip inside the main box of the camera that the cone just rests on. The standard way of mating two parts like this is to use they typical kind of metal clip used to mate lens boards and other parts in more standard LF cameras. I'm severely limited when it comes to fashioning metal parts, and in any case it seems an awkward solution given the angles at which everything meets. My thought then is to secure the cone to the body from the inside, but I'm not sure my current plan for doing so is all that sound.

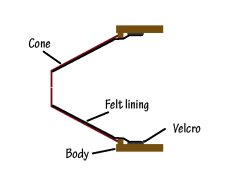
What I'm thinking is this - currently the inside of the cone is lined with felt (very dark though I worry about fibers landing on the film) secured with a generous spread of carpenter's glue, and I've left this untrimmed at the base so that the felt hang down into the box. My thought is that I can attach one side of a Velcro strip to the felt which can be used to secure it to a strip of the mating side running just inside the lip it rests on in the camera thusly:
810va.jpg

My main concerns are that this scheme may not allow the two parts to be held tightly enough together, or that they may loosen too much over time. It would be easy to avoid this situation by permanently attaching the two sections, giving up on interchangeability. A big part of the cone rationale was weight savings anyway (plus I like the way it looks). If anybody has other ideas though I'm all ears.
 

wildbill

Member
Joined
Nov 28, 2004
Messages
2,828
Location
Grand Rapids
Format
Multi Format
I was thinking velcro before i read your idea. Put 2" wide velcro around the edges of your cones a d 3/4" or 1" on the body with the felt overlapping it. Craft stores sell sticky back felt sheets which may help too. Remember, light doesn't bend around corners:smile:
 
OP
OP
eyesage

eyesage

Member
Joined
Oct 13, 2010
Messages
49
Location
Niagara, Can
Format
Multi Format
I was thinking velcro before i read your idea. Put 2" wide velcro around the edges of your cones a d 3/4" or 1" on the body with the felt overlapping it. Craft stores sell sticky back felt sheets which may help too. Remember, light doesn't bend around corners:smile:

Wider Velcro on the cones - there's one I hadn't thought of and it addresses some concerns I have with my plan. I had been thinking of attaching the Velcro right to the underside of the felt and using the strength of the felt to hold things in place and one of my concerns is that felt doesn't seem to be suited to that kind of task.
 

TheToadMen

Subscriber
Joined
Sep 18, 2012
Messages
3,570
Location
Netherlands, EU
Format
Pinhole
Very nice project, thank you for posting it.
 

nsurit

Subscriber
Joined
Jan 27, 2005
Messages
1,808
Location
Texas Hill Country
Format
Multi Format
Interesting build. In your blog you said you might want something a little more elegent for the tripod socket. Skink makes one and if you do a search on eBay you will find it. A little pricey and I used one on my 8X10. Looks and works great. Bill Barber
 

pdeeh

Member
Joined
Jun 8, 2012
Messages
4,770
Location
UK
Format
Multi Format
Eeek that's is a terrible lot of money for the SKink thing.

"teenuts" are about 1/20th the price - see my "LF Box" thread (there was a url link here which no longer exists)
 

Matt Fattori

Member
Joined
Mar 7, 2013
Messages
40
Format
Medium Format
I think you'll be getting into trouble going the velcro route: the condition of the felt will degrade every time you detach a cone and will cause strain on the glue. I also think the felt will stretch and not hold the cone to the back in a particularly secure manner. And then there is all that fibre to contend with. Instead, I would embed small rare earth magnets(such as you can find at Lee Valley) around the lip that the cone rests on. Then I would embed mating magnets or small steel tacks/nails in the bottom of the cone that comes in contact with the lip. I would then cover the lip/ledge with a good quality velvet ribbon and add a small pull tab or loop near the base of the cone as the magnetic seal with these magnets can be surprisingly strong. It is important that all your edges are flush to avoid light leaks. I've employed this strategy to clip film holders into the back of an 8x10 pinhole camera and it's been very effective.

Best of luck,
Matt
 

Pioneer

Member
Joined
May 29, 2010
Messages
3,886
Location
Elko, Nevada
Format
Multi Format
I do agree with Matt on this one. I think your felt will turn out to be more of a problem then its worth.

I have used a flat black paint along with black flocking in the past with excellent results.

Also, do use the magnets. They won't wear out over time.
 
OP
OP
eyesage

eyesage

Member
Joined
Oct 13, 2010
Messages
49
Location
Niagara, Can
Format
Multi Format
Thanks for the ideas about magnets Matt. Your thoughts about using felt as I've been planning pretty much describe why I was concerned about using it this way in the first place. I've been leaning towards the idea of attaching nylon straps to the cone instead of attaching the Velcro to the felt.The idea of using rare earth magnets might be even better though if I can come up with some sort of scheme to affix them. I'm having a hard time picturing how I'd arrange this though as the mating surface is only about 1/4" all the way around. This may require some thought.

Also I'm interested to hear a bit more on the arrangement you used to clip film holders to the back as this is the other area where I'm still tossing around ideas. The 4x5 project I built does this with a nylon strap/Velcro scheme but this project will have a nicer finish and I'm not keen on ruining it with stuck on Velcro strips on the outside.

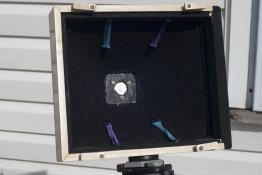
This shot was taken fairly early in the construction, but it should give you a good idea of how the film holder will sit against the camera in case this helps.

810box1.jpg
 

DWThomas

Subscriber
Joined
Jun 13, 2006
Messages
4,611
Location
SE Pennsylvania
Format
Multi Format
Here's the one I did last year -- so far, so good! I had to buy a bag of about fifty big rubber bands (at Staples) to get the size needed to hold the filmholder in place, but a few spares are good, as I just know I'll send one flying off to disappear occasionally. (Bicycle innertube or bungi cord might be possible alternates.)
 
Last edited by a moderator:
OP
OP
eyesage

eyesage

Member
Joined
Oct 13, 2010
Messages
49
Location
Niagara, Can
Format
Multi Format
Thanks Dave, I actually found your site previously and have been combing over it for ideas that could be useful. Very nice work, both with the camera and the detail with which you present it on the site. The "kickstand" is a nice touch.
 

Matt Fattori

Member
Joined
Mar 7, 2013
Messages
40
Format
Medium Format
Right, so the back of my camera looks essentially the same as yours and it looks like you have one of those old Eastman or Ansco film holders, which is also what I used. I think you can get those rare earth magnets as small as 1/8" and, as I mentioned, they are very strong and also very cheap. I drilled holes in the holders to the depth of the magnets(a depth gauge would be useful but I think I got lazy and just wrapped a piece of tape around the drill bit to mark the depth) and then glued them into the holes so that they were flush with the surface of the holder. I did the same thing with the ledge of the camera that the holder rests on(with careful placement so that the magnets line up and are oriented properly) and then glued the velvet tape over top for the light seal. I gotta say, it is very satisfying when it snaps into place! The only issue I had is that it was possible that the magnets(and therefore the holder) could slide sideways if you had to pull too hard on the dark slide, say it was sticking or something. So you have to be careful or else devise a stop tab or something to prevent it from moving in that direction. Anyway, I guess I was proposing the same idea to affix your cone to the camera body...I think it would work quite nicely. The drill work might be a bit finicky but is not too tough. A drill press would be ideal. And the velvet won't give you any fibre problems. I hope that explanation was clear enough. I'd post a couple photos but I'm working afield far away from my camera.

Good luck, I'll be interested to see what you come up with.

Matt
 

Matt Fattori

Member
Joined
Mar 7, 2013
Messages
40
Format
Medium Format
That's a great looking camera Dave! I also use huge elastic bands to attach plastic holders sometimes but hadn't considered adding pegs for them...nice idea.
 

DWThomas

Subscriber
Joined
Jun 13, 2006
Messages
4,611
Location
SE Pennsylvania
Format
Multi Format
Thanks guys! In 2011 I built a 4x5 pinhole camera that was my most successful effort at the time. So then in 2013 I got emboldened to push things up a notch.The 4x5 I was able to fabricate from scraps left from a home improvement project; the 8x10 parts were big enough to require spending a little money. Not to mention 8x10 filmholders are not for the faint of wallet! :confused:

So the 8x10 evolved a bit design wise. A (there was a url link here which no longer exists) just won a $100 award in a juried show, so I've recovered some of my investment!
 
OP
OP
eyesage

eyesage

Member
Joined
Oct 13, 2010
Messages
49
Location
Niagara, Can
Format
Multi Format
Matt: Yeesh, drill the film holders eh? That's what I was afraid you'd say. I guess it's just wood like the rest of the camera, but as cool as it would be to have them just click in I don't know if I'd have the nerve to take a drill bit to them after what it took to get them.

Dave: Thanks for the inspiration. I notice you're using x-ray film here which is what I'll be doing most of the time as well. (According to UPS my first box should arrive tomorrow in fact. I hope it amuses my RN wife to see a shipment from a medical supply company arrive addressed to me.) I'm a bit leery about scratches because I understand that can be a big problem with this stuff unless you develop in hangers. Is that what you do or are there any special measures you take against this?
 

DWThomas

Subscriber
Joined
Jun 13, 2006
Messages
4,611
Location
SE Pennsylvania
Format
Multi Format
. . .

Dave: Thanks for the inspiration. I notice you're using x-ray film here which is what I'll be doing most of the time as well. (According to UPS my first box should arrive tomorrow in fact. I hope it amuses my RN wife to see a shipment from a medical supply company arrive addressed to me.) I'm a bit leery about scratches because I understand that can be a big problem with this stuff unless you develop in hangers. Is that what you do or are there any special measures you take against this?

You're welcome! Though I hate spending money, I purchased a set of 3 Cesco trays which are available with a smooth bottom -- it's a sort of satin finish, not shiny smooth, but there are no ribs or waffles. I do one at a time and handle carefully, it's worked out pretty well. For washing I've set up a cascade of two larger smooth bottom trays and spread out my processing so I'm only washing one sheet in each tray. I turn them over a few times so both surfaces (there's emulsion on both sides) get some washing action.

I looked into hangers, etc. but didn't bite. I suppose one can get lucky on ePrey, but they cost a bit -- and then there's the matter of a tank (or tanks) to hang them in. Since a tank may take multiple gallons to fill, chemistry cost factors in too. I mean, I do a dozen or two shots in a year, not a week! Maybe someone handy at plastic fabrication could make smaller tanks -- or maybe they used to be made -- but I'm managing with the trays. Picking up an edge with a fingernail is tricky, but can be done. I hang them to dry with small alligator clips on a corner.

I've heard of people processing sheets in large zip-lock bags, but that doesn't sound all that handy either.

Have fun!
 

Matt Fattori

Member
Joined
Mar 7, 2013
Messages
40
Format
Medium Format
Joe, I understand your reticence to drill the holders. I inherited a few of them so had no qualms about altering them a bit for this experiment.; they are just tools after all. For plastic holders I installed a metal tab on the camera for the far end of the holder to slide under and use a large elastic band for the near end. Adding Dave's elastic band posts would make this a very quick and convenient system, especially if the band was permanently attached to one of the posts to avoid dropping or losing it. I find using bands for both ends of the holder to be a huge PITA!
I also use x ray film in mine, or else paper with a contrast filter. I bought a few 8x10 pieces of glass from a stained glass place in Toronto to put in the bottom of my plastic trays and found this to eliminate the scratching problem which is both real and severe. You will also certainly mark your x ray negatives with fingerprints unless you wear gloves and are extremely careful. I'm sure this is why hangers and tanks are preferred...you really want to avoid touching the emulsion as much as possible. I haven't done this yet but thought it might be a good idea to attach some sort of clip to the negative for tray processing and handle only this. Forget about the zip-lock bag method. Sunflower.jpg
That one is x ray film. You can probably see finger markings around the corners, and that was with gloves on! This following one is from a paper negative: Island_Pinhole_03.jpg

I think for my next camera I'll try to devise an interchangeable cone or some sort of variable focal length system because this one is 150mm and too wide for a lot of stuff.

Cheers.
 
OP
OP
eyesage

eyesage

Member
Joined
Oct 13, 2010
Messages
49
Location
Niagara, Can
Format
Multi Format
Things are nearing completion, so here's what I wound up doing...

To secure the cone I bolted some mirror hangers inside as an attachment point for, at least for the time being, some good old fashioned elastic bands. I bought some mini bungee cords for this but even the small ones turned out to be too thick. I've been saving the short thick ones that grocery store uses to wrap heads of broccoli together as it seem to be the kind of thing that's likely to come in handy for something, and indeed they were just right for this. On the body side these go over some upholstery tacks that I didn't drive in all the way.

810019.jpg

I may change things out as I go along, maybe swapping the elastics for nylon straps with Velcro, but for now this configuration seems to be doing the job nicely.

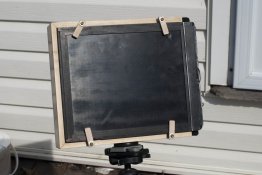
A for securing the film holder, I chickened out of drilling the film holders in order to add rare-earth magnets as Matt suggested, cool as this idea is. After agonizing over a few fancier options I was considering I went with something more along the lines of what I had originally been thinking and made up some simple latches using a surprisingly appropriately sized off-cut strip left over from making the original box.

810020.jpg

I had assumed it would be easy to find latches like this ready-made but found nothing at the local big-box hardware stores I visited. All the better I suppose as these match the rest of the camera.

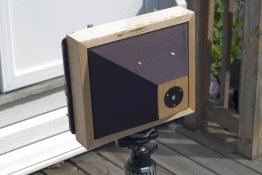
There's a few finishing touches needed but overall the camera is now in a usable state and ready for some test shots.

810015.jpg

This cone gives me 180mm at f/330. I'll probably add a threaded ring so I can attach a lens cap to use as a shutter once I find an appropriate sacrificial filter or step-up ring. The nice thing about this kind of LF pinhole camera is that a shutter isn't a full time requirement, it's only needed when the dark-slide is pulled.
 

Truzi

Member
Joined
Mar 18, 2012
Messages
2,660
Format
Multi Format
Looks like a good solution, though I would be careful with the rubber bands. They seem to age poorly; easily replaced, but you don't want one coming apart when you are about to use the camera.

Perhaps an hairband/tie. Not the "scrunchy," but the more traditional and smaller ones:
http://en.wikipedia.org/wiki/Hair_tie
This would be like a mini "bungie," and can stretch out, but I've never had one have a "catastrophic" failure (when used normally).
 
OP
OP
eyesage

eyesage

Member
Joined
Oct 13, 2010
Messages
49
Location
Niagara, Can
Format
Multi Format
Looks like a good solution, though I would be careful with the rubber bands. They seem to age poorly; easily replaced, but you don't want one coming apart when you are about to use the camera.

You're spot on about this. I was lucky to find the four fairly fresh ones in the collection I'd made, the rest all broke when I tried them. It's for sure I'll need to carry spares. Of course this means I'll need to eat a lot more broccoli. One more way photography is good for my health.

Perhaps an hairband/tie. Not the "scrunchy," but the more traditional and smaller ones:
http://en.wikipedia.org/wiki/Hair_tie
This would be like a mini "bungie," and can stretch out, but I've never had one have a "catastrophic" failure (when used normally).

This was actually my first thought. My daughter has these in droves but after she cut her hair short this summer we have a surfeit of these things around the house.

FE_025.jpg

As a bonus they're all black. Unfortunately I found they didn't have the elastic "pull" needed to hold things together tightly enough. Neither did the typical office supply elastic bands, at least the standard size ones I tried. I'm still considering options though. I may try cutting something out of an old bicycle inner tube to see how that works.
 

Truzi

Member
Joined
Mar 18, 2012
Messages
2,660
Format
Multi Format
Maybe you can find some elastic cord at a fabric or art/craft store. You could tie a between two of the mirror hangers on the cone, and pull it over your anchors on the body (so one piece for the top, and another for the bottom).
 

DWThomas

Subscriber
Joined
Jun 13, 2006
Messages
4,611
Location
SE Pennsylvania
Format
Multi Format
You're spot on about this. I was lucky to find the four fairly fresh ones in the collection I'd made, the rest all broke when I tried them. It's for sure I'll need to carry spares. Of course this means I'll need to eat a lot more broccoli. One more way photography is good for my health.
[ . . . ]

A character who occasionally comments on my PBase gallery once suggested that he thinks the red rubber bands from carrots produce sharper results. :laugh:

Actually, being serious for a moment, you might look into rubber 'O' rings. Some hardware stores carry assortments of those. They come in a bewildering array of thickness and diameter.
 

rince

Member
Joined
May 11, 2011
Messages
219
Location
Germany
Format
Multi Format
Wow, what nice cameras! Unfortunately I have two left hands and all thumbs when it comes to building stuff.


Gesendet von meinem iPhone mit Tapatalk
 
OP
OP
eyesage

eyesage

Member
Joined
Oct 13, 2010
Messages
49
Location
Niagara, Can
Format
Multi Format
Wow, what nice cameras! Unfortunately I have two left hands and all thumbs when it comes to building stuff.

Though with each passing project it seems I get a little better at masking the evidence of my poor working skills I still feel like I have two left hands most of the time. Eventually I may get to the point where I feel like I have only one left hand, but as I work with power tools I often worry about whether I'll then have a right.
 
Photrio.com contains affiliate links to products. We may receive a commission for purchases made through these links.
To read our full affiliate disclosure statement please click Here.

PHOTRIO PARTNERS EQUALLY FUNDING OUR COMMUNITY:


Ilford ADOX Freestyle Photographic Stearman Press Weldon Color Lab Blue Moon Camera & Machine
Top Bottom