8banners Dragon 2 6x18 tips?

Sydney Harbour

A
Sydney Harbour

  • 2
  • 0
  • 38
Sonatas XII-90 (Farms)

A
Sonatas XII-90 (Farms)

  • 0
  • 1
  • 40
Barn and Silo

H
Barn and Silo

  • 3
  • 0
  • 64
Awaiting light

D
Awaiting light

  • 3
  • 0
  • 53
Dusk in the Rockies

A
Dusk in the Rockies

  • 4
  • 0
  • 124

Recent Classifieds

Forum statistics

Threads
200,351
Messages
2,806,632
Members
100,223
Latest member
SachalWest
Recent bookmarks
0

Greg_E2

Member
Joined
Sep 19, 2025
Messages
48
Location
Usa
Format
Medium Format
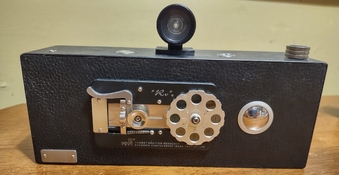
My old name may be unrecoverable, working on that now (Greg_E from the APUG days), so I made the new version you see today. Why come back after so many years away? Because I need to, part of life has been missing. I've taking pictures as a hobby since the late 1970's, 35mm, medium format, digital, and some pinhole film. I need to gather my developing stuff, by some coffee for Caffenol, and get cracking with the old Yashica 635, and my pinhole stuff. On that note, I just bought a used 8banners Dragon 2 6x18 with the turret shutter, it will ship out on Monday. I've wanted one of these since they came out, wish they weren't "forced" to close (there's some lore to this part, maybe we can discuss it).

Any tips and tricks for this camera would be great.

I wish f295 was still around.

In addition I have a 50mm wooden DIY Dirkon that I built, an 80mm that takes Mamiya 645 backs, a Zero Image multi format 6x45 to 6x9, and another Zero that I don't really remember. I do have a cardstock Dirkon too, did that before building the wooden version just to try it out.
 
OP
OP

Greg_E2

Member
Joined
Sep 19, 2025
Messages
48
Location
Usa
Format
Medium Format
I did reply to the automated welcome message with some details about the old account and why I can't recover the password. Old email is no longer available.
 
OP
OP

Greg_E2

Member
Joined
Sep 19, 2025
Messages
48
Location
Usa
Format
Medium Format
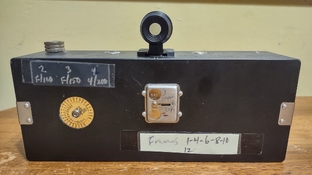
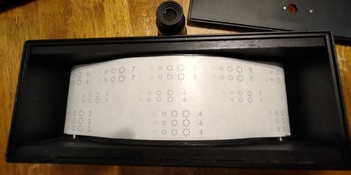
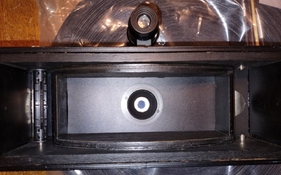
It's here. Looks like someone misunderstood the pinholes in the turret, slot 2 is the smallest, slot 4 the largest. I think this came with a .2mm with optional .3 and .4, so I'm guessing those are the three sizes installed. There are a bunch of patterns in there and two sizes of zone plate. I'll have to change that back legend to reflect the correct f stop for the number 2, 3, and 4 positions.

The one thing I really don't like is that the pinholes are really shiny, I'm going to need to do something to stop the reflections. Not sure if I have any good matte black paint anymore, might need to get some fresh stuff.

Dragon1.jpg

Dragon2.jpg

Does anyone know which numbers I need to turn to in order to line the film up correctly? Should be 4 exposures as far as I can tell, but not sure which numbers on the 645 or 66 opening, it certainly can't be the frame numbers written on the label, that's too many. What I've read on other cameras is that 6x9 gets 8 exposures so this should be 4. Wish they used a window for the 6x9 printing on the film.

(edit) would 3, 6, 9, and 12 in the 645 window make sense? Been away from this stuff for way too long.
 
Last edited:
OP
OP

Greg_E2

Member
Joined
Sep 19, 2025
Messages
48
Location
Usa
Format
Medium Format
Thanks, I'll give it a try, maybe later today.
 
OP
OP

Greg_E2

Member
Joined
Sep 19, 2025
Messages
48
Location
Usa
Format
Medium Format
Well... Loading the film is certainly not the most simple task for me. I need to make some kind of tool to help hold the spools and get them in the centers.

Also make sure the red windows are clean and try to buy film with nice dark numbers printed on it. I have some ultra cheap "Ultrafine Extreme" that I picked up somewhere, it has light gray printing and very hard to see. So I wrecked a roll to find out. Stuff was in the fridge for about 5 years now.

IMG_20250927_133522557_HDR.jpg

After I realized that I couldn't see things moving past the window, I pulled the back off to see what was happening. On rewinding the film back to the source spool for more practice, I noticed that this film might expose part of the tape when using the about 1,4, 7, 9 scheme. Also should that be 10 and not 9?

Pretty clear that this camera lived on a shelf for many years, the front viewfinder cover glass is "frosted" with something, cleaned the outer surface but still something inside. I need to apply some heat and see if I can get the black part away from the lens assembly inside. Also had the clean the red windows for a similar problem (inside and out).

Not sure I'll get out to try some pictures for a few days, but now I have a test roll to practice loading the reel in the changing bag.
 
OP
OP

Greg_E2

Member
Joined
Sep 19, 2025
Messages
48
Location
Usa
Format
Medium Format
Shiny inside needs to be fixed.

IMG_20250927_184117407_20250927184930979.jpg

Flash on to try and demonstrate how reflective it is inside. Hopeful fix

IMG_20250927_184220553.jpg

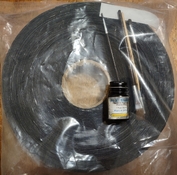
Flat black enamel from Microtools and a roll of telescope flocking that I've used on other cameras to help with light leaking through wood and remove reflections. Probably not going to start on this tonight.
 
OP
OP

Greg_E2

Member
Joined
Sep 19, 2025
Messages
48
Location
Usa
Format
Medium Format
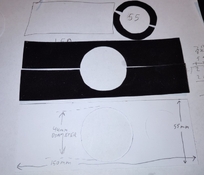
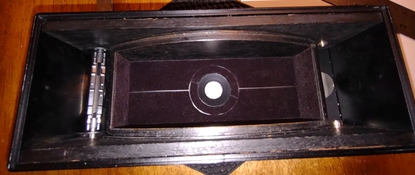
Making some progress, need to cut pieces for the top and bottom of the frame. Not exactly doing the most complete job, but should be good enough. Others will probably think this is polishing a turd, which might be true, but it's my turd to polish, and it's dark outside so what else can I do with this camera right now.

In the end, I know reducing scattered light inside will help to increase contrast in the image. How much it will help? Who knows, but it's my time and materials to waste so I might as well do something that I think will help. If I see a horizontal line in the middle of the frames, then I'll have to go back and fix things with new material. Considering that it looks like I have a lifetime supply of flocking, I can mess around a little.

IMG_20250928_191736745.jpg

IMG_20250928_194430132.jpg

Again using flash to try and demonstrate the affect. You can see a reflection off of the shutter on the top of the box, so I definitely want to put something on there. Then paint the metal parts I can't flock to try and reduce their reflectivity.
 
OP
OP

Greg_E2

Member
Joined
Sep 19, 2025
Messages
48
Location
Usa
Format
Medium Format
The matte black paint was not a real success, but all the other surfaces are "good" now.

If you are wondering why the center round part has the split offset, because it sits roughly on top of the wrench holes that holds the turret on. It also needs to be tightened a bit, the cable release has enough leverage to cause the turret to rotate.

I also tried the email address from the old 8banners WordPress site, but it bounced back. A lot of the information is hidden in their, I just need to scoop it out. It also reminded me that I wanted an Ma and an Mb camera from them. If you have one and don't want it, let me know.
 

loccdor

Subscriber
Joined
Jan 12, 2024
Messages
2,042
Location
USA
Format
Multi Format
OP
OP

Greg_E2

Member
Joined
Sep 19, 2025
Messages
48
Location
Usa
Format
Medium Format
It was still very shiny. All my notes on what paint worked best were on f295, and I have not looked on the wayback machine to see if it was archived.

I think I need black chalkboard paint for this, but not sure.
 

loccdor

Subscriber
Joined
Jan 12, 2024
Messages
2,042
Location
USA
Format
Multi Format
Rustoleum oil-based enamel in flat black should work. It has a long curing time but sticks well to metal. If you try to paint it over latex-based paint you'll need to use a primer made for that.
 
OP
OP

Greg_E2

Member
Joined
Sep 19, 2025
Messages
48
Location
Usa
Format
Medium Format
I remember trying it, and I think Rustolium or one of the other brands had a flat black in their camo line that worked really well. A lot of this stuff got lost in time, and now that I want to get back into photography, I have another huge mountain to climb. Should have keep this info in a notebook.
 
OP
OP

Greg_E2

Member
Joined
Sep 19, 2025
Messages
48
Location
Usa
Format
Medium Format
Went to the internet archives, but my thread on flat black paint didn't get stored, just the title in the forum section back in 2006.
 
OP
OP

Greg_E2

Member
Joined
Sep 19, 2025
Messages
48
Location
Usa
Format
Medium Format
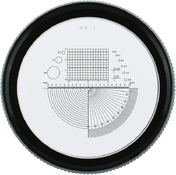
Unravelling the mysteries of this camera. Not knowing the sizes of the pinholes, I'm glad I didn't trust what was written on the back. I bought a cheap magnifier with an etched glass scale and measured.

613GchQyQQL._AC_SX679_.jpg

In order on the turret, I have what I originally thought. #2, 3, and 4 positions hold a 0.2, 0.3, and 0.4 mm pinhole. The camera being 60mm focal length, that gives f300, f200, and f150. I you have the "click-clack" style basic shutter, then you probably have a 0.3mm pinhole or f200 (original stock size).

I think I'm going to load up another roll of the old film I have, and waste it to make sure I'm winding to the correct numbers.
 
OP
OP

Greg_E2

Member
Joined
Sep 19, 2025
Messages
48
Location
Usa
Format
Medium Format
Ran another roll through with the back off and a pen to mark the edges.

On 645 scale, it looks like 2, 6, 10, and 14 get the job done.

On 66 scale it looks like 2, 5, 8, and 11.

The 645 scale gets that first exposure really close to the tape, the 66 scale really close to the end so this may come down to how generous the film company is with heads and tails on the spool.

I still need to bend some kind of tool to help me position the reels in place, find my light meter and put a fresh battery in, and then take some pictures to test.
 
OP
OP

Greg_E2

Member
Joined
Sep 19, 2025
Messages
48
Location
Usa
Format
Medium Format
Birchwood Casey Super Black touch up pen, that was what I was thinking of, have some on the way. I also ordered a Musou super black but it's acrylic water based paint that's really designed to be sprayed, going to brush it. I had to buy 100ml of the stuff, more than one would need in a lifetime of self building pinhole cameras.
 

mshchem

Subscriber
Joined
Nov 26, 2007
Messages
15,326
Location
Iowa City, Iowa USA
Format
Medium Format
Good Progress!

And welcome back. I went out with my old Fujica G617 today, frame spacing is weird but it works. No substitute for wide. 60mm, that's going to be awesome!
 
OP
OP

Greg_E2

Member
Joined
Sep 19, 2025
Messages
48
Location
Usa
Format
Medium Format
The Musou super black is definitely darker and less reflective on paper testing. I think it will be the choice if it can adhere to the enamel that I already put down. Should be nice if anyone is paining the inside of a wooden camera. I'll get a comparison picture when I can.

The Musou is going to be fragile, it scuffs to shiny with very little contact... Might need to stick with the Birchwood Casey stuff.
 
Photrio.com contains affiliate links to products. We may receive a commission for purchases made through these links.
To read our full affiliate disclosure statement please click Here.

PHOTRIO PARTNERS EQUALLY FUNDING OUR COMMUNITY:


Ilford ADOX Freestyle Photographic Stearman Press Weldon Color Lab Blue Moon Camera & Machine
Top Bottom