5x12, there and back again!

Shadow 2

A
Shadow 2

  • 0
  • 0
  • 7
Shadow 1

A
Shadow 1

  • 1
  • 0
  • 9
Darkroom c1972

A
Darkroom c1972

  • 1
  • 1
  • 20
Tōrō

H
Tōrō

  • 4
  • 0
  • 38

Recent Classifieds

Forum statistics

Threads
198,824
Messages
2,781,462
Members
99,718
Latest member
nesunoio
Recent bookmarks
0
OP
OP

Colin Graham

Member
Joined
Sep 5, 2004
Messages
1,264
Format
Plastic Cameras
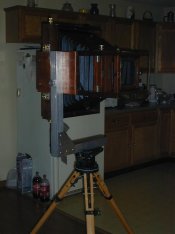
One of the filmgate before the film-loading relief was cut out, and an assembled frame without septum and lighttraps. For the hinges I used black bookbinder's tape. The gate has it's own lighttrap so light-tightness in the tape isn't an issue. These piece aren't glued up yet, but when gluing up the frames, don't forget to insert the septum first ;-). Ahem, did that one... Also, don't get any glue on the septum itself so it can expand and contract (thanks Sandy King for that sage advice), and be careful not to get glue in the tiny slots- very hard to get it out once it dries.

PS- I just noticed that the plan jpegs I posted yesterday got a little corrupted in the transition from the original CAD files, some of the dimension arrows and slashes doubled up and are otherwise confusing. I'll try to repost some cleaner renderings later.

I know this is all a rampant mess, and I apologize, but it's the only documentation I have available from when I was doing this a year and a half ago. I lost some of the photo journal I was keeping of the process unfortunately. Anyway, this is the info that goes out when I receive emails and PMs, so consider yourself warned, this is as good as it gets. :-]
 
Last edited by a moderator:

Steve Goldstein

Subscriber
Joined
Jul 8, 2007
Messages
1,755
Location
Northeastern US
Format
Multi Format
Colin,

How did you cut the garolite? I've heard rumors the stuff is difficult to work with. And what's the name of that slitting saw? It looks quite slick.
 
OP
OP

Colin Graham

Member
Joined
Sep 5, 2004
Messages
1,264
Format
Plastic Cameras
I get alot of questions about cost, so I recently tracked down the considerable paper trail of invoices and the total for all the materials for the camera and 8 holders, not including tools or lenses obviously, was just under 700. There was considerable nickle&diming of McMaster-Carr, unfortunately- they probably rolled their eyes when never they saw my name on an invoice...There alway seems to be one more spring, knob or screw you need. One day I hope to get a lathe for turning knobs and fabricating gears and so forth, but they have so much stuff it's hard to justify it.

I also want to post a pic of a vertical mounting bracket, since this issue comes up often with banquet cameras. As 5x12 is relatively small it's not a complete horror to mount it this way, but I still get a little pale. The idea was stolen outright from the Lotus VMD, btw. I got the idea for the parts from Kerry Thalmann's arca-conversion- he found 8020 surplus on ebay, aluminum extrusions, very cool stuff. They have all sorts of different profiles, brackets and angles in all manner of sizes, like a tinkerer's erector set.

The bracket mounts to the tripod head by way of a 3/8 thread coupling nut that's mortised into the aluminum and is locked and secured from above with a 3/8 bolt and lock washer. The camera attaches with 2 1/4-20 screws to keep it from spinning. I use a 3/8 screw on the Reis head for regular mounting, but only had the 1/4 20 knobs on hand so used them and threaded two matching holes in the camera's mounting plate. (That's the jr tilt head, btw, and it's plenty strong enough.) The knobs are captive, which means you can loosen them without fully removing them from the bracket and thus promptly loosing them. I simply fed some retaining nuts into the hollow parts of the bracket that keep them from unscrewing completely out of the bracket. Hope that makes sense.
 
Last edited by a moderator:
OP
OP

Colin Graham

Member
Joined
Sep 5, 2004
Messages
1,264
Format
Plastic Cameras
Steve,
I cut the garolite by scoring and snapping the thinner stuff with a scoring blade. For the thicker stuff I cut it oversized on a tablesaw and trimmed it with a template and a small trim router and a bearing bit. It tends to flake out a little on the cut line, at least with an allpurpose blade, but I've heard that blades made for lexan and metals work much better. Those blades can get pretty pricy though. I liked using the template and router because all the parts come out exactly the same size and shape- including a slight concavity at the end of the slide so any sagging wont make it hang up and not go in the slot. (That step turned out to be unnecessary for 5x12, the stuff is very rigid at this size.) The router bit leaves a little burr, but dragging a razor blade over the edge like a scraper take care of that. All in all alot easier to work with than lexan. Also, glue sticks to it very well- I was going to pin the darkslide handles, but yellow PVA glue was plenty strong enough.

The slitting saws are from McMaster Carr as well. They have different arbors paired to different blades, depending on what kind of collet you have. If i remember right my mill is an odd size - 2 morse taper- and I bought an arbor to fit the taper directly here. Sorry I can't post the link to the slitting saw page, M-C seems to have their own internal browser and I don't know how to link to it directly.

BTW, the Little Machine Shop made me feel alot better about buying such a cheap little mill- they sell replacement gears and other parts for it, so I wasn't too worried about getting stuck for parts. All said it is surprisingly good for the money, plenty of gib screw adjustments in the table and head travel and the castings are decent. Good enough for rural work, as they say.
 
Last edited by a moderator:

barryjyoung

Member
Joined
Jul 31, 2005
Messages
426
Location
Patterson MO, USA
Format
ULarge Format
light traps

Hi Colin:

I am curious what you used for light traps? We had a terrible time here with fingerstock covered with velvet. Finally we switched to a modern material that works mo bettuh.

Thanks
 
OP
OP

Colin Graham

Member
Joined
Sep 5, 2004
Messages
1,264
Format
Plastic Cameras
Hi Barry,

Funny you should ask- I severely over exposed some sheet film and glued some velvet to it and cut it into compression strips. Amazing how springy the stuff is! Works very well if you don't crease it outright. I've been checking it every 6 months or so, and it's remarkably resilient; still keeps a very nice seal. I almost went with fingerstock, but could only find some rare berilum stuff that was staggeringly expensive. I had tried some thin brass shim stock, some vinyl weatherstripping and other things before I though about trying the film.
 

RobertP

Subscriber
Joined
May 11, 2006
Messages
1,190
Format
ULarge Format
Here is a verticle mounting bracket for my Korona 12x20. The wooden plate was added to make the bed and front extension more stable. The 12x20 Banquet's bed is bolted with 2 bolts and an additional 2 bolts bolt the front extension rail.(there was a url link here which no longer exists)
 

Attachments

  • DSCN0006.jpg
    DSCN0006.jpg
    79.4 KB · Views: 196

barryjyoung

Member
Joined
Jul 31, 2005
Messages
426
Location
Patterson MO, USA
Format
ULarge Format
Hi Barry,

Funny you should ask- I severely over exposed some sheet film and glued some velvet to it and cut it into compression strips. Amazing how springy the stuff is! Works very well if you don't crease it outright. I've been checking it every 6 months or so, and it's remarkably resilient; still keeps a very nice seal. I almost went with fingerstock, but could only find some rare berilum stuff that was staggeringly expensive. I had tried some thin brass shim stock, some vinyl weatherstripping and other things before I though about trying the film.


Thanks Colin:

I had some fingerstock seals fail on me. I was just curious what you did.
 

RobertP

Subscriber
Joined
May 11, 2006
Messages
1,190
Format
ULarge Format
Oops...sorry. I realize this thread is about 5x12. I just wanted to comment on Colin's bracket. These L-brackets work very well and keep the camera centered over the tripod. I wouldn't think of turning that old Korona on its side without it.
 
OP
OP

Colin Graham

Member
Joined
Sep 5, 2004
Messages
1,264
Format
Plastic Cameras
I appreciate you posting yours, Robert. Always great to see different takes on things. Looks great. Do you mount the bracket on the tripod first, then the camera? Or put the camera on the bracket and then put it on the tripod? You have my utmost respect for doing this with a 12x20!
 

RobertP

Subscriber
Joined
May 11, 2006
Messages
1,190
Format
ULarge Format
Colin, We just finished the bracket last week so I'm still unsure if I have found the best way to mount this as of yet. What I'm doing now is mounting the bracket to the tripod head first then mounting the camera. I index the head 90 degrees after the bracket is mounted then I mount the camera to the plate. Now when I'm doing this by myself the bracket has the camera so far boomed out over the side of the tripod that it really concerns me. On a flat even floor it will hold it but I use a monopod as assurance if I'm working alone. I'll post a few pics. Roberthttp://www.apug.org/forums/attachment.php?attachmentid=10309&stc=1&d=1206551238http://www.apug.org/forums/attachment.php?attachmentid=10312&stc=1&d=1206551607http://www.apug.org/forums/attachment.php?attachmentid=10313&stc=1&d=1206551711
 

Attachments

  • DSCN0012-1.jpg
    DSCN0012-1.jpg
    146 KB · Views: 144
  • DSCN0013.jpg
    DSCN0013.jpg
    138.9 KB · Views: 144
  • DSCN0009-1.jpg
    DSCN0009-1.jpg
    53.7 KB · Views: 191
  • DSCN0011-1.jpg
    DSCN0011-1.jpg
    49.8 KB · Views: 140

RobertP

Subscriber
Joined
May 11, 2006
Messages
1,190
Format
ULarge Format
I think what I may do is shorten up the vertical arm. I could do without a couple of inches of clearance. But I would still use the monopod when mounting this way for assurance. Robert
 
OP
OP

Colin Graham

Member
Joined
Sep 5, 2004
Messages
1,264
Format
Plastic Cameras
Looks great! That's a good idea about flipping the bracket over 90 degrees to attach the camera, I'm going to try that my next time out. I'm letting alot of shots go because I'm still a little uncomfortable with my routine for verticals, so this is great. Thanks.
 

RobertP

Subscriber
Joined
May 11, 2006
Messages
1,190
Format
ULarge Format
Colin, Once to have the camera up into position you can easily rotate the camera and bracket around to put you back into position on the head for forward tilt. My next move is to make 4 knurled knobs for the 4 plate mounting screws. Using a screw driver is just an additional move that can be eliminated.
 

scootermm

Subscriber
Joined
Jun 10, 2004
Messages
1,864
Location
Austin, TX
Format
ULarge Format
Robert.
That is genius.

Care to sell one to a manufacturing-dysfunctional 12x20 F&S user?

Again really well done and executed.
 

mark

Member
Joined
Nov 13, 2003
Messages
5,703
Sorry for the off topicness of this but how much does that L bracket weigh? Looks plenty sturdy but is the weight an issue?
 

RobertP

Subscriber
Joined
May 11, 2006
Messages
1,190
Format
ULarge Format
Mark, The bracket with plate and all the mounting screws weighs about 6.5-7lb. Now this is according to my high tech scale. (bathroom scale). This is made with 2" O.D. aluminum tube. I think it is somewhat of an over kill. You could hang a Volkswagon on its side with this. I'm sure 1.5" tubing would work just as well and maybe save you a few onces. I have come to the conclusion that when you start getting into cameras this size you have to accept the fact that things are going to be heavier. Robert
 
Last edited by a moderator:

RobertP

Subscriber
Joined
May 11, 2006
Messages
1,190
Format
ULarge Format
I better post a disclaimer here. I use to work in a tool and die/fabrication job shop many years ago. But I can't take a lot of credit for the work that was done on the 12x20. I have a friend who is a retired NASA engineer that happens to have a pretty well equipped workshop, complete with bridgeports, engine lathe, ect...ect. If you look carefully at the 12x20 you will see all new hardware for the rear focus assembly and the rear swing. The rear focus assembly was missing when I bought the Korona and someone had just run wood screws through the frame into the bed. He machined all those parts and even realigned the gear tracks. This thing works as good as new. Although all it takes to make the bracket is a drill press and a saw the knurled knobs were made on the engine lathe. If anyone is interested in him doing any work, he is a great guy. And he will not take payment until you have it in your hands and are satisfied with his work. I would much rather see him make a few bucks to help pay for his hobby than I would want to put the time into making a bracket. I'd rather burn film. Robert
 
OP
OP

Colin Graham

Member
Joined
Sep 5, 2004
Messages
1,264
Format
Plastic Cameras
Wow, that's heavy. I always forget how much of a commitment ULF is!

I wonder if the 8020 extrusions would make it any lighter? Mine's under 2 pounds and if it was a few inches longer would easily hold a larger 25lb camera; the stuff is unbelievably strong. It might cut the weight in half or better. What gauge did you use to make it?
 
Last edited by a moderator:

RobertP

Subscriber
Joined
May 11, 2006
Messages
1,190
Format
ULarge Format
Colin, You can definitely go with a thinner wall and smaller tube. And cut out a lot of weight. This 2" looks to be at least .090 or more like .125 wall. This is what you get when a NASA engineer decides on the material. Of couse I told him I wasn't worried about weight so much. So I can gaurantee there is no flex whatsoever in this bracket. This camera won't go over 100 yards from as far as a two wheel cart will take it. If I have to carry a camera for any distance I have an 8x20 that weighs 14lb and that goes if it has to be carried. Of course these old Korona 12x20's weighed just under 20lb. You are right though, when working in ULF a 6.5lb bracket seems light. Words like porter/phot assistant/ATV/pack mules/4 wheel drive are used more the older you get with ULF. If I was going to do it over I would go with 1.5" tube and thinner wall. You could probably cut 2lb off easily and still be strong enough to hang a heavey camera. Robert
 
OP
OP

Colin Graham

Member
Joined
Sep 5, 2004
Messages
1,264
Format
Plastic Cameras
That's for sure. I'm a incorrigible ounce-counter, one of the reasons I went no bigger than 5x12, Er, until my wife gets back in shape anyway :-] Thanks again for the info Robert.


*I wanted to give a film update- Just ordered 10 boxes of 5x12 FP4+ from Freestlye. They still have 31 boxes left from last year's ULF cut in Ilford's USA warehouse. Item number is #1142118, best to email sales directly if you want to grab some, price is $80.60 per.
 
Last edited by a moderator:

chrisf

Member
Joined
Dec 27, 2004
Messages
79
Format
Large Format
Colin,

I just found this thread from the lf site. Great job on your camera. I made a 5x7 and have been lusting for an 11x14. This is inspirational.

For the light traps have you considered black flocked paper on the film? Just a thought.

chris
 
OP
OP

Colin Graham

Member
Joined
Sep 5, 2004
Messages
1,264
Format
Plastic Cameras
Thank you Chris for the comment.
I never thought of the black flocked paper- do you know of a source for it? It's about time to check the light traps again. Thanks for the idea.
 

chrisf

Member
Joined
Dec 27, 2004
Messages
79
Format
Large Format
Thank you Chris for the comment.
I never thought of the black flocked paper- do you know of a source for it? It's about time to check the light traps again. Thanks for the idea.

Colin,

If you don't need too much I could send you a small amount. I bought 3 sheets that are 20x28 at $10 per sheet with pressure sensitive adhesive. I'm sure I have enough for your holders. I think I bought mine here http://www.fpi-protostar.com/flock.htm.

Let me know if I can help you out.
 
Photrio.com contains affiliate links to products. We may receive a commission for purchases made through these links.
To read our full affiliate disclosure statement please click Here.

PHOTRIO PARTNERS EQUALLY FUNDING OUR COMMUNITY:


Ilford ADOX Freestyle Photographic Stearman Press Weldon Color Lab Blue Moon Camera & Machine
Top Bottom