
Curt, you want 32' for the bellows. It is nice to have the extra length. BTW for any of you building 11x14's or looking for holders I have two to sell. Send me a PM if interested.
-
Welcome to Photrio!Registration is fast and free. Join today to unlock search, see fewer ads, and access all forum features.Click here to sign up
- Home
- Forums
- Analog Workflow Forums (100% Analog/Traditional)
- Analog Equipment
- Ultra Large Format Cameras and Accessories
You are using an out of date browser. It may not display this or other websites correctly.
You should upgrade or use an alternative browser.
You should upgrade or use an alternative browser.
11x14 project
-
A
- Thread starter tim k
- Start date

Recent Classifieds
-
For Sale Colorado Tripod Company Vector tripod and Aspen ball head combo
- Started by jshcrlsn
-
For Sale Shen-Hao HZX810-IIA Classic - like new
- Started by Solicitor
-
Sold SOLD
- Started by jbprichard
-
For Sale BRONICA EC BODY AND METERED VIEWFINDER for parts or repair
- Started by Simon Benton
-
For Sale BRONICA EC 6x6 TLR WITH 2 LENSES and 2 BACKS
- Started by Simon Benton
Forum statistics
Curt, if 11x14 looks tiny, I'm afraid your toast. Just as well start planing the next step up.
I've probably got 10-15 hours in my bellows, and perhaps 30-40 dollars. But I rather enjoy the project and satisfaction of doing it myself. I guess thats my rationalization for having more time than money.
For what its worth, my plan "A" was to build everything but the gears and knobs. I've started on the holders. My idea might not work out, but I'm going to try it anyway. Worst case is do a spring back and spring for a thousand bucks worth of store bought holders. Jim, I might be PMing. I'll post a pic or two of the holders when I get something together.
Tim, I'm going with 32" for the bellows, my material will make a 36" with over lap so 32" will be fine. I'm trying hard not to buy ready-made products too. If I built it by buying new parts then I might as well buy a factory made camera.
I'm lucky to have some old wood holders, one taken apart which I've examined throughly and two 11x14 "glass plate" holders. When I got the film yesterday I measured it and then dropped it right into the plate holder and it's a dead ringer for the the glass. I'm sure it will be a challenge but I have the facilities to work at will and the motivation to do the work. I just put in an order for the materials needed for the light traps, slides and septum's. I was thinking of making single sheet holders but I'm heading for the double sided ones.
It's going to take some time to make them and I have no illusions as to the complexity involved.
Thanks Jim for the offer, how's the 14X17 working out for you? Got them hangers made yet? I check last night to see how the film handles. When dry it's fine but when it's wet it's susceptible to scratches and scrapes. I did a job on one just to see. With care it's OK though. I've wasted a couple of sheets but at 50 cents a sheet there's no lost sleep. I've got 98 left in the box, better order some more.
Back to the salt mine.
Curt
I'm lucky to have some old wood holders, one taken apart which I've examined throughly
Curt
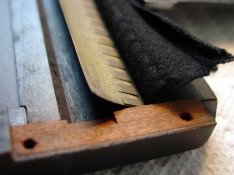
Curt, Any chance you have a picture or two of the light traps in those holders?
My prototype holder is pretty much done, except for the light traps. I have a plan, but it wouldn't hurt to get some more ideas.
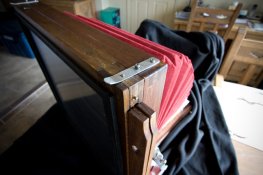
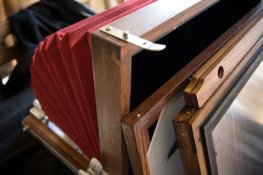
This is what I'm using as a basis for my design of the light traps. These digital photographs are of a 5x7 wooden holder that I had sitting around and it has one piece of brass with a finger / comb piece on top of it and all covered with some felt like material.
I'm going to use one piece of brass shim stock covered with velvet like the wood holder shows in configuration. The brass wraps around the holder and is continuous from one side to the other. There is a wood piece on top of it where the locking screws are attached into. So there are two pieces of wood. One has an opening for the septum plus film and has a surface that is even to the dark slide plane; it has a recesses on both sides for the velvet light trap to go into when the slide is inserted. The top piece is thicker at the bottom where it sits on the light trap. The trap brass/velvet is not glued to the holder and stays in place because it is wrapped over the wood and held down by the top piece and a cover is place over it.
The old manufacturers, designer, inventors spent a lot of time work to make this design. I have a holder made, it's made of mahogany pieces that I had in the shop. I've made my septum groove 1/8" and the dark slide 1/16" but I'm going to make a septum groove 1/16" on the first 'real' holder to exact size.
My first model is a size of 5x9 inches, there isn't a film size for it, it's to see if I could actually get the holders made and to experiment on the assembly and procedure before I make a set of them.
I found that Garolite XX cuts very smooth on my Powermatic 66 cabinet saw with a fine tooth carbide blade, no problems with that. I bought a 1/16" four wing carbide shaper cutter for my Powermatic 27 shaper. It's like cutting through butter. I got some new DeStaCo clamps for a custom cutting platform jig.
I have an excellent planer and a Uniplaner so surfacing the stock isn't a problem. What I thought was hard is easier and what I thought was going to be easy is a bit harder.
This week I'm going over to get the cherry stock that I'm going use for the holders. My plan is to make 6, then make a second run of 6 for a total of 12 11x14 holders. Believe me I've spent many many evening with a caliper pencil and paper going over all the materials and dimensions. There are some things that became apparent with a mock-up that just isn't apparent when drawing them on paper. I did some work on cad but I'm not going to spend months with drawings when I have already made one and now can see how it's done.
My suggestion is to make a model, mock-up, what ever you want to call it and see how it works. Originally I was going to make a single side holder but I slowly realized that what came before me was what I was slowly modifying my holders to. I figured that I was trying too hard to reinvent the basic film holder. I'm making double side holders.
I hope you can read this as I've just returned from the North Cascades National Park. I've been house bound and it was nice to get out. I saw some things I want to photograph with a large format camera. I have 100 sheet box of Kodak green 11x14 film here and that's what I'll probably use for the most part. I will use some regular film too later on.
Curt
Attachments

Curt, thanks for the pictures. That was a quick reply. The pictures help out a lot, actually seeing what someone has previously worked out.
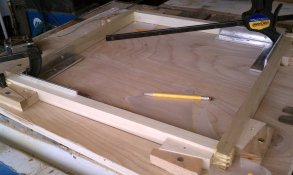
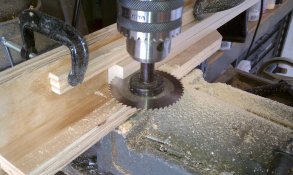
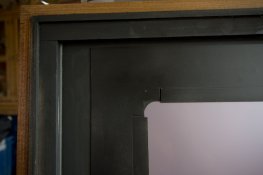
Here are a couple of shots I took with my phone. One is gluing the exterior frame, the other is how I cut my grooves for the dark slides and septum. I'll get some more current pics soon.
Here are a couple of shots I took with my phone. One is gluing the exterior frame, the other is how I cut my grooves for the dark slides and septum. I'll get some more current pics soon.
Attachments
Tim that's excellent, using what's available and the right jig is the key. I'll post some pic's of mine soon. I've taken this as a challenge and it takes camera building to a new height. The design and planning stage is always longer but worth the effort.
Curt
Curt
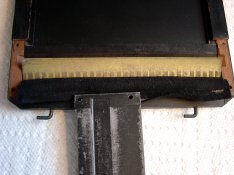
Tim, I'm rechecking my design of the light trap. Upon careful examination and with some thought I figured out what the combed brass does. I had just laid down to sleep and it popped into my head. I thought the second layer of brass which is not connected to the larger brass strip just added some increased force to the set but suddenly I thought that if that's so then why not use a stiffer or heavier single layer. The combed brass strip work like this. When the dark slide is inserted the larger brass bends down and as the slide is inserted the combed brass pushes up behind it making not only one contact point but a plane of contact. It's easy to see this happen when the cover plate is off. It's a very cleaver invention, someone or some people knew how to design and manufacture back then.
So does it have to be combed or can it be a straight piece. It would take days to cut one in the combed configuration. I'll have to recheck this. I think the combed design provides even more independent pressure so if a change in the slides straightness is encountered the comb will compensate. It's a very nice design. The velvet or felt material has to be attached to the underside of the larger brass and not to the top of either.
Curt
It would take days to cut one in the combed configuration. I'll have to recheck this. I think the combed design provides even more independent pressure so if a change in the slides straightness is encountered the comb will compensate.
Curt
I think your absolutely correct about the even pressure on a curved surface. I think it could be cut rather quickly if you have a box joint jig. Just screw your thin piece of brass between two pieces of wood, then run the whole thing thru the jig. The only issue I see is getting a thin blade. Here is a link to the type of jig I'm talking about. http://www.google.com/imgres?imgurl...a=X&ei=F1fcTevuCYO0sAOI9aCeDg&ved=0CDgQ9QEwAQ
I've completed my prototype 11x14 film holder, at least far enough to start planning the set I need. I've made mistakes along the way but in return I gained a full understanding of the operation of a light tight holder.
Curt
My camera is only partly completed however. Now I want a better camera so I have to burn the midnight oil on the design. That's ULF, help!
Curt
My camera is only partly completed however. Now I want a better camera so I have to burn the midnight oil on the design. That's ULF, help!
Curt, thats good to hear. I've got my first holder done as well, Actually I'm far enough along to actually expose a piece of film. The camera is about 90% done and my holder is 99.3% functional. I'll get some pictures up soon.
.jpg")

Tim, that is what I said until I realized that you could get x-ray film in 14x17!!!!
Heres a funny thing. I ordered a box of 8x10 film, before I stepped up to the final 11x14 (or 14x14) film size. It arrived via brown truck yesterday. Thought I'd save a buck or two, while getting my development ironed out.
Ready................. Its tiny.
Lord help me.
Ready................. Its tiny.
Lord help me.
- Joined
- May 21, 2010
- Messages
- 966
- Format
- Medium Format
yeah....it's interesting how that "little" jump to 11x14 really is huge...same thing for me...now 8x10 is like small to me...even though 11x14 is only double the size of 8x10...
8x10 is FOUR times the size of 4x5, but it doesn't seem like such a HUGE jump in size...not like from 8x10 to 11x14 (to me)
4x5 is almost the same as the hasselblad now....stuff you can handhold, all in the same group now.
8x10 you can still handhold--just barely--with a LOT of caveats on what you shoot...very limited handheld
its at the "tipping point" of the scale....at the 11x14 size, it's no longer negligible with your size..8x10 is almost getting competitive magnification-wise you the scale of a person...but 11x14--that size is now starting to be comparable to the size of a person...funny thing...16x10 does not seem so much bigger than 11x14..not in the sense that 11x14 is compared to 8x10...it's like the "transition point" size for me...that's when things start getting BIG.
You seem to forget that 5x7 is pretty comfy right between 4x5 & 8x10.
I don't know why it isn't the most popular size.
I don't know why it isn't the most popular size.
- Joined
- May 21, 2010
- Messages
- 966
- Format
- Medium Format
well, yeah...but i lump in 5x7 with 8x10 and 4x5....they're all like the same size range....
just like 4x5 is kind of in the range with roll film 120
BIG jump in my opinion between MF and 35mm though...35mm is like 16 like 8....all movie sizes
of course theres 70mm movies too....
just like 4x5 is kind of in the range with roll film 120
BIG jump in my opinion between MF and 35mm though...35mm is like 16 like 8....all movie sizes
of course theres 70mm movies too....
just like 4x5 is kind of in the range with roll film 120 .
Ouch, that ought to get a few people fired up.

I have to look at 645 negatives with a reading glass and magnifier these days.
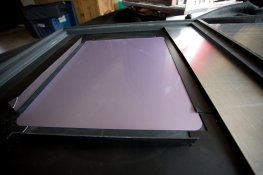
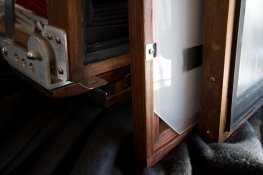
A little peek at the holder
Here are a few shots of the cameras back side, and holder.
My concept was to be able to use any size film up to 14x14, and to make it easy to load, and build. I did not want to have to slide the film in and out. And more importantly, I'm too cheap to spend 300 bucks on a holder. And in a pinch I can bake dozen cookies on the darkslide.
After a few 8x10 test shots yesterday, I'm going to call it a success. You just fold up the flaps, lay the film down, and fold the flaps back down.
The septum is a 29ga piece of painted steel, and the little thing holding the film in place is a mask made of magnetic sign material. So if I want to change formats, just change the mask.
I'm done now.
Oh, and thanks everybody who kept me inside the lines.
Attachments
- Joined
- May 21, 2010
- Messages
- 966
- Format
- Medium Format
excellent---yes--you are right about sliding film---difficult and finicky--particulary with larger sizes--plus your method reduces the chances of sliding scratches for sure....good work great ideas....more for the back of my head--always looking to improve, you know?
| Photrio.com contains affiliate links to products. We may receive a commission for purchases made through these links. To read our full affiliate disclosure statement please click Here. |
PHOTRIO PARTNERS EQUALLY FUNDING OUR COMMUNITY:  |