• Welcome to Photrio!
    Registration is fast and free. Join today to unlock search, see fewer ads, and access all forum features.
    Click here to sign up

Sinar Norma 8x10 Field Camera Long Telephoto

On The Mound

A
On The Mound

  • 0
  • 0
  • 26
On The Mound

A
On The Mound

  • 0
  • 0
  • 34

Forum statistics

Threads
204,418
Messages
2,868,252
Members
102,263
Latest member
csambi
Recent bookmarks
0
This is quite the apparatus. Are those two Linhof Twin-shank tripods? They still sell this model at serious cost. And I see two of the white Zone VI camera bags. Very practical design for large format cameras.

Thanks Kodachromeguy :smile:
 
BTW those two tripods, are FOBA C40 models, which are in the original Norma catalog. I think they complete this humongous camera. About all the same vintage so all is good.

SONY DSC by Nokton48, on Flickr

For telescopic location work (scaled down a bit!) the 500mm Schneider Tele-Xenar F5.5 in Compound Shutter. Been advised by my repairman not to use the cable release, it caused a jam he fixed it. Best to use it as is, I'll be trying. Same perspective very similar view to 1000mm F16 I'm keeping set up in the studio for long 8x10 work. It's heavy but hey it's sturdy to use.

This Sinar Norma is set up for 9x12cm and 4x5in long telephoto perspective. And it's portable, I believe I can fit all of this in my original Norma 4x5 Case for traveling. We will see.
 
SONY DSC by Nokton48, on Flickr


I've reworked mounting the lens, settled on a strip of Gorilla Tape for now. This whole unit will slide onto the very long rail of 18" pieces, creating a portable Optical Bench using all original Norma Parts. I've also switched out the supports, from FOBA C40's, to Big Manfrottos with hex connections. Manfrotto is more portable than FOBA for this use. In the studio FOBA is way more solid. In the field this could be transported to the location in one complete piece. And then no need for a gym workout!
 
First Test of NPL 8x10 HRU 1000mm F32 18 pops Octobox by Nokton48, on Flickr

First test of Negative Lab Pro, a program which converts large format negatives (small ones too) into nice looking positives. This is 8x10 Fuji HRU XRAY Film, D23 replenished. Neg copied with Sony Nex-7 (36mp) with 50mm Zeiss F2.8 Touit, an AWESOME optic. Big learning curve ahead :smile:
 
SONY DSC by Nokton48, on Flickr


Here I'm testing my suspended Broncolor Hazylight Modeling Light On. Additional FOBA F1000 Head down low left to illuminate shadows. The 3D Printed Tophat appears robust to my eye, we will see. This I intend to test out in the field soon. I can carry it around assembled for now. I will put the 5x7 Bag Bellows and Monocular on the back, for outdoor viewing. I do have the Reducing Back for 4x12/9x12 as well if I need cropping.

Here the Broncolor Hazylight Head is doing what it does best. Providing beautiful simulated "window lighting". I'm using the Broncolor Hazylight 1600JHead which is an unusual design.
 
Hi, This is a wonderful super-focus photography equipment! With such a large bellows, it looks like an astronomical observation device. Is it difficult to shoot outdoors? Also, does the slight movement of the air inside the bellows affect the photography?
 
@Nokton48 could I ask you with what tools you punched out and in again the pins? I'm trying to do that with P2 parts but I'm afraid I will 1. bend the pins, no replacement available, I'm screwed 2. not being able to punch them in again. Sorry for necroposting :D
 
I took a Sinar Norma Auxilary Standard, and drilled out the holes with a drill press. Then I attached some large bolts and nuts from the hardware store.

I guess those are the "pins" you are talking about? I don't know anything about the P2.
 
This morning I went out into my workshop and removed some steel pins using vise and center punch/hammer.

The pins you mentioned… a while ago, in 2021. I wasn't able to find any other relevant info on that, sorry 😥
 
"held in perfect position by 4 positioning screws. Your film holder is resting against felt around the perimeter--except at the light trap at the entrance to the film back, however, it bottoms out on those 4 positioning pins. Precision is essential because depth of field is so limited. "

You talkin' about this? I'm quoting Glenn Evans from Glennview.com . Does the P2 have positioning pins like the Norma? I have no idea. Check the original Norma instruction book for more on the pins. I have never needed to adjust mine in my 8x10 Norma.
 
5x7 PlusX 2402 Aero D23 5x7 Norma 500mm Tele Xenar by Nokton48, on Flickr


Kodak Aerographic Five Inch Plus-X cut seven inches, to fit a 5x7 Lisco Holder. 5x7 Sinar Norma with my newly CLA'ed Schneider 500mm Tele Xenar at F22. Hasselblad 40mm Distagon Yellow Filter jammed inside the lenshood, it fits! D23 1:1 8x10 Unidrum on Uniroller. 5x7 Contact Print on Arista #2 RC Dektol 1:2 The Tele-Xenar is quite sharp up front as you can see. I'm liking this film for 5x7, but I can also cut it to 4x5 or even 9x12cm. Like the tonality you get with the Aerial emulsion.

Tim Kelly Inspired Broncolor Balloon 90 degrees left, lighting the entire set. Main light Broncolor C171 Monolight Pulsoflex Softbox, one stop brighter than the fill, 45 left to the set. Just out of camera shot 45 right, is a foamcore freestanding panel for passive fill. Finally, the creme on the sundae, is Broncolor C70 Monolight with Snoot and Handmade Grid from an olde Broncolor Honeycomb. Selecting lighting a small portion of the background. Just because
 
First let me point that Ronar is not a telephoto lens, a telephoto glass has a well shorter FFL than the Focal, as defined in the Kingslake bibles...

The Sinar Norma + Ronar is battle tested setup !!!

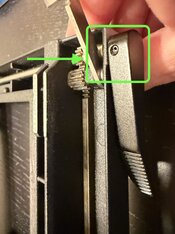
View attachment 267907 View attachment 267908

...being Reinhart Wolf a remarkable user crafting impressive works with that !

Personally I'm experimenting that with cambo sc, as I lack a sinar 8x10 back...

____

Let me point that Apo Ronars and Claron glasses for graphic work were optimized for close distance. It is possible to optimize those lenses for distant subjects by adding a proper shim in the front cell to increase a bit the inter-cell distance.

Procedure was described in "Internationale Phototechnik" issue 8/1993...

"Focus the center of your ground-glass on fine structures in the distance like leafless trees or high grasses with a strong loupe at wide open aperture.

Shift the rear frame of your camera to the left and the front frame to the right up to the point you can see the structures get blurry.

Unscrew the front group of the lens circa 2 mm (1 line or 0.08 inch) from the shutter or barrel and look for the fine structures, twigs or leafs. Adjust the distance between the front group and the shutter up to the point the structures are as sharp as possible without any coma and blur. Refocus if necessary during the adjustment.

Place a steel or brass shim of the determined thickness between shutter and front group. If the thickness of the shim is the correct one there is no difference in image quality between the center and the edge of distant subjects. For close-up work remove the shim or place a much thinner one."


Additionally when you unscreewed the from cell to its optimal place then you may count the tours (and fraction of a tour) you need to screew again the front cell. If we multiply the number of tours by the thread pitch then we have the thread thickness we need.

That operation mostly optimizes image quality off center, in the corners and mid.

Probably many (or most) long Ronars around have the optimal inter-cell distance for close work, this can be known by checking if the corners in the image improves when the front cell is unscreewed a bit.

For very long focal Ronars that effect should be noticed less as we take more the center of the image circle, still it would be well noticed when shift/rise performed.


This is very important technical stuff. How to fine tune your Apo Ronars! :smile:

"Internationale Phototechnik" issue 8/1993...

 
1000mm F16 Apo Ronar Wolfe Configuration Close Up Looks Good by Nokton48, on Flickr

This is very close to what Mr. Wolf was using out in the field. A standard sized 8x10 Norma Bellows, three Norma Auxiliary Standards (I have another one coming). Three Norma 4x5 standards. The Compendium Hood is a Norma Tapered 4x5 Bellows. Viewing through the lens image looks really good and sharp. The two C40's provide ROCK SOLID support even in strong wind. Tripods may be weighted down in the field.
  1. Measured bellows draw is Fifty-three Inches, so calculated Bellows draw factor is TWO STOPS for this close-up.
View through 8x10 Tele Sinar Norma 1000mm F16 Apo Ronar by Nokton48, on Flickr

View through the 8x10 Tele Norma 1000mm F16 Rodenstock Apo Ronar. I have a fresnel screen on the camera, the hotspot moves around, to view the glass in "quadrants". Quite sharp as I would expect from all my Apo Ronar, from the 150mm tiny gem, to this MONSTER. I'll leave this up til I'm satisfied, need to load 8x10 and 18x24cm holders next. This is great fun! :smile:

Figuring how to break this down, into my Sinar Norma Cases, will take some thinking. Three or four cases would hold it all. I have a Mint 8x10 Norma Case (bought from a very Nice Gentlemen in Italy), for the rear standard and a lot of stuff. The two FOBA tripods continue at my CLA Spa, one is fully done, cleaning it with Electronic Contact Cleaner, as I would do with Normas, makes a big operational difference in how the big rig handles. Easy to make changes once the rig is up and running!
 
"held in perfect position by 4 positioning screws. Your film holder is resting against felt around the perimeter--except at the light trap at the entrance to the film back, however, it bottoms out on those 4 positioning pins. Precision is essential because depth of field is so limited. "

You talkin' about this? I'm quoting Glenn Evans from Glennview.com . Does the P2 have positioning pins like the Norma? I have no idea. Check the original Norma instruction book for more on the pins. I have never needed to adjust mine in my 8x10 Norma.
I was thinking about the pins that hold in place some of the piece of the P series like the back of the lever, let me attach a picture for clarity.
Gorgeous Norma setup, congrats!
 

Attachments

  • IMG_0518.jpeg
    IMG_0518.jpeg
    381.9 KB · Views: 15
OK but my Norma knobs and levers are completely different from the P2 cameras. Why not post a thread and ask P2 users what they think?
 
OK but my Norma knobs and levers are completely different from the P2 cameras. Why not post a thread and ask P2 users what they think?

You are right, I wasn’t aware they were so much different, that’s why :smile:
 
I can never quite figure out if you're really taking pictures with you super-long bellows and rail setups, or if you have some kind of linear accelerator in there attempting a DIY patent on fusion energy.
 
I can never quite figure out if you're really taking pictures with you super-long bellows and rail setups, or if you have some kind of linear accelerator in there attempting a DIY patent on fusion energy.

Yep, I agree, it's got to be satisfying to get it all to work. Better to hire a three or four porters and get ahold of a Deardorff commercial camera with 7-8 feet extension 😊 maybe a reducing back to 6x9 cm 😁😎 I've done something like this but it was with a 450mm on 8x10" . All great fun. I always enjoy your conglomerations 😎👍
 
Photrio.com contains affiliate links to products. We may receive a commission for purchases made through these links.
To read our full affiliate disclosure statement please click Here.

PHOTRIO PARTNERS EQUALLY FUNDING OUR COMMUNITY:


Ilford ADOX Freestyle Photographic Stearman Press Weldon Color Lab Blue Moon Camera & Machine
Top Bottom