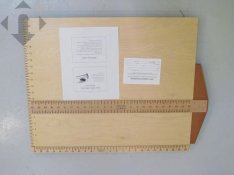
Zone VI dry mount jig

Relaxing in the Vondelpark

A
Relaxing in the Vondelpark

  • 6
  • 3
  • 131
Mark's Workshop

H
Mark's Workshop

  • 0
  • 1
  • 79
Yosemite Valley.jpg

H
Yosemite Valley.jpg

  • 3
  • 1
  • 88
Three pillars.

D
Three pillars.

  • 4
  • 4
  • 89
Water from the Mountain

A
Water from the Mountain

  • 4
  • 0
  • 110

Forum statistics

Threads
197,545
Messages
2,760,824
Members
99,399
Latest member
fabianoliver
Recent bookmarks
0
Joined
Mar 18, 2005
Messages
451
Location
Toronto
Format
Medium Format
Does anyone have the written instructions for using the Zone VI dry mounting jig? I was thinking of trying to make one, and would like to work backwards if you know what I mean.

Thanks!
 

Alan9940

Member
Joined
Jun 17, 2006
Messages
2,380
Location
Arizona
Format
Multi Format
Hello Marco,

I looked through all my old Zone VI instructions/literature and couldn't find anything specific for the dry mount jig. Either there weren't any real instructions or I lost it over the years. Regardless, it's not difficult to use; basically, it goes like this:

1. Place matboard along lower rail matching outer numbers on each side. For example, an 18" board on the long side would align with "18" on both the right & left sides of the bottom rail. This board is now centered.

2. Place print on matboard aligning vertically wherever you want it. Then, place the t-square along the top edge of the print. Align the left/right edges of the paper matching numbers on the t-square as in #1. Square up the top edge of the print along the edge of the t-square.

3. Finish however you're mounting the photo. I use dry mount tissue.

4. Done!

Hope this helps.
 
OP
OP
Joined
Mar 18, 2005
Messages
451
Location
Toronto
Format
Medium Format
Hi Alan, thanks for taking the time to write that out. A few things are clear to me now, in looking at the picture I have. One being that the ruler on the left hand side is not a zero centered ruler like on the T-square and bottom ruler. That's a big help.

If anyone is interested, here's the only picture I was able to find online:

zone vi dry mounting jig.jpg
 
Joined
Sep 10, 2002
Messages
3,565
Location
Eugene, Oregon
Format
4x5 Format
Marco,

It's easy to make a positioning tool like the Zone VI (which I find not accurate enough since it doesn't have small enough increments). You don't need all those scales along the sides of the board, nor do you even need a board...

Find a good quality T-square long enough for the largest size mount board you will be using (it must be at least half as long as the longest dimension).

Make sure the T-square you buy has a scale along the longitudinal bar with the "0" positions located at the bottom of the T-bar. Also make sure that the bottom of the square is cushioned (rubber, felt, etc., since you'll be laying it on top of prints).

Now, find yourself a suitable rule (metal or even a stick-on scale) to apply to the T-bar. Position this rule so the "0" position is at the right edge of the long bar. You want both zero-positions to be in the same corner (inside right corner for right handers).

The way I use it is this: Position the print at the far right of the mat board, even with the edge. Place the T-square along the left side of the mat board ("T" along the left side so the bar is perpendicular). Note the distance from the left edge of the mat board to the left edge of the print using the scale along the long bar. Divide this in half to find the distance from the left edge of the mat board needed to center the print.

Now, reposition your T-square 90°, with the T at the top. Using the scale along the T-bar (that you have added), set the distance from the left edge of the mat board to the edge of the long bar at the distance needed to center the print. Position the print against the long bar.

Now using the scale on the long bar, slide the print up or down to the desired position. I like to leave a bit more room at the bottom of the mat than at the top; others like to center their work on the mat board. Whatever you like, simply position the print so it's where you want it vertically. As long as the T-square is in the right position horizontally, the print will be centered that way.

When the print is in the right place, weight it with a shot bag or the like and (important!) check all the positions again with your square and/or a tape measure to make sure it's in exactly the right place (I usually have to adjust a bit).

When the print is exactly right, tack the dry-mount tissue to the board (that you have already tacked to the back of the print before trimming it).

Done. Sandwich the print between boards and transfer it to the dry-mount press.

Best,

Doremus
 

Reinhold

Advertiser
Joined
Aug 20, 2003
Messages
911
Location
Washougal, Washington
Format
Multi Format
Placing the print on a mat may be based on which cultural standard you favor.
Contemporary/Modern, Classical European/Caucasian, or Traditional Oriental.

Here are three ways to mount a print to three different cultures...
 

Attachments

  • Contemporary placement on Mat.pdf
    100.1 KB · Views: 327
  • European placement on Mat.pdf
    107 KB · Views: 401
  • Oriental placement on Mat.pdf
    110.4 KB · Views: 417

AgX

Member
Joined
Apr 5, 2007
Messages
29,973
Location
Germany
Format
Multi Format
Placing the print on a mat may be based on which cultural standard you favor.
Contemporary/Modern, Classical European/Caucasian, or Traditional Oriental.

Thank you. I was neither aware of these designations nor schools.
 

RalphLambrecht

Subscriber
Joined
Sep 19, 2003
Messages
14,567
Location
K,Germany
Format
Medium Format
Does anyone have the written instructions for using the Zone VI dry mounting jig? I was thinking of trying to make one, and would like to work backwards if you know what I mean.

Thanks!

Marco, are you familiar with finding the optical center on a mountboard? That is the principle behind that jig.:smile:
 
OP
OP
Joined
Mar 18, 2005
Messages
451
Location
Toronto
Format
Medium Format
Thank you, Doremus, for the detailed advice. The idea of putting felt on the back of the T-square is brilliant, and something I will absolutely do. I agree that lead shot bags are a must, and I've been using them for years. I think I have a dozen in my framing toolbox!

I bought some zero centering rulers from GEI in Syracuse:

http://www.geionline.com/rulers/center-finding-zero-centered/1033a/

They come in 24" lengths, which is what I needed for this project. They are marked to 1/32", which I believe is more than accurate enough for me. They come in packs of 5 for what I consider to be a fair price. I will use these for the bottom guide as well as on the T-square, and have a traditional ruler running up the side.

Once the jig is completed, I will post some pictures up here.
 
OP
OP
Joined
Mar 18, 2005
Messages
451
Location
Toronto
Format
Medium Format
Placing the print on a mat may be based on which cultural standard you favor.
Contemporary/Modern, Classical European/Caucasian, or Traditional Oriental.

Here are three ways to mount a print to three different cultures...

Hello Reinhold, thank you for posting these PDFs. They are very clear and interesting. I appreciate it!
 
OP
OP
Joined
Mar 18, 2005
Messages
451
Location
Toronto
Format
Medium Format
Marco, are you familiar with finding the optical center on a mountboard? That is the principle behind that jig.:smile:

Hello Ralph, I am familiar with optical centering. I use Russell Cottrell's wonderful website:

http://www.russellcottrell.com/photo/centering.htm

He makes reference to your book with Chris Woodhouse, which has also been a great reference.

I think the presentation of my work has greatly improved since I've started using Mr. Cottrell's website. In my eyes, the optical centering seems to very much suit the square format in which I most often shoot.

In fact, the website above is what has lead me down this path to making the dry mounting jig. One of the pieces of information he provides is the print position, from the top and sides, which is wonderful. I consult that website before I frame any of my own work, it's become an essential tool for me.
 

Rich Ullsmith

Member
Joined
Jan 26, 2007
Messages
1,159
Format
Medium Format
This is interesting discussion. A print can be perfectly mounted, but if the over mat is off by 1/16 anywhere (in my experience it always is, maybe because of all the cuts being right-handed) then it doesn't really matter how well the print is optically centered, the converging line between the print and overmat will stand out like a hard on. I suppose if an overmat is not being used then this is not an issue.
 
OP
OP
Joined
Mar 18, 2005
Messages
451
Location
Toronto
Format
Medium Format
I'm pretty good at cutting mats with a fair degree of accuracy ; I use a Fletcher 2100 which is a wonderful tool. I normally present work with 1/4" of paper showing before the mat edge. It looks good, but is fussy. I'll see if this jig is something that can fit into the system or not.
 
OP
OP
Joined
Mar 18, 2005
Messages
451
Location
Toronto
Format
Medium Format
I really should have followed up on this, but better late than never. I did put the jig together, and it performed very well. I had to mount a large portfolio, as well as a series of prints for exhibition with a 3/8" border between the print and the window mat. I feel I was able to be accurate to 1/32" which was fine with me.

I'll post a series of photos, and then information on parts if anyone is interested.

Dead Link Removed

Dead Link Removed

Dead Link Removed

Dead Link Removed


Dead Link Removed

As you can see, the base I used was an Ikea Perfekt Gnosjo part # 002.204.60 - it sort of fell into my lap, but believe it is for a cabinet or something. It is wood, square, and accommodates a 20x24 mount which was my goal. I screwed in rubber feet into the bottom, which I got from Lee Valley tools.

The T-Square is an Alvin C36 which has the transparent edge. I attached some felt to the bottom of the T-Square, which was Doremus Scudder's suggestion I believe. I think I used double sided tape?

There are two 24" zero centered rulers, which were purchased from GEI in Syracuse. Product # 1033A-24. They are accurate to a 1/32" and are just brilliant. As you can see, one is attached to the T-Square, and the other runs along the bottom of the baseboard. The two had to be positioned very precisely, which took some fiddling. The bottom ruler is screwed in, but that was a bad idea - the ruler "flexes" with the torque of the screws. I probably should have put in washers or something.

The ruler running up on the left side is a regular cabinet maker's ruler, which I bought from Lee Valley Tools. It starts at 0, which I like. You can see in the second picture that the zeroes on the two rulers have to be aligned exactly. More fiddling there, but not too difficult.

Using the jig requires a system, but once you get the hang of it, you can move fast and efficiently.

One of the goals was the be able to mount an image, and put a window mat around with a 3/8" reveal of the paper base. In this case, the window mat is 16x20 and the photo is dry mounted to a 16x20 piece of board - the two have to align perfectly. Realistically, there is very little room for error. It was a good test of the jig. Here's a photo of one of the framed pieces:

Dead Link Removed

If you do a lot of dry mounting, perhaps this is something to consider. I'm sure it can be improved upon, but all in all it has saved me a lot of time and given me results I am happy with.
 

AgX

Member
Joined
Apr 5, 2007
Messages
29,973
Location
Germany
Format
Multi Format
Except for those drawing triangles I never have come across zere centered rulers loose.
Thank you for that link.
Their metrical ruler as a second, end-starting scale that likey is irritating, one could cover it with paint.
 
Last edited:
OP
OP
Joined
Mar 18, 2005
Messages
451
Location
Toronto
Format
Medium Format
I should also note, I use this jig in combination with Russell Cottrell's truly excellent website:

http://www.russellcottrell.com/photo/centering.htm

One of the pieces of information he includes in his print centering calculator is the "print position" data. I find it to be an irreplaceable part of my whole framing and dry mounting process. It takes some time to get familiar with using the online calculator with the jig, but with a bit of practice, it becomes quick and efficient. I guess that's true of just about any tool!
 
Photrio.com contains affiliate links to products. We may receive a commission for purchases made through these links.
To read our full affiliate disclosure statement please click Here.

PHOTRIO PARTNERS EQUALLY FUNDING OUR COMMUNITY:


Ilford ADOX Freestyle Photographic Stearman Press Weldon Color Lab Blue Moon Camera & Machine
Top Bottom