Several years ago, I inherited a nice Zeiss Ikoflex Ia with an excellent Tessar 75mm f/3.5 taking lens. I put several rolls through it and they came out great. Everything was in working order, but also very stiff and kinda grimy. This was in 2016 or so.
In my infinite wisdom, I decided to do a bit of disassembly and try to clean some lens elements and whatnot. Nothing too serious, and I did get everything clean on the viewing lens (a Teronar-Anastigmat f/3.5). Unfortunately I didn't pay close enough attention to how it all came apart, and managed to get it back in wrong. From that point forward I couldn't get good focus with it. Seemed odd and not quite... flat? Like the center could be in focus, but the edges would be way out of focus and smeary-looking. Wasn't like that before I disassembled and reassembled it.
Luckily I had the common sense not to touch the taking lens. I quietly put this camera back on the shelf and went back to shooting my Yashica Mat 124 when I was feeling in a 6x6 mood.
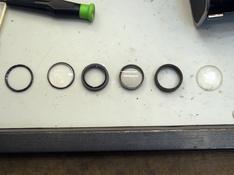
Now here we are 8 years later, and I want to get it back up and running. I have disassembled the viewing lens completely. Below is a photo and description of what I *think* each piece is. Looking at diagrams online, this lens appears to be a cooke triplet design. Front and rear elements that are both convex on one side and flat on the other. A middle element that is concave on both surfaces.
Anyone think they could help me get things back in place properly? It looks like once it's back together into the housing, it's a fairly simple matter of screwing it back into the camera body right up until it matches infinity focus with the scale, and then locking in place with the retaining ring.

A: Front element (convex and flat sides)
B: Middle element inside a housing ring (two concave sides, one slightly more so than the other)
C: Rear element (convex and flat sides, just slightly smaller in both diameter and concavity than front element)
D: Lens barrel
E: Trim ring or possibly retaining ring to help keep distances correct as lens assembly screws into camera body
F: Spacer; definitely fits just right on one side of the middle element housing B
G: Appears to be a ring to hold the rear element C and make up the diameter difference to keep it centered in the housing; that element fits perfectly in a small shelf here. No threads on it.
H: Rear retaining ring that keeps the entire assembly in place inside the barrel. The outer threads fit the inside of the lens barrel. There are notches cut for a spanner. Oddly it has inner threads too; not sure what those would be for.
I: Screws over the lens barrel D and interfaces with E; can be locked to the barrel with a set screw at any point. I think E and I work together to help lock the lens assembly at the correct distance from the body when installed.
Very open to suggestions on how to get this put back together.
Update after an evening of listening to my college football team lose and messing with various configurations. Feel free to ignore if you already know the right answer. So far I've tried:
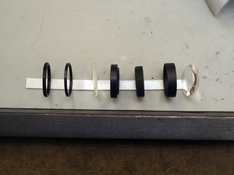
1. Not messing with E or I yet as they don't seem to control lens distance from reflex mirror in the camera body; I'm guessing they just lock it down when the correct distance is obtained by screwing D into the camera body. Inside the lens barrel D, from front to back (everything inserted from rear): Front element A, convex side facing forward. Then spacer F. Then middle element B, with slightly less concave of the two sides facing forward. Then rear element C inside ring G, with convex side of C facing rearward. Finally H to lock everything in place. Result: Can't get anywhere near infinity focus even screwed all the way in - but I definitely have extremely close focus (closer than should be possible with this camera). This suggests to me that the front cell is too far forward.
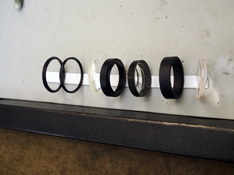
2. All orientations the same as attempt #1, but spacer F is moved to sit between the middle and rear elements instead of the front and middle. Now the front and middle elements are touching. Result: Much closer to correct, it seems. Can't quite get infinity, but error goes the opposite direction now. I have no close focus, and I reach infinity when the assembly is held about 2mm forward from where it can touch the threads of the camera body.
3. Everything the same as #2, except I flipped middle element B around, so the more concave of the two surfaces faces forward now. Result: I can now reach infinity focus while the lens is screwed into the camera body, but I have a very strong blooming/haze effect and nothing is particularly sharp even when in focus. I confirmed this isn't due to smudges on the glass anywhere, it's all clean.
I'm calling it for the night. Still open to suggestions for what to try!
In my infinite wisdom, I decided to do a bit of disassembly and try to clean some lens elements and whatnot. Nothing too serious, and I did get everything clean on the viewing lens (a Teronar-Anastigmat f/3.5). Unfortunately I didn't pay close enough attention to how it all came apart, and managed to get it back in wrong. From that point forward I couldn't get good focus with it. Seemed odd and not quite... flat? Like the center could be in focus, but the edges would be way out of focus and smeary-looking. Wasn't like that before I disassembled and reassembled it.
Luckily I had the common sense not to touch the taking lens. I quietly put this camera back on the shelf and went back to shooting my Yashica Mat 124 when I was feeling in a 6x6 mood.
Now here we are 8 years later, and I want to get it back up and running. I have disassembled the viewing lens completely. Below is a photo and description of what I *think* each piece is. Looking at diagrams online, this lens appears to be a cooke triplet design. Front and rear elements that are both convex on one side and flat on the other. A middle element that is concave on both surfaces.
Anyone think they could help me get things back in place properly? It looks like once it's back together into the housing, it's a fairly simple matter of screwing it back into the camera body right up until it matches infinity focus with the scale, and then locking in place with the retaining ring.
A: Front element (convex and flat sides)
B: Middle element inside a housing ring (two concave sides, one slightly more so than the other)
C: Rear element (convex and flat sides, just slightly smaller in both diameter and concavity than front element)
D: Lens barrel
E: Trim ring or possibly retaining ring to help keep distances correct as lens assembly screws into camera body
F: Spacer; definitely fits just right on one side of the middle element housing B
G: Appears to be a ring to hold the rear element C and make up the diameter difference to keep it centered in the housing; that element fits perfectly in a small shelf here. No threads on it.
H: Rear retaining ring that keeps the entire assembly in place inside the barrel. The outer threads fit the inside of the lens barrel. There are notches cut for a spanner. Oddly it has inner threads too; not sure what those would be for.
I: Screws over the lens barrel D and interfaces with E; can be locked to the barrel with a set screw at any point. I think E and I work together to help lock the lens assembly at the correct distance from the body when installed.
Very open to suggestions on how to get this put back together.
Update after an evening of listening to my college football team lose and messing with various configurations. Feel free to ignore if you already know the right answer. So far I've tried:
1. Not messing with E or I yet as they don't seem to control lens distance from reflex mirror in the camera body; I'm guessing they just lock it down when the correct distance is obtained by screwing D into the camera body. Inside the lens barrel D, from front to back (everything inserted from rear): Front element A, convex side facing forward. Then spacer F. Then middle element B, with slightly less concave of the two sides facing forward. Then rear element C inside ring G, with convex side of C facing rearward. Finally H to lock everything in place. Result: Can't get anywhere near infinity focus even screwed all the way in - but I definitely have extremely close focus (closer than should be possible with this camera). This suggests to me that the front cell is too far forward.
2. All orientations the same as attempt #1, but spacer F is moved to sit between the middle and rear elements instead of the front and middle. Now the front and middle elements are touching. Result: Much closer to correct, it seems. Can't quite get infinity, but error goes the opposite direction now. I have no close focus, and I reach infinity when the assembly is held about 2mm forward from where it can touch the threads of the camera body.
3. Everything the same as #2, except I flipped middle element B around, so the more concave of the two surfaces faces forward now. Result: I can now reach infinity focus while the lens is screwed into the camera body, but I have a very strong blooming/haze effect and nothing is particularly sharp even when in focus. I confirmed this isn't due to smudges on the glass anywhere, it's all clean.
I'm calling it for the night. Still open to suggestions for what to try!
Last edited: