Wire coat hangers to make dodger handles - cut, bend to shape, tape a bit of cardboard to the end.
-
Welcome to Photrio!Registration is fast and free. Join today to unlock search, see fewer ads, and access all forum features.Click here to sign up
You are using an out of date browser. It may not display this or other websites correctly.
You should upgrade or use an alternative browser.
You should upgrade or use an alternative browser.
Your favorite "Improvised" darkroom equipment
-
A
- Thread starter bblhed
- Start date


Recent Classifieds
-
For Sale Pentax 67 body with metered prism and grip
- Started by Guivd
-
For Sale Lens boards:Toyo, Canham, cambo, grafle
- Started by darinwc
-
For Sale Toyo 110mm lens boards (45 CF 45AR, 45ARII A11, AX
- Started by binglebugbob
-
Want to Buy Hasselblad A12 type III or IV back (Black or Silver)
- Started by jshcrlsn
-
For Sale Nikon F2S (body only, meter not working)
- Started by MCB18
Forum statistics
Wire coat hangers to make dodger handles - cut, bend to shape, tape a bit of cardboard to the end.
I've done the same thing with screwdrivers. I have a few really long, narrow-shafted screwdrivers which really are not much thicker than wire clothes hangers. The scredrivers were in my darkroom already, and I didnt feel like going to the laundry room and unravelling a wire clothes hanger

A 4x5 film washer from an old Yankee-style plastic cut film developing tank?
Mine was inherited. If you turned it over it had a moderately recessed bottom. So I drilled a grid of small holes into the bottom, along with a single slightly larger hole. I then drilled another larger hole 2/3rds of the way up one side wall of the tank. Inside the tank I connected the two larger holes with a short flexible piece of tubing in such a way as not to interfere with the held film sheets. Finally, I epoxied a quarter-inch sheet of rigid plastic over the bottom, completely sealing it airtight. This produced a small internal tank space for water just below the film chamber. The side hole got fitted for a two-foot length of tubing that terminated in a garden hose fitting. My darkroom sink faucets use garden hose connections.
To use it I connect the external hose to a tempered faucet. The water enters the side wall opening and passes through the short internal tube down into the base, where it then wells back up evenly through the grid of holes and overflows the tank top. If the supply of water should stop, the tank then just sits full.
If I owned one of those digital imaging thingies, I'd post an image or two. But alas, I don't.
Ken
Last edited by a moderator:
If I owned one of those digital imaging thingies, I'd post an image or two. But alas, I don't.
How 'bout a friend or other family member. I'd love to see a picture, having some trouble visualizing all the details.
I'd love to see a picture, having some trouble visualizing all the details.
It's more simple than my description makes it sound. I'll see what I can do. The wife has a cell phone that makes images, if I can figure out how to use it.
(Geez, I can't believe I just said that...)

Ken
You will be forgiven this one contact with/mention of, the "D" word. 
At the suggestion of a screen printer, I'm working on a vacuum easel that uses a single-speed air mattress pump to provide suction, and thin magnetic strips over the unused portions of the board to control the intensity. The mattress was thrown away years ago, but I couldn't bring myself to throw away the pump.
I have also used all manners of containers for processing trays.
I use my bathroom mirror as a squeegee board, and a towel laid on the washer and dryer as a drying rack.
I use a half bathroom shower stall as a drying cabinet, after steaming up the bathroom first.
I use a paper towel roll as a drying rack for graduates and bottles.
I use a kitty litter container (about 3.5 gallons, with a big screw top) to store spent fixer.
Yes, I need to do some work on my darkroom!
Last edited by a moderator:
- Joined
- Dec 10, 2009
- Messages
- 6,295
- Format
- Multi Format
I'm really enjoying this thread. Maybe APUG could make a new forum "Improvised photo and darkroom gear".
I too was going to make my own base for my 16x20 easel; but I managed to snag a brand new Saunders 16x20 borderless easel of Craigslist for $35.
Good score. Those things go for about $140 USD new. I must admit though, I've had my share of good luck this year. Early on this summer, a friend gifted me a 1967 Nikon F with two lenses, a 50 mm f/1.4 chrome nose, and a pre-AI 85 mm f/1.8. The shutter was a little sticky on the camera, but with a little cleaning it's now in top form. The meter is way off, and while I know how to adjust it, I don't want to peel back the leather to access the adjustment screws. The camera is too pretty and I'd hate to ugly it up. The barrels of the lenses were a little scuffed up, but no big deal there. They've seen some use. The glass is clean and clear, the focusing mechanisms are smooth and without excess play, and iris blades are clean and operate as they should. Then, just a few weeks ago, I picked up a Beseler 45MX-II with an Aristo Cold light head. While the machine is in good shape, the previous owner couldn't find any buyers and was about to just give up. We connected by chance and the enlarger now has a new home. I found a condenser head for it, and it will be back in use when I make a space in my darkroom for it.
At the suggestion of a screen printer, I'm working on a vacuum easel that uses a single-speed air mattress pump to provide suction, and thin magnetic strips over the unused portions of the board to control the intensity. The mattress was thrown away years ago, but I couldn't bring myself to throw away the pump.
Neat idea. I have one of those pumps lying around here somewhere.
A salad dryer to remove excessive fluid from the film. I put the film on the reel in, spin it and its mostly dry. I modified the dryer a bit,making a pin for the film to stick on, and a counterweight on the other side.


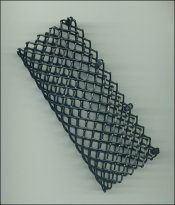
Rigid, high-flow, taco-style 4x5 sheet film developing cages?
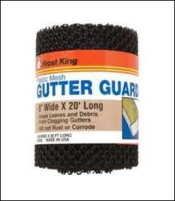
Made from Dead Link Removed plastic mesh. Supplied in 6-inch by 20-foot rolls, it's designed to act as a leaf filter over your rain gutters.
It's a quarter-inch mesh that, when suitably trimmed down, can provide a perfect enclosure to allow processing solutions to access both the front and back sides of negatives. This is especially useful in facilitating the removal of anti-halation dye since it prevents the film back from being pressed against other sheets or the tank wall. It works much better than window screen for this because of the thicker gauge and much larger mesh openings.
Just trim off a 5.75-inch length piece from the roll. Then trim the original width down from 6-inches to 5.5-inches. Set up a small flame of some sort. I used a small propane torch (burner) adjusted to the lowest flame. Gently and evenly pass the sharp trimmed edges of the mesh through the flame. They will quickly melt and recool, smoothing the sharp-edged cuts in the process.
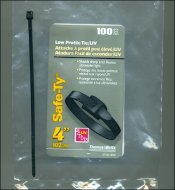
Then fold the mesh over along the length dimension and secure the edges using four small plastic cable ties. I used Thomas & Betts SF100-18XC ties because they are designed not to expose the sharp edges common to this class of product when the excess length is clipped off. Plus they are black, so they look cool.
Voila! A chemically inert, reusable, taco-shaped protective cage for your negatives.
I have found it extremely easy to load these cages in total darkness. The sheets slide in quickly and smoothly. And once inside, the film is completely protected. Three of these will comfortably fit into a 4-reel stainless steel developing tank, thus allowing you to use your regular inversion protocol if you wish. And keep you from having to spend US$200+ on a Nikor 4x5 tank...
Ken
Made from Dead Link Removed plastic mesh. Supplied in 6-inch by 20-foot rolls, it's designed to act as a leaf filter over your rain gutters.
It's a quarter-inch mesh that, when suitably trimmed down, can provide a perfect enclosure to allow processing solutions to access both the front and back sides of negatives. This is especially useful in facilitating the removal of anti-halation dye since it prevents the film back from being pressed against other sheets or the tank wall. It works much better than window screen for this because of the thicker gauge and much larger mesh openings.
Just trim off a 5.75-inch length piece from the roll. Then trim the original width down from 6-inches to 5.5-inches. Set up a small flame of some sort. I used a small propane torch (burner) adjusted to the lowest flame. Gently and evenly pass the sharp trimmed edges of the mesh through the flame. They will quickly melt and recool, smoothing the sharp-edged cuts in the process.
Then fold the mesh over along the length dimension and secure the edges using four small plastic cable ties. I used Thomas & Betts SF100-18XC ties because they are designed not to expose the sharp edges common to this class of product when the excess length is clipped off. Plus they are black, so they look cool.
Voila! A chemically inert, reusable, taco-shaped protective cage for your negatives.
I have found it extremely easy to load these cages in total darkness. The sheets slide in quickly and smoothly. And once inside, the film is completely protected. Three of these will comfortably fit into a 4-reel stainless steel developing tank, thus allowing you to use your regular inversion protocol if you wish. And keep you from having to spend US$200+ on a Nikor 4x5 tank...
Ken
Attachments
A (tested) 60-minute safe LED darkroom safelight?
When I moved to try out variable contrast papers I decided I needed a universal red safelight. I already had a Thomas Duplex for which I had installed a custom designed Roscoe filter set for use with Kentmere Bromide graded papers. (Perhaps another post to this thread?) But I wanted something in red to be compatible with pretty much everything.
After some looking about, I settled on an OptiLED 627nm S-11 style bulb. Holding a CD disc up to view the light generated by this bulb I noticed there were a few minor spikes in the blue and green portions of the spectrum also visible. Not intense, but still visible.
I always keep a few sheets of Rubylith and Amberlith around, so I grabbed a piece of Rubylith and filtered the light. Looking again at the CD showed absolutely no dangerous spikes, at least visible to the naked eye. There was only a small reduction in overall brightness using the filter.
So I cut a 3x13-inch piece of plywood, painted it flat black, and attached four tiny neodymium magnets to the bottom. These magnets were rescued from old SonicCare toothbrush heads destined for the trash. (I always save these guys. They're incredibly powerful and useful.)
Then I ran to the local hardware store and purchased six cheap, plastic E-26 bulb sockets, which I mounted in line on the top of the plywood. I wired the sockets together, attached a short line plug, screwed in the LED bulbs, and covered the entire assembly with a smooth rollover of Rubylith held in place with opaque black photography tape.
The magnets allow me to securely mount the strip right on top of my sheet metal Thomas Duplex. This places the bulbs about seven inches below a white acoustical ceiling. The six filtered LEDs give off a surprising amount of light, which is then reflected off the ceiling throughout the darkroom.
I then performed the classic pre-fogged safelight test on my enlarging easel using Ilford MGIV RC. I tested at five minute intervals for 12 intervals, or 60 minutes total. When processed the test showed absolutely no evidence of safelight fog out to the 60 minute mark. I'm not sure how far I could have gone, but 60 minutes seemed more than sufficient.
Ken
Last edited by a moderator:
ozphoto
Subscriber
I use one of these to remove the excess air from my mixed developer:
http://www.vacuvin.com/Vacuum_Wine_Saver_286_270_267.html
My partner rarely leaves a bottle of red unfinished, so don't need them for their intended use!!
http://www.vacuvin.com/Vacuum_Wine_Saver_286_270_267.html
My partner rarely leaves a bottle of red unfinished, so don't need them for their intended use!!
Talking timers. They are the duck's guts.
I am enjoying this thread, thanks.
I would be a rare thing in the world of analogue photography if there were many questions that have never been asked before, or many improvisations that have not been tried.
I have often dreamt a lens turret would be a great addition to my favourite enlarger but I am yet to stumble on one. Recently I had an idea to build one and started searching for the plans. After many clicks through Google I came across a reference in an old Popular Science magazine from January 1948. On reading this thread I have gone back to it to see what more I could find.
Here is a link to a 'Google Books' search I did on 'photography' in Popular Science that has heaps of back issues going back to the 30's. It is fun to click through.
Cheers
http://www.google.co.nz/search?q=ph...644153&ei=X1agTOKVEJCUvAPMmeG9DQ&start=0&sa=N
Some very interesting historical browsing there, thanks for posting this link.
Vacuum food saver for storing opened film in the freezer:
I do the same, except I put five rolls of 35mm film, in film cans, in a 1.33L milk bag and seal it with a vacuum food saver. It's great when you use this rig to keep film cool in the summer, as when you take the five rolls out to warm them up, the condensation forms on the bag, not on the film cans.
I made my own enlarger footswitches ( one for the timer, and one for a "Bulb" duration) out of some blocks of wood, 3mm plywood, and duct tape, and a magnetic stirrer from a computer fan and super magnets.
I used a telegraph key for a footswitch for quite a long time. My father had had a stint as a telegraph operator in the late 1930's, when the telegraph key was a mainline communication tool. It was a sturdy one, made of brass bar stock.
I build an improvised light proof paper drying box for drying hand-coated liquid emulsion silver gelatine paper. It uses an ordinary darkroom tray with a home build lid of foam board, mat board and gaffer tape, and has active air flow using three computer ventilators.
See the images. Full build info here:
http://www.boeringa.demon.nl/menu_technic_paperdryingbox.htm


See the images. Full build info here:
http://www.boeringa.demon.nl/menu_technic_paperdryingbox.htm
| Photrio.com contains affiliate links to products. We may receive a commission for purchases made through these links. To read our full affiliate disclosure statement please click Here. |
PHOTRIO PARTNERS EQUALLY FUNDING OUR COMMUNITY:  |