• Welcome to Photrio!
    Registration is fast and free. Join today to unlock search, see fewer ads, and access all forum features.
    Click here to sign up

YCM Process for Color Negative Film

a sidebar

H
a sidebar

  • Tel
  • Feb 3, 2026
  • 0
  • 0
  • 106

Recent Classifieds

Forum statistics

Threads
202,160
Messages
2,836,103
Members
101,148
Latest member
stammc
Recent bookmarks
0

gelat0

Member
Allowing Ads
Joined
Feb 3, 2026
Messages
8
Location
Jupiter
Format
Multi Format
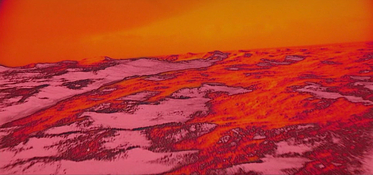
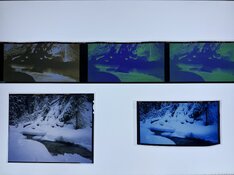
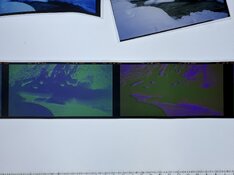
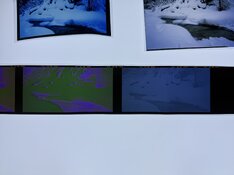
Does anyone know (in detail) about the YCM process for technicolor and or color negative film, I wish to replicate it, but need to further my understanding. For context I am trying to replicate the landscape sequences in the stargate (from 2001) but with a photo workflow. My tools are a light table, YCM wratten filters, and a camera+tripod. Lots of research has led me to confusion and differing answers as to what the YCM process actually means. My goal is to start from a color positive or negative, apply these changes, and end up with a final color positive reflecting these effects.

In the case of space odyssey,

This was done from references:

A) “Separation Masters… a photographic technique in which each of three colors of developed color negative film are reprinted on fine-grained black-and-white stock… Once the three colors- yellow, cyan, and magenta- had been teased apart, much more control could be exercise over each color. Working with the new machine (65mm optical printer), Loftus discovered that if he made certain fortuitous mistakes- for example, by reprinting the separated colors back onto color negative stock in the wrong order, or using the ‘wrong’ aperture settings- he could produce vividly improbable color inversions.”

and B) https://www.tvstoreonline.com/blogs...a-space-odyssey-interview-series-bryan-loftus

"You had three color strips, and you took those and made three high contrast versions off of the negative, and then three low contrast versions. Effectively you would be creating twelve different stripes of film for every shot in the Stargate off of the positive and negative film. So by effectively combining those the wrong way you would end up getting lots and lots of different colors on the film. "

I am confused about what happens from mainly the recombination of these elements, and how the pipeline works (unsure of the color negative -> color negative). From my understanding the ‘correct/baseline process’ is:

regular color negative film
|
v
Shoot copies of this onto BNW negative stock, with corresponding filters (YCM) and correctly (exposure) compensating for each, so they have the same gamma
|
v
in rejoining them with a triple exposure, you shoot the corresponding BNW strips onto color negative film with the same filters they were made from (YCM) ?
|
v
You then arrive at a color negative with the separated channels combined, and can recombine back onto a slide with a triple exposure through YCM filters.

I want to know how this process works as clear as possible in order to establish what a correct pipeline looks like. And my final question would be: Could you also accomplish this starting from a color positive rather than a color negative and what would this look like.

I would greatly appreciate any insight on this, and/or if anyone could help point me in the proper direction. This is my first time posting on a forum. Thank you!
 

Attachments

  • 2001-a-space-odyssey-2-10-14.jpg
    2001-a-space-odyssey-2-10-14.jpg
    1.1 MB · Views: 18

koraks

Moderator
Moderator
Joined
Nov 29, 2018
Messages
27,433
Location
Europe
Format
Multi Format
Welcome aboard @gelat0!

I wonder if there is something like a 'correct pipeline' for this kind of effect. I think what's 'correct' is whatever is (1) technically feasible and (2) gives the kind of result you're after, in the knowledge that it will be rather experimental. I bet that the effects you see in the movie weren't planned ahead in detail, but were 'designed' in concept only and then considerable variation was left to chance in the end result.

Having said that, the second Loftus quote seems to be the most specific and it sort of aligns with the flow you propose, save for one notable difference: not one, but two negatives were made for each color channel: one high contrast and one low contrast. So working from negative film, this would result in a total of six interpositives. Since you ultimately need to end up with a positive, they had to go through another negative stave in the interim. They could have done this (theoretically) by projecting the 6 different interpositives onto a single color negative, but apparently they chose to make another 6 internegatives at this stage, before merging them into a single image again.

There are evidently plenty of variations to be thought of in this process; hence my statement earlier that there's probably not one particular way that's more 'correct' than any other. What works depends a lot also on what kind of materials are available to you. In that sense, it's very bad news if you try to directly replicate what was done back then, since those materials do not exist anymore and for several of them, there's likely no modern equivalent. So my suggestion would be to avoid attempts to literally replicate what Loftus did back in 1968 (or what was it) and instead start with the materials available today and the kind of end result you're after, and then do some tests to see what gets you closest.

Evidently, doing this digitally would be so much easier and more flexible, but I assume there's some compelling reason to do this on film. If there is, I'd be interested to hear it.

PS: I'll move this to the Color Film & Paper section where I think it fits a little better.
 
OP
OP

gelat0

Member
Allowing Ads
Joined
Feb 3, 2026
Messages
8
Location
Jupiter
Format
Multi Format
Welcome aboard @gelat0!

I wonder if there is something like a 'correct pipeline' for this kind of effect. I think what's 'correct' is whatever is (1) technically feasible and (2) gives the kind of result you're after, in the knowledge that it will be rather experimental. I bet that the effects you see in the movie weren't planned ahead in detail, but were 'designed' in concept only and then considerable variation was left to chance in the end result.

Having said that, the second Loftus quote seems to be the most specific and it sort of aligns with the flow you propose, save for one notable difference: not one, but two negatives were made for each color channel: one high contrast and one low contrast. So working from negative film, this would result in a total of six interpositives. Since you ultimately need to end up with a positive, they had to go through another negative stave in the interim. They could have done this (theoretically) by projecting the 6 different interpositives onto a single color negative, but apparently they chose to make another 6 internegatives at this stage, before merging them into a single image again.

There are evidently plenty of variations to be thought of in this process; hence my statement earlier that there's probably not one particular way that's more 'correct' than any other. What works depends a lot also on what kind of materials are available to you. In that sense, it's very bad news if you try to directly replicate what was done back then, since those materials do not exist anymore and for several of them, there's likely no modern equivalent. So my suggestion would be to avoid attempts to literally replicate what Loftus did back in 1968 (or what was it) and instead start with the materials available today and the kind of end result you're after, and then do some tests to see what gets you closest.

Evidently, doing this digitally would be so much easier and more flexible, but I assume there's some compelling reason to do this on film. If there is, I'd be interested to hear it.

PS: I'll move this to the Color Film & Paper section where I think it fits a little better.

Hi! Thanks for the reply.

So I think how the quotes would relate to each other is- the first one pertains to the fundamental idea of what can cause these color shifts and how they were discovered. Simple tweaks in altering contribution per channel, and or passing internegatives through incorrect filters (cyan bnw record being exposed through magenta filter, for example). Where the second, more directly relates to the route they took in order to create the different color combinations and washes they achieved.

I think what I am referring to as the "correct" pipeline, would be: "What process can I do to separate these channels and re-achieve the same color image as my source on a final color positive?" (going through the original process used to accomplish control of color balance, which is from what I understand the main reasoning they chose to do this for the film alongside the extensive visual effects).

Once I am sure of this baseline example, I can then make alterations from it to achieve the color shifts. I think if this was done with optical printers and making copies, this is still possible at least in some equivalent method. The simplest of this would be taking pictures of pictures on a light table with filters I'm imagining? Or a color enlarger?

As for keeping this analog, I'm sure this can all be exactly replicated to a T with a digital process (just playing around with the channels and curves), but I wanted to see if I could try to keep it as original as I could and maybe it would lead me to some other discovery.
 

koraks

Moderator
Moderator
Joined
Nov 29, 2018
Messages
27,433
Location
Europe
Format
Multi Format
Ok, so to be clear on this, you're looking not to recreate moving images, but stills, right? That makes matters more practical for sure.

In terms of output, what are your requirements? Does it need to be positive or is a final output on color negative film OK? What kind of size/format does it need to be?

In general, yes, you could use a color enlarger. That has the advantage of having built-in filters. You could also contact print and use a filtered light source. In principle there are several ways to do this; it depends a bit on the answer to the questions I asked above.
 
OP
OP

gelat0

Member
Allowing Ads
Joined
Feb 3, 2026
Messages
8
Location
Jupiter
Format
Multi Format
Correct, not moving images, but rather stills that accomplish the same color shifts. In terms of output my only constraint is I want to end up with a color positive with these effects. 'Final' output on color negative is OK, because I can always print to color from this.

As far as format, I was thinking the best option is to do 6x6cm medium format (considering what I have available), if I am to go the pictures of pictures on a light table route. Eventually scaling up if I wish to do so with 4x5 for instance.
 

koraks

Moderator
Moderator
Joined
Nov 29, 2018
Messages
27,433
Location
Europe
Format
Multi Format
Okay, 4x5 is going to cost ya, just see the current price point of sheet color film. You'll probably think twice!

Personally I'd start with something I could easily obtain or already have - in my case that would probably be some bulk-rolled Kodak Vision3 50D and some Kodak Double X, also bulk. That's because I have it on hand, not because it would be the best choice. If you're going to purchase materials, you could try and see if you can find any Kodak duplicating film; I think there's still one active product line and you may be able to obtain some of that. It'll be slow, which is nice if you're going to expose it in the darkroom. Normal camera film is uncomfortably fast for that, but with sufficient ND filtering (or very short exposures) you can still make it work.

I'd start with 35mm for the simple fact that you can generally find bulk film of some kind (esp. the B&W stuff) and also because it's fairly easy to experiment with as you can just load some into a cassette and use little bits of it for experiments. 120 is more fussy since you have to use a whole roll at a time or respool it onto something that can be made light proof between exposures/sessions. Cost per length unit are also lower for 135 but in terms of film surface the difference is not so great. However, depending on the size you'll want to print at, 135 may be good enough.

For final presentation I'd just print optically onto RA4 provided the whole workflow really needs to be analog. Otherwise scan and inkjet (but if that's permissible, I'd do the whole damn thing digitally to begin with). The reason here is that it'll be more flexible in terms of adjusting the final look without having to do the difficult bit over if you don't like the result. If you are bent on something that can be projected, pick up some E100D, but honestly, I'd start with regular CN film.

If you can't get the motion picture film, just start with something like Kodacolor 100 or ProImage 100 for the color part and maybe something simple like Fomapan 100 or Harman Kentmere 100 or so.

Undoubtedly someone will come along and point out that for perfect toe behavior you really need TMAX and a fancy developer and blah blah, but really, I'd just start simple with whatever you can get your mitts on and see how it goes; there'll be plenty of opportunity to complicate matters once you've figured out the mechanics.
 
OP
OP

gelat0

Member
Allowing Ads
Joined
Feb 3, 2026
Messages
8
Location
Jupiter
Format
Multi Format
Okay, 4x5 is going to cost ya, just see the current price point of sheet color film. You'll probably think twice!

Personally I'd start with something I could easily obtain or already have - in my case that would probably be some bulk-rolled Kodak Vision3 50D and some Kodak Double X, also bulk. That's because I have it on hand, not because it would be the best choice. If you're going to purchase materials, you could try and see if you can find any Kodak duplicating film; I think there's still one active product line and you may be able to obtain some of that. It'll be slow, which is nice if you're going to expose it in the darkroom. Normal camera film is uncomfortably fast for that, but with sufficient ND filtering (or very short exposures) you can still make it work.

I'd start with 35mm for the simple fact that you can generally find bulk film of some kind (esp. the B&W stuff) and also because it's fairly easy to experiment with as you can just load some into a cassette and use little bits of it for experiments. 120 is more fussy since you have to use a whole roll at a time or respool it onto something that can be made light proof between exposures/sessions. Cost per length unit are also lower for 135 but in terms of film surface the difference is not so great. However, depending on the size you'll want to print at, 135 may be good enough.

For final presentation I'd just print optically onto RA4 provided the whole workflow really needs to be analog. Otherwise scan and inkjet (but if that's permissible, I'd do the whole damn thing digitally to begin with). The reason here is that it'll be more flexible in terms of adjusting the final look without having to do the difficult bit over if you don't like the result. If you are bent on something that can be projected, pick up some E100D, but honestly, I'd start with regular CN film.

If you can't get the motion picture film, just start with something like Kodacolor 100 or ProImage 100 for the color part and maybe something simple like Fomapan 100 or Harman Kentmere 100 or so.

Undoubtedly someone will come along and point out that for perfect toe behavior you really need TMAX and a fancy developer and blah blah, but really, I'd just start simple with whatever you can get your mitts on and see how it goes; there'll be plenty of opportunity to complicate matters once you've figured out the mechanics.

I have images that I would like to do this on that would also be a good example or test (also easy to color balance, like a photo of clouds). Images shot on ektar 100 and provia 100f. For the Internegatives I was planning on delta 100 to keep things consistent as fair as grain.

If I start with a color negative and go through the process I mentioned earlier of:

"
regular color negative film
|
v
Shoot copies of this onto BNW negative stock, with corresponding filters (YCM) and correctly (exposure) compensating for each, so they have the same gamma
|
v
in rejoining them with a triple exposure, you shoot the corresponding BNW strips onto color negative film with the same filters they were made from (YCM) ?
|
v
You then arrive at a color negative with the separated channels combined, and can recombine back onto a slide with a triple exposure through YCM filters.
"

Would you say this is a logical path to first get back to the source image, based on the quotes I gave? And what would happen if I instead started-

color positive
|
v
Shoot copies of this onto BNW negative stock, with corresponding filters (YCM)
|
v
in rejoining them, you shoot the corresponding BNW strips onto color POSITIVE film with the same filters they were made from (YCM)
|
v
You then arrive at a color positive with the separated channels combined.

Or would I need to make more copies of the internegatives and make bnw interpositives to be able to go from bnw separations to color positive?
 

koraks

Moderator
Moderator
Joined
Nov 29, 2018
Messages
27,433
Location
Europe
Format
Multi Format
In very general terms, yes. The devil is in the 1000 details and the 10,000 hours of work needed to make either of these processes work reliably.

Edit: the 10k hours is of course a bit of an exaggeration if you're looking for a proof of concept initially. I think you can get somewhere with as little as maybe 100-200 hours of work or so, depending on what experience you have.
 

Lachlan Young

Member
Allowing Ads
Joined
Dec 2, 2005
Messages
5,109
Location
Glasgow
Format
Multi Format
Its essentially about making a set of RGB colour seps and some creative messing around with them before printing them back in 'wrong' order.

If you're working with non moving subject matter (I'm assuming you don't have a one-shot camera), you could even make direct B&W separations.
 
Last edited:
OP
OP

gelat0

Member
Allowing Ads
Joined
Feb 3, 2026
Messages
8
Location
Jupiter
Format
Multi Format
Its essentially about making a set of RGB colour seps and some creative messing around with them before printing them back in 'wrong' order.

If you're working with non moving subject matter (I'm assuming you don't have a one-shot camera), you could even make direct B&W separations.

Was this done with RGB filters or YCM filters? YCM filters would yield minus red, minus green etc. on a bnw negative. Right? I guess it could mean YCM separations and these are made with RGB filters from color neg -> bnw? Or could be accomplished with either
 

Yezishu

Member
Allowing Ads
Joined
Dec 21, 2024
Messages
183
Location
Hong Kong
Format
35mm
Concept is simple; the challenge lies in details. I also suggest experimenting in digital first to observe the expected results.
For example, I just came across the description of Kodak RGB separation in Photographic Chemistry, Volume II By Glafkides.

In Chapter 31: Color Reproduction, they start from a color negative and use RGB filters—Wratten 70 + Corning 2403; Wratten 16 + 61 + Corning 3484 + 5032; and Wratten 47B + 2B + Corning 5543—to print three black-and-white separation positives on Eastman panchromatic Separation film 5235. Wratten 47B + 2B = Wratten 98, and Wratten 16 + 61 = Wratten 99.

Then, they use Wratten 29 + Corning 2412; Wratten 16 + 61 + Corning 3484 + 5032; and Wratten 47B + Corning 5543 to print a color internegative (such as in the Eastman Color Intermediate Film 5253), before finally printing the release copies.

The YCM system also works, but the practical problem is that for a one color light shift(e.g., red), two color components need to be adjusted.
 
Last edited:
OP
OP

gelat0

Member
Allowing Ads
Joined
Feb 3, 2026
Messages
8
Location
Jupiter
Format
Multi Format
Concept is simple; the challenge lies in details. I also suggest experimenting in digital first to observe the expected results.
For example, I just came across the description of Kodak RGB separation in Photographic Chemistry, Volume II By Glafkides.

In Chapter 31: Color Reproduction, they start from a color negative and use RGB filters—Wratten 70 + Corning 2403; Wratten 16 + 61 + Corning 3484 + 5032; and Wratten 47B + 2B + Corning 5543—to print three black-and-white separation positives on Eastman panchromatic Separation film 5235. Wratten 47B + 2B = Wratten 98, and Wratten 16 + 61 = Wratten 99.

Then, they use Wratten 29 + Corning 2412; Wratten 16 + 61 + Corning 3484 + 5032; and Wratten 47B + Corning 5543 to print a color internegative (such as in the Eastman Color Intermediate Film 5253), before finally printing the release copies.

The YCM system also works, but the practical problem is that for a one color light shift(e.g., red), two color components need to be adjusted.

This is good insight, and thank you for the reference!
 

Lachlan Young

Member
Allowing Ads
Joined
Dec 2, 2005
Messages
5,109
Location
Glasgow
Format
Multi Format
Was this done with RGB filters or YCM filters? YCM filters would yield minus red, minus green etc. on a bnw negative. Right? I guess it could mean YCM separations and these are made with RGB filters from color neg -> bnw? Or could be accomplished with either

Your red sep is your cyan printer, green sep is magenta printer and blue sep is yellow printer. You separate with RGB and you print back to a colour print stock with RGB.

In the classic Technicolor process the relevant separations would be used to make imbibition matrices that would transfer the relevant CMY dyes to a mordanted blank.

Standard stuff, if you understand the ways that industrial colour separation was done. There's a lot of manipulation that can be done on the B&W separations.
 
OP
OP

gelat0

Member
Allowing Ads
Joined
Feb 3, 2026
Messages
8
Location
Jupiter
Format
Multi Format
Concept is simple; the challenge lies in details. I also suggest experimenting in digital first to observe the expected results.
For example, I just came across the description of Kodak RGB separation in Photographic Chemistry, Volume II By Glafkides.

In Chapter 31: Color Reproduction, they start from a color negative and use RGB filters—Wratten 70 + Corning 2403; Wratten 16 + 61 + Corning 3484 + 5032; and Wratten 47B + 2B + Corning 5543—to print three black-and-white separation positives on Eastman panchromatic Separation film 5235. Wratten 47B + 2B = Wratten 98, and Wratten 16 + 61 = Wratten 99.

Then, they use Wratten 29 + Corning 2412; Wratten 16 + 61 + Corning 3484 + 5032; and Wratten 47B + Corning 5543 to print a color internegative (such as in the Eastman Color Intermediate Film 5253), before finally printing the release copies.

The YCM system also works, but the practical problem is that for a one color light shift(e.g., red), two color components need to be adjusted.

So after some thought and more research I found these sources that may be of help, but leads me to another question.

https://www.pacificrimcamera.com/rl/04133/04133.pdf
(Mainly page 9 discussing Schemes of Printing 35mm and 16mm Color Prints from 35mm Negatives and referring to the left example)


So my question would be, with the process you described- (using the Wratten 70, 99, and 47B +2B, going from color negative to bnw) is this an "RGB separation process"? In that it refers to the kind of separations that form on the negative when using those corresponding filters. Whereas a "YCM separation process" uses more generic separation filters such as Wratten 25, 58, and 47B in order to create effective yellow, cyan, and magenta representations on the BNW negative? and also the fact that both of these systems use red green and blue filters? but differ in their target separations?
 

Yezishu

Member
Allowing Ads
Joined
Dec 21, 2024
Messages
183
Location
Hong Kong
Format
35mm
So after some thought and more research I found these sources that may be of help, but leads me to another question.

https://www.pacificrimcamera.com/rl/04133/04133.pdf
(Mainly page 9 discussing Schemes of Printing 35mm and 16mm Color Prints from 35mm Negatives and referring to the left example)


So my question would be, with the process you described- (using the Wratten 70, 99, and 47B +2B, going from color negative to bnw) is this an "RGB separation process"? In that it refers to the kind of separations that form on the negative when using those corresponding filters. Whereas a "YCM separation process" uses more generic separation filters such as Wratten 25, 58, and 47B in order to create effective yellow, cyan, and magenta representations on the BNW negative? and also the fact that both of these systems use red green and blue filters? but differ in their target separations?

Ignoring implementation details, for the same original color image, you can use an Red filter to create a BW image A on a 5235 film. And then use a nagetive image of the original image with Red filter to create another BW image B on another 5235 film. Image A and B are complementary patterns, like a pair of positive and negative film. Contact printing A onto another 5235 film will produce B, and vice versa. This is YCM and RGB separation masters. You could say it preserves Red light intensity, or negative Cyan dye density (or vice versa), which is the same thing under ideal conditions. The specific details lie in the fact that in all filters, all dyes are not ideal and not ideally complementary.

Roughly speaking, I believe Wratten 70 and Wratten 29/32 are generally "usable," but it's best to find a complete process and their corresponding films. You may have noticed that Kodak uses Wratten 70 for color separation and Wratten 29 for color merging; this is related to the differences in the source film, target film, and the light source of the printing press. Therefore, Kodak (in this case only) felt that a different filter should be used.
 
Last edited:
OP
OP

gelat0

Member
Allowing Ads
Joined
Feb 3, 2026
Messages
8
Location
Jupiter
Format
Multi Format
Ignoring implementation details, for the same original color image, you can use an Red filter to create a BW image A on a 5235 film. And then use a nagetive image of the original image with Red filter to create another BW image B on another 5235 film. Image A and B are complementary patterns, like a pair of positive and negative film. Contact printing A onto another 5235 film will produce B, and vice versa. This is YCM and RGB separation masters. You could say it preserves Red light intensity, or negative Cyan dye density (or vice versa), which is the same thing under ideal conditions. The specific details lie in the fact that in all filters, all dyes are not ideal and not ideally complementary.

Roughly speaking, I believe Wratten 70 and Wratten 29/32 are generally "usable," but it's best to find a complete process and their corresponding films. You may have noticed that Kodak uses Wratten 70 for color separation and Wratten 29 for color merging; this is related to the differences in the source film, target film, and the light source of the printing press. Therefore, Kodak (in this case only) felt that a different filter should be used.

That was very well put thank you.

So rather it is a matter of what you are referring to, dyes or light. And I think because of how catered those filters are to the example process you mentioned, these or more ‘general’ filters can be used in my experimental case
 

koraks

Moderator
Moderator
Joined
Nov 29, 2018
Messages
27,433
Location
Europe
Format
Multi Format
a "YCM separation process"
CMY filters are used for subtractive printing, not for making separations, although you could use CMY filters for separations, but you'll have to combine two at a time, and the filters may need to have a higher attenuation than those found in typical color enlargers to make clean separations. To isolate out the red channel, use yellow + magenta. To isolate green, use cyan + yellow. To isolate blue, use cyan + magenta. Look at the transmission curves, e.g. these:
1770279518830.png

(from here)
You'll notice none of the filters selects for a single color channel, which is why you need to use two to get R, G or B.

You could use CMY filters for your idea since you likely have easy access to them (i.e. a color enlarger). If, at a later stage, you want to optimize quality (i.e. get cleaner separations with less crossover), you would probably end up with an actual RGB separation system using either filters, or monochromatic light sources (e.g. RGB LEDs).
 
Photrio.com contains affiliate links to products. We may receive a commission for purchases made through these links.
To read our full affiliate disclosure statement please click Here.

PHOTRIO PARTNERS EQUALLY FUNDING OUR COMMUNITY:


Ilford ADOX Freestyle Photographic Stearman Press Weldon Color Lab Blue Moon Camera & Machine
Top Bottom