Bill Burk
Subscriber
- Joined
- Feb 9, 2010
- Messages
- 9,154
- Format
- 4x5 Format
I've been working up a system with the help of Stephen Benskin and other APUG members as we go along...
It's close enough to working to discuss...
My idea is that different sides of the brain are involved in different aspects of photography.
In the field taking pictures and in the darkroom making prints - creativity is important.
In the lab testing and developing film, deciding film speed - analytical process is important.
---
So I picked pieces from different concepts and chose processes that I like according to how well they work with how my brain works at different times.
Taking pictures, I use traditional Zone System nomenclature. I spot a shadow and place on Zone II. I spot caucasian flesh and place on Zone VI. I can spot highlights and place on Zone VII. All the placing and N developing nomenclature is available and usable pretty much as is.
---
Then I go to the darkroom. Here it's sensitometry all the way. Film tests are run and graphed. Time/CI chart is devised. Control is established so that I can hit any CI that I desire (or at least know when I'm out of control). I also can know the effective EI from the graphs.
---
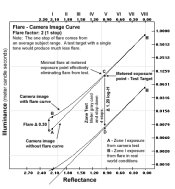
EI - the variable I change to place my exposures where I want them on the film curve. I originally started arbitrarily at half box speed (primarily to give shadows full exposure), but I found results consistently denser than necessary - I now use one-third stop up from half box speed.
---
Film developing. Knowing my Subject Brightness range - after all I did mark each sheet N, N+1, N-1 or made notes about the overall conditions for the roll.
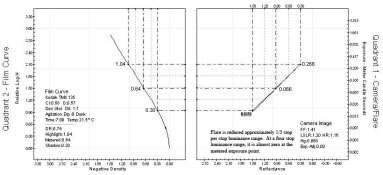
I target either 1.05 or 0.95 Log Exposure Range (LER) because my specification for a quality negative is to never have a worse negative than two real negatives of mine. They were difficult but successful prints. I call them my upper control limit 1.18 and lower control limit 0.86. You must choose your own specification for a quality negative of your own. Because I use Galerie 2 and Galerie 3 on a DII with Omegalite that's where I came out with my own aim point.
In the Zone Placement thread...
(there was a url link here which no longer exists)
Stephen Benskin provides a chart that tells what CI to develop to in order to get a desired LER
(there was a url link here which no longer exists)
So I develop according to my Time/Contrast Index chart (derived from family of sensitometry).
---
Then it comes to the darkroom for printing. Creative mind takes over the high-tech analytical side shuts down...
Now I have negatives that are likely to fit Grade 2 or Grade 3 paper. That's all I have. So I make a call. Is the neg kind of thin or kind of contrasty. Not a tough call. I pick Grade 2, make a test strip by F/Stop times in third-stop increments. Take a look at the result, try to estimate dry-down (I use Fiber Based paper). I sketch out my burns and dodges.
This is where having a negative that prints well on Grade 2 is a pleasure. The burns and dodges have the effect I was going for. Usually I will see "something" wrong and have to print again for an improvement. Like Bob Carnie, I make 3 prints. Like ROL, sometimes I make a noticeable improvement each time.
It's close enough to working to discuss...
My idea is that different sides of the brain are involved in different aspects of photography.
In the field taking pictures and in the darkroom making prints - creativity is important.
In the lab testing and developing film, deciding film speed - analytical process is important.
---
So I picked pieces from different concepts and chose processes that I like according to how well they work with how my brain works at different times.
Taking pictures, I use traditional Zone System nomenclature. I spot a shadow and place on Zone II. I spot caucasian flesh and place on Zone VI. I can spot highlights and place on Zone VII. All the placing and N developing nomenclature is available and usable pretty much as is.
---
Then I go to the darkroom. Here it's sensitometry all the way. Film tests are run and graphed. Time/CI chart is devised. Control is established so that I can hit any CI that I desire (or at least know when I'm out of control). I also can know the effective EI from the graphs.
---
EI - the variable I change to place my exposures where I want them on the film curve. I originally started arbitrarily at half box speed (primarily to give shadows full exposure), but I found results consistently denser than necessary - I now use one-third stop up from half box speed.
---
Film developing. Knowing my Subject Brightness range - after all I did mark each sheet N, N+1, N-1 or made notes about the overall conditions for the roll.
I target either 1.05 or 0.95 Log Exposure Range (LER) because my specification for a quality negative is to never have a worse negative than two real negatives of mine. They were difficult but successful prints. I call them my upper control limit 1.18 and lower control limit 0.86. You must choose your own specification for a quality negative of your own. Because I use Galerie 2 and Galerie 3 on a DII with Omegalite that's where I came out with my own aim point.
In the Zone Placement thread...
(there was a url link here which no longer exists)
Stephen Benskin provides a chart that tells what CI to develop to in order to get a desired LER
(there was a url link here which no longer exists)
So I develop according to my Time/Contrast Index chart (derived from family of sensitometry).
---
Then it comes to the darkroom for printing. Creative mind takes over the high-tech analytical side shuts down...
Now I have negatives that are likely to fit Grade 2 or Grade 3 paper. That's all I have. So I make a call. Is the neg kind of thin or kind of contrasty. Not a tough call. I pick Grade 2, make a test strip by F/Stop times in third-stop increments. Take a look at the result, try to estimate dry-down (I use Fiber Based paper). I sketch out my burns and dodges.
This is where having a negative that prints well on Grade 2 is a pleasure. The burns and dodges have the effect I was going for. Usually I will see "something" wrong and have to print again for an improvement. Like Bob Carnie, I make 3 prints. Like ROL, sometimes I make a noticeable improvement each time.