• Welcome to Photrio!
    Registration is fast and free. Join today to unlock search, see fewer ads, and access all forum features.
    Click here to sign up

"Window" coating for paper emulsion? Would this idea be reasonable?

Somewhere...

D
Somewhere...

  • 2
  • 1
  • 27
Iriana

H
Iriana

  • 5
  • 1
  • 82

Forum statistics

Threads
202,734
Messages
2,844,830
Members
101,492
Latest member
code0312
Recent bookmarks
0

grainyvision

Subscriber
Joined
Feb 19, 2018
Messages
695
Location
Seattle
Format
Multi Format
I've been reading through Denise Ross's excellent paper coating book, but looking over each different proposed method, none of them seem ideal for my situation though, limited working room (but ample drying room, a dark cabinet) and no ability to really get a super level (previously said flat. I can get flatness) surface in my current setup. (I do plan on building a large dedicated darkroom eventually, but I want to mess around with emulsions before then!)

Anyway, the big concerns I have for coating are:

* Consistency! I understand it's difficult to really determine how good the coating is while under safelights. I want a method that I can use to get consistent emulsion thickness and covering, even if that means some waste of emulsion and paper
* Being able to clearly mark (and potentially then cut) where the emulsion borders in and knowing absolutely sure that within those borders is good and printable.
* Not requiring a huge amount of space. I'm ok with coating fairly small sizes at this stage, like the final printable size being 4x6 and maybe on 5x7 total paper size. 8x10 would be as big as I'd imagine going until I get a much larger dedicated darkroom.

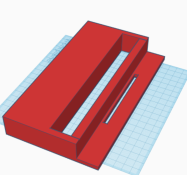
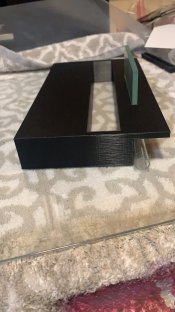
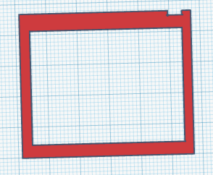
The idea I'd like feedback on is where I 3D print (or alternatively get a thin sheet of metal custom fabricated) a simple "window frame", of appropriate thickness (4 or 5 mils) and with the open window having an appropriate printable size (ie, 4x6) and the "frame" being enough room to hold onto (ie, 1/2" so that I can easily do 4x6 emulsion area on 5x7 cut paper) and figuring out some way of clamping it or simply weighting it down onto the paper so that it stays precisely lined up. Assuming I want to cut the paper down to only emulsion area, then I'd trace around the window using a pencil or marker and use that as a guide for cutting under safelight. With the frame affixed onto the paper, I'd use a puddle pusher (or very straight metal blade) to actually move the emulsion. The idea would be using slightly more emulsion than actually needed, and put it at the top of the "window" and drag the puddle pusher down, then push it back up to flatten out the top of the window where the emulsion was placed. Ideally I can even add additional emulsion if determined to be needed by calibration tests and drag the window with the puddle pusher multiple times to get it perfectly consistent. I'd expect some emulsion will go under the frame, but this isn't a big concern. Note the frame here would be flexible (glass of this thickness would be very fragile, nothing else can be rigid at this thickness) but I don't think this is a real problem. In theory the frame can be either clamped on all sides or just held down by the over-length of the puddle pusher as needed.

Finally, after coating, I'd just move the paper to a dark cabinet for drying (unsure how big of a concern flatness is for drying? If it's a bigger concern than I think, then I'd follow the stuff in Denise's books to clamp the paper down to keep it flat)

Does this idea have a name already and/or does it seem at all reasonable? I feel like there is probably something I'm missing as I don't see why it wouldn't already be an established method.
 
Last edited:
Decided to test it a ~0.15mm (kinda thick for paper but should be usable) "window" using the food coloring+food grade gelatin method and some cheap matte inkjet paper I had laying around that is probably far from ideal for this... Regardless, my coating technique needs some work but it does seem to have some merit. I got maybe 2 or 3 successful looking coatings but I think my gelatin wasn't mixed properly. This is definitely a messy process with a lot of waste at least with my rudimentary technique (using too much or too little emulsion. I also vastly underestimated how quickly the gelatin begins to setup when it hits cold paper and a cold puddle pusher, it's impossible to get consistent results with a double swipe method, so instead I fill the top of the window and then just wipe it down, making sure to wipe a bit past the window to make sure none leaks in and makes the bottom of the window too thick. Also, the window and puddle pusher must be cleaned after each coating, though that is a simple rinse for the window and rinse+wipe for the puddle pusher.

Also, 3D printing-wise, this is something my printer can just barely handle and the window itself is rather fragile but very fast and cheap to print. Before trying a real coating I'd probably make sure I had 5 windows or more printed to account for handling ruining the window (on my printer it's only 3 layers!). The window "frame" would definitely be nice to have more than 1/2" of width to hold onto, but it's easily usable. I don't think I'd want to decrease the width though it should be possible and incur less waste. The window naturally sticks to the wet paper without any need I think for clamping or weights, which should make this fairly fast, especially if I had the room to factory line it where I setup say 4 sheets, then coated the sheets, then waited a minute for gelatin to begin to harden and removed the windows, move coated paper to cabinet and setup for another 4 sheets etc.
 
First, for your 3D printed frame idea - you could put the paper on a metal easel and use magnets to secure the frame.

Second, how about screen printing the emulsion? It would require some extra equipment but might work. There is screen filler that doesn't require UV to cure from Speedball or their blockout tape. I've never done any coating so I don't know how thick it would be or how fast it sets up.
 
Last edited:
First, for your 3D printed frame idea - you could put the paper on a metal easel and use magnets to secure the frame.

Second, how about screen printing the emulsion? It would require some extra equipment but might work. There is screen filler that doesn't require UV to cure from Speedball or their blockout tape. I've never done any coating so I don't know how thick it would be or how fast it sets up.

I'm currently coating on some simple glass sheets (from frames) because they're easy to clean and what I have. If I could find a not too expensive source of metal sheets like that it could definitely make things easier by using magnets and also easier to clean without risk of breaks. Also could dry "in-place" by putting magnets on top of the prints to keep everything flat. Any ideas of sources of metal sheets ideal for this?

edit: I definitely don't want to sacrifice my metal 4 blade easel for coating. Also I think the blades are too thick anyway
 
Last edited:
Did another test run tonight with a new 3d print and properly mixed food grade+dye gelatin (10% gelatin, 10 drops of photo flo added). This coating was a lot more consistent, but figuring out proper temp and such took some time. Seems that for my setup, best temp is to keep my hot plate at 55C and overall best gelatin temp was ~106. Hard to capture how well the coating looks (despite a non-ideal paper) but I've attached a picture of the result showing coverage. Layer flatness is hard to capture on camera. I'm also not too sure about if the coating is too thick or thin. Think I'll just have to try a real coating to figure that out for sure.

Anyway, process while keeping gelatin temp stable:

Initial setup, standard glass plate on relatively flat (but not perfectly level) surface
Per print:
* take paper out of tray and place onto glass sheet
* put mylar on top of paper
* squeeze water out (eventually will use a proper squeegee but for now tried a few different improvised methods. Rolling a bottle down the paper several times worked good enough)
* remove mylar (double check everything is ready and in place before doing this)
* place window frame on top of paper, ensuring it is flat all the way around (the windows seem to wear out and warp over several coatings, possibly due to using too warm of water in cleaning). If the frame won't lay flat it might be warped. you should have a few window frames printed and ready to use if this happens
* (optional) mark using a pencil or marker the edges of the frame for later cutting (you can mark inside the frame if you later want to cut to only include the printable area
* For 3.75x4.75" printable area size, 2-3ml seemed to be the proper amount of emulsion. Draw up emulsion into syringe
* "flood" emulsion on the top of window frame (make a fairly straight line pour at the top of the printable area). It's ok if the emulsion goes over the top of the frame a bit, though that would be wasted emulsion
* Working quite quickly, put untaped puddle pusher at the top of the frame
* Moving quickly, and using a fair amount of pressure, pull the puddle pusher down the frame, and going all the way to the bottom being careful not to nudge the frame
* Coating is "done"

Clean up/swap process
* Quickly rinse off emulsion from the puddle pusher, wipe with a clean dry cloth afterwards and place somewhere clean
* Quickly rinse syringe of emulsion
* carefully peel up the window frame (some emulsions might require waiting a bit before doing this to ensure setup has begun)
* Clean window frame with not too hot of water, rubbing with fingers to ensure all emulsion is removed. Note that a 3d print this thin can easily be stretched, so handle with care.
* Carefully peel up the paper from one side, furthest away from printable area (this is easier if using oversized paper that you can slightly drape off the edge of the glass)
* Move the paper to a flat drying area (perfect flat and levelness seems to not matter too much here, but does matter some. Don't want an obviously tilted surface)
* Wipe glass with a wet cloth to remove any left behind emulsion (rinse this cloth every couple of times with hot water)
* Wipe glass with a dry and fairly clean cloth
* Ready to do the per-print setup again

Biggest problem with this process is that it seemed to really want to create little divets/thin spots in the middle emulsion. That seemed to mostly go away by doing the puddle pushing movements fast, but could've also been a paper/gelatin issue. The overall thickness seemed to be very consistent otherwise within the printing area/window frame
 

Attachments

  • IMG_3929.jpg
    IMG_3929.jpg
    408.5 KB · Views: 169
  • upload_2020-6-18_3-2-10.png
    upload_2020-6-18_3-2-10.png
    276.3 KB · Views: 163
Last edited:
Finally got some calipers.. they're just cheap ones without a calibration certificate or anything, but seem pretty reasonable and state an accuracy to +/-1 mil and resolution of 0.5 mil. Measuring my window frame, pretty much regardless of the different print settings used in testing, they're all about 10 mils. Definitely thick for paper coating, but also has been regarded as "fine" by the great Denise and PE (apparently thicker means more contrast. I like contrast anyway :smile: 
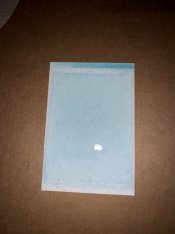
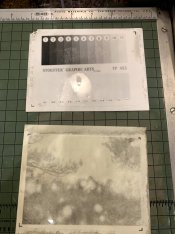
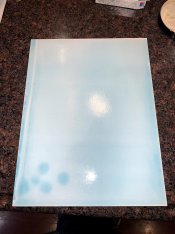
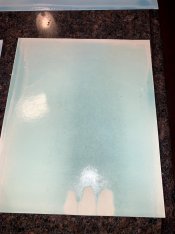
). Measuring the actual coating is where things get weird. No matter how I measure I see that the coating is no thicker than 2mils, and is often more like 1 mil. This is within measurement error, but wondering if maybe my emulsion was too warm or absorbed into the paper I used. I also tried wet measurement where the difference looked more like 4 mils. Measuring paper like this is definitely up against the capabilities of these cheap calipers so I'll take it with a grain of salt while assuming the frame thickness measurement is right, which basically means I'm coating at 10 mils which should work. I'll be trying to make a simple chloride contact printing emulsion this weekend and report back with how it works with a real emulsion on my more expensive water color paper (though I'll try this inkjet paper as well, it shows some promise maybe and it'd be great to have a cheap paper for testing)
 
Sounds like the emulsion shrinks as it dries. Good luck with it. Its possible to coat again if the overall dried thickness need to be greater.
 
I coat for POP emulsion using fixed out baryta paper but it shouldn't be any different than what you are doing
I tape a sheet of paper on to a piece of glass and use a Meyer rod heated to 120 degrees to coat. works every time.
 
I finally made a real emulsion and coating tonight. Wow, slightly more complicated and time consuming than expected, but on the plus side I have pretty much exactly enough drying space for ~30 4x6 sheets. The window method was a success after I figured out all the things wrong with my setup. Biggest thing is not nearly enough temp control. My hot plate has an automatic temperature feature (with probe) which I used for the water bath... turns out it's kind of a terrible "feature" and accuracy is somewhere in the range of +/- 6C. At the end when I used an alt thermometer (laser temp gun) on the emulsion itself, I figured out that I had been coating at much too low of a temperature and had much better luck with the coating after getting the temperature right. Basically I need the hot plate setting to be 52C to get the emulsion surface temp to 40C. (which is colder than below the surface, but still was much more accurate than relying on my probe). The process itself wasn't too bad, but quite time consuming. It took about 2 hours to get the coating done after the emulsion was completed (though with ~20 minutes in there waiting on temp corrections) Some of it was lack of practice (didn't plan on coating "film" but I did accidentally coat a ziploc bag) and others was a few problems other than temp.

* Near the end I had weird syringe clogging problems. Where I'd squirt out the emulsion, but it'd seem to get clogged, leading to overshooting the "flooding" of the top of frame and was a big waste of emulsion. This might just be due to the emulsion need to be kept warm for so long. The problem always went away when using a new syringe, and seemed to get worse after rinsing with hot water. Anyone have any tips for this? I can use a new syringe occasionally, but for each sheet of paper is kind of crazy
* The frame was sometimes time consuming to clean. Using warm water (but not hot!) made this a lot easier than with cold water. I also ruined one out of 4 frames during the process
* Sometimes the frame would move slightly during coating. There is a fairly precise amount of pressure needed on the puddle pusher to get a good coating without moving the frame. Tape would probably help in the future
* Despite the food grade gelatin tests, best results were by using a comparably slow speed of pulling the puddle pusher. This took a while to figure out though due to the temp problems I had
* I found it best to "rotate" frames to use the least recently cleaned frame next and to place the frame face up on a dry clean cloth. This allowed for minimal residual water to be left on the frame
* small beakers are annoying. Already spilled my first silver nitrate solution in set up and got my first silver nitrate stain on my fingers (normally wear gloves and wore goggles during addition/mixing, but since I was setting up I let my guard down heh)
* Because of the temp problem, it's very likely that ripening was done at a lower than expected temperature. Unsure how this will affect the actual image characteristics.

I also found out that the cheap inkjet paper does seem to actually work for real coating. I got a good coating with the last bit of emulsion I had, no idea if it's hold up to processing though. I also tried an experiment at the same time of using two frames for a "variable" size emulsion. Basically not containing the emulsion within an actual frame but rather using the frame only for setting emulsion thickness and size, and pouring from a beaker more free form. I actually got my best coating from this, likely because pouring emulsion from a beaker rather than syringe seems more consistent despite being significantly less convenient and less easy to measure.

I halved the batch of emulsion so I can attempt coating again at some later point. Knowing the temp problem I think I'll have much better luck next time, but I want to figure out the syringe problem first
 
Still waiting on all the paper to dry, but the emulsion is interesting for sure despite the coating problems. It's a very slow speed (almost too slow for using an enlarger light source for contact printing) and definitely too slow to use an enlarged image for anything. It's also much lower contrast than expected. According to examples in Denise's book it should only give around 8 steps or so of range, but mine (despite slightly under exposed) reveals at least 14 steps using Ansco 130 1+1 for 3m. I did fixing using TF-4 for 1m, a few small spots appeared so I should probably slightly extend fixing time. I didn't use any hardener but the emulsion seems to hold up well in processing. Rub tests had to be fairly rough to get the emulsion to thin out. The bottom paper is a crane watercolor paper (sold by formulary) that really doesn't seem to hold up in processing. It is coated backwards in this example though which may have affected that. The step wedge print was on the platinum rag sold by formulary. It held up with absolutely no problems in processing and in general is a lot more attractive to me both in visual appearance and feel
 

Attachments

  • IMG_3944.jpg
    IMG_3944.jpg
    359.2 KB · Views: 160
Unsure how well this will actually work, but with the next coating I'll be trying out something heavily inspired by the mowery blade. Specifically the idea of containing the emulsion in a well, but instead of needing to get a super precise gap, using the flat surface of a print on my 3d printer bed on top of the window frame to set the thickness to about 10mil. My biggest concern about a method like this is blade flatness. My printer bed is textured so it'll retain some texture on the under side. I could sand it down a bit, but that must be done very carefully. Also if very much pressure is used in coating the part will bend slightly, even with a setup made to be fairly inflexible (25% infill). ABS would likely work much better for this than PLA since ABS tends to be much harder and less flexible

upload_2020-6-22_13-18-57.png
 
I've officially given up on the window coating method. It still could potentially work, but it's just too time consuming and my printer can't fit a 8x10 window coater which would make it more efficient. So, instead I printed a 3d printer adapted version of the Mowrey blade, but with a taped puddle pusher instead of an actual blade. Instead, I'd call it an emulsion "well" and it has an opening that's about 20mils thick. The puddle pusher then has tape on it setting the overall thickness to 6mils and sits flush against the well opening. Despite it sitting flush, there is still some leaking around the puddle pusher, resulting in thick edges. Tests seemed good but had the strange effect with food grade gelatin+dye. The emulsion seemed to be a little bit thicker in the middle than on the edges. This could even be the glass I'm coating on top of not being greatly flat.

In addition I found a very interesting way to avoid the syringe clogging problem (as well as minimize safelight exposure, air bubbles, and evaporation changes). Film canisters are air/water tight and hold ~30ml of emulsion when full, I fill it instead to around 20ml. I use a small sous vide bath to keep the emulsion at coating temperature (the sous vide needs to be a few degrees higher than the target since the canisters float and the air exposure makes things a bit cooler.

(note drop marks are from accidentally dripping the emulsion on the paper)
 

Attachments

  • upload_2020-6-30_2-32-9.png
    upload_2020-6-30_2-32-9.png
    402.3 KB · Views: 162
  • 776247BB-88BF-4EDD-B19C-0A68F470F275.jpg
    776247BB-88BF-4EDD-B19C-0A68F470F275.jpg
    394.2 KB · Views: 161
  • IMG_3979.jpg
    IMG_3979.jpg
    506.4 KB · Views: 179
  • IMG_3978.jpg
    IMG_3978.jpg
    366.4 KB · Views: 152
I would think a 400 mesh stainless steel silkscreen would give you better results than that. The mesh might create a fine pattern but if the viscosity it right it settles to a smooth surface before it has a chance to dry. The screen is easily masked to print the desired area.
 
I do wish you'd give this try: http://thelightfarm.com//cgi-bin/newcarousel/htmlclanslidegen.py?chapter=papercoating
I think you might be making coating more difficult than it is. Also, gelatin isn't the best practice material. Melted gelatin does not behave like emulsion. The page I posted will give you some options for faux emulsion. If you are limited for space, you can coat each sheet of a separate pieces of glass or granite tile and stack the sheets in a cabinet or with spaces between so that the sheets don't touch.
 
I use oversized syringes from the veterinarian; they work quite well
as Denise said there is absolutely no reason to reinvent the wheel
I'm taping the paper onto glass and attaching the top and bottom; then fill the syringe; grab my coating rod and go for it
usually 10 sheets of 11x14 in a session. emulsion held in a water bath.
after the emulsion sets I cut the tape away from the glass and hang the paper to dry; takes about 20 minutes for it to set.
 
I do wish you'd give this try: http://thelightfarm.com//cgi-bin/newcarousel/htmlclanslidegen.py?chapter=papercoating
I think you might be making coating more difficult than it is. Also, gelatin isn't the best practice material. Melted gelatin does not behave like emulsion. The page I posted will give you some options for faux emulsion. If you are limited for space, you can coat each sheet of a separate pieces of glass or granite tile and stack the sheets in a cabinet or with spaces between so that the sheets don't touch.

I wish you had included that faux emulsion recipe in your book! Will definitely have to try that since the paper can be reused. My main constraint is drying space. I live in Colorado so humidity is always low, but I guess due to the local humidity of a closed cabinet, one test coating took 3 days before all the sheets were dry! I put a dehumidifer right next to the cabinet and luckily got the time down to just about 36 hours. Still long, but much more reasonable for a shared space (laundry room). The cabinet used is still fairly small. The top shelf is not light tight, but the other 2 shelves are. Without figuring out a stacking method, I'm limited to around 8 9x12" sheets at a time for drying space. I have another cabinet I could potentially use, though that's currently for darkroom chemicals, so a bit of a pain to use.

The coating technique I use is kinda complicated, but I wasn't happy with test coatings using just a taped puddle pusher. A lot of waste, and very difficult to predict what the usable size would be even if I wasted a lot of emulsion (ie, one side runs thin, even when doubling up the amount of emulsion that should be required, every sheet was a bit different in tendencies). A coating bar style system could help, but a few simple tests toward that resulted in thicker edges that were significantly beyond where the tape on the puddle pusher is (it seemed to make a wave type effect since the rod can't be perfectly flush to the metal I used as a rail). That also could've been a food grade gelatin quirk though.

Honestly the coating well needs a few minor tweaks, but actually seems to work well to improve consistency, though some waste is still required of course to get a consistent printable area. It's more difficult to control but I might try it on dry paper next, since that's what the Mowrey blade was actually designed for. I don't understand how good consistent results are achieved there though. In all my tests, I got the expected cupping effect, but the emulsion ran away from the center "peak" of the cup and so when dry it was a thin center coating and very thick edge coating. Dry coating would be a lot easier in my setup if I can manage to get consistent results from it (drying area has a lot of head space for cupped paper, but it would also dry a lot faster)
 
I do wish you'd give this try: http://thelightfarm.com//cgi-bin/newcarousel/htmlclanslidegen.py?chapter=papercoating
I think you might be making coating more difficult than it is. Also, gelatin isn't the best practice material. Melted gelatin does not behave like emulsion. The page I posted will give you some options for faux emulsion. If you are limited for space, you can coat each sheet of a separate pieces of glass or granite tile and stack the sheets in a cabinet or with spaces between so that the sheets don't touch.

That's a handy post, Denise - But I have one tip that's worked well; instead of having guide bars that need to be clamped down, I got 2 pieces of 1/2" angle iron, cut to 24" and painted with gloss rustoleum spray paint. I've stuck self-adhesive rubber weather strip down one side of each. I just set it on the paper, rubber-side-down, its weight + the rubber keeps it from sliding around. (My table wouldn't work with clamps). Works really well.

Also, I stick a damp towel in the freezer while the emulsion is melting, 10 minutes and into a small soft cooler. Once I've coated the paper, I rinse the rod and angle iron strips, lay the towel out folded-over in 2 layers and flat, and rest the glass + paper on it - this really sets the emulsion up fast. I'm coating 16x20 paper and it's working well.
 
The materials and practices of handmade silver gelatin emulsions is classic "work-in-progress." When I wrote my first two books, I hadn't yet developed a better faux emulsion. Melted gelatin works fine; a starch-based suspension works better. It also has the advantage of being a lot less messy to clean up. I had to come up with a non-messy solution for a symposium demonstration last September. I love necessity.

Anyone who has read a bit of my writings on emulsion-making knows I'm all in on collaboration, with everyone encouraged to find their own path forward. Some of those paths stand the test of time -- many do not. My workflow is constantly evolving. I try to share what I know as I go along. I love when anyone does that.

Younger photographers may not know that the practices of "alternative photography" aren't that old. I was at Arizona State University in the early 80s, taking one of the first historical process classes offered (at least in the US). It's hard even for me to remember how primitive everything was. All the processes were just getting a toehold. Getting a decent gum print was practically a miracle. There was no internet for information. Photographers Formulary was almost the only place to buy ingredients. But, little by little, everyone learned and shared and we got to today's state of technical precision that seems like a miracle for dozens of processes.

However, we are still in the very early stages of silver gelatin. There haven't been forty years of hundreds of people working the challenges, but I feel sure that will come. I would love to see earlz, M Carter, Peter, and anyone else interested, publish their coating techniques somewhere in addition to Photrio. Perhaps you could collaborate on a Blurb book. The internet is wonderful, but any one piece of information can get as lost as a small child in a big store, and you never know when a site will disappear.

That's the surprising thing to me entering this crazy space, how relatively little there is on the internet about a doing a process that has been used commercially for over 100 years, at home. Even stuff like different emulsion recipes are hard to come by. I have an in-progress blog post about my coating method, but want a bit more success before I actually publish it. It definitely seems like there's plenty of guidelines, but each method involves a bit of customization for your specific setup and requirements. One day I do think it'd be great fun to write a book on this and a few other topics, but I'm far too inexperienced for that thus far.

Regardless, I'm quickly learning why it's so highly recommended to coat big and cut to size. Keeping emulsion hot enough for coating involves the chemistry changing etc over that time, not to mention spending 2 hours coating emulsion is no fun.

That's a handy post, Denise - But I have one tip that's worked well; instead of having guide bars that need to be clamped down, I got 2 pieces of 1/2" angle iron, cut to 24" and painted with gloss rustoleum spray paint. I've stuck self-adhesive rubber weather strip down one side of each. I just set it on the paper, rubber-side-down, its weight + the rubber keeps it from sliding around. (My table wouldn't work with clamps). Works really well.

Also, I stick a damp towel in the freezer while the emulsion is melting, 10 minutes and into a small soft cooler. Once I've coated the paper, I rinse the rod and angle iron strips, lay the towel out folded-over in 2 layers and flat, and rest the glass + paper on it - this really sets the emulsion up fast. I'm coating 16x20 paper and it's working well.

Maybe it's my humidity (~40%) or room temp (~72F) but I've never wanted for the emulsion to set up faster than it does already. With 4x5 it sets up almost instantly (probably part of my problem heh) but with the bigger 8x10 sheets it did take ~2 minutes or so for a good amount of setup. I don't have a proper space for hanging to dry, so I just move it from the glass sheet to a dry flat in a cabinet. It curls quite a bit, but I can make it work by using some recycled harddrive magnets on my metal easel (warning: easy to pinch your fingers with!) to keep everything flat.
 
Photrio.com contains affiliate links to products. We may receive a commission for purchases made through these links.
To read our full affiliate disclosure statement please click Here.

PHOTRIO PARTNERS EQUALLY FUNDING OUR COMMUNITY:


Ilford ADOX Freestyle Photographic Stearman Press Weldon Color Lab Blue Moon Camera & Machine
Top Bottom