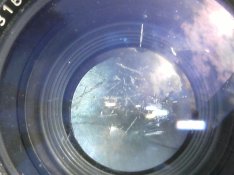
I have just been given an old Rolli s/n W2490506 which looks like one of the first 506 made. I just ordered a repairers cd but the main problem is the scratched taking lens. It is marked Distagon 1:40 f=55 Karl Zeiss. Is I possible to repair this on the cheap with another lens?
-
Welcome to Photrio!Registration is fast and free. Join today to unlock search, see fewer ads, and access all forum features.Click here to sign up
- Home
- Forums
- Analog Workflow Forums (100% Analog/Traditional)
- Analog Equipment
- Camera Building, Repairs & Modification
You are using an out of date browser. It may not display this or other websites correctly.
You should upgrade or use an alternative browser.
You should upgrade or use an alternative browser.
Wide Rolleiflex lenses
-
A
- Thread starter Humphrey
- Start date


Recent Classifieds
-
For Sale Linhof Master Technika '50 Jahre' Edition 4x5 Large Format Camera
- Started by jbprichard
-
Free Zone VI VC Cold Light Head - For Cost Of Shipping
- Started by chuckroast
-
For Sale Acculab VI-400 scale in like new condition. 400 gram capacity.
- Started by MTGseattle
-
For Sale We likely need light seals
- Started by MTGseattle
Forum statistics
- Threads
- 203,520
- Messages
- 2,855,944
- Members
- 101,884
- Latest member
- Nighthawk Studio
- Recent bookmarks
- 2
Wow... You were given a Rollei Wide? Very nice!
My only thought is, are the taking and viewing lenses the same? In which case, they could be swapped.
EDIT: I don't think they are.
Hopefully other, more knowledgeable people will be along soon to confirm or tell me not to be so stupid.
Have you tried it to see if the scratches actually have any affect on the images?
Steve.
baachitraka
Member
Hmm..Rollei wide as a gift. You must be very lucky.
Can we see some photos of the scratch if possible?
Can we see some photos of the scratch if possible?
I would put some film through it and see what effect if any the scratches have. If you're lucky, they might lower the contrast a little but nothing else. They might even have no effect at all except when shooting backlit scenes.
Hi Steve,no such luck . they are a different diameter.
The camera is not ready for use yet as it came to me covered in dust and the front dismantled. Any one know the order of assembly of the left front adjuster?
The camera is not ready for use yet as it came to me covered in dust and the front dismantled. Any one know the order of assembly of the left front adjuster?
Dan Daniel
Subscriber
Download a repair manual here-
http://www.kyphoto.com/classics/repairmanuals.html
pp. 227-240, Weitwinkel-Rollieflex.
Good luck.
http://www.kyphoto.com/classics/repairmanuals.html
pp. 227-240, Weitwinkel-Rollieflex.
Good luck.
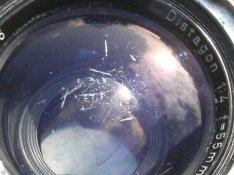
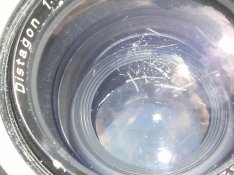
Those are pretty ugly but not beyond salvation. Strange as it might sound, I'd take a black fine-tip Sharpie to the scratches and fill them in. Get a lens shade for it, and use it. At this point, you got the camera for free, so what's the harm in trying? Look around APUG for an old classified ad/discussion thread Jim Galli had posted about a lens that was old, rare, and literally cracked all the way through. It still worked. The scratches on yours are ugly, and certainly harm resale value, but if you keep the sun out of the frame and have the front element well-shaded, you should still be able to make good images.
People ask about polishing and re-coating the lens on their point-and-shoot, and it is never worthwhile. However, it might be worth it to inquire about salvaging that front element.
http://www.focalpointlens.com/fp_services.html
http://www.focalpointlens.com/fp_services.html
The Rolleiwide might be my favorite camera. Amazing glass. Paid a pretty penny for mine in top condition but no regrets. Seeing that lens makes me feel like I'm viewing crime scene photos. 
baachitraka
Member
That looked really nasty and very sad to see indeed!!!
I shot some film and developed it. It looks like that as bad as the scratches are, it does not show. Enlargement might be a different story.
The transport was not counting so after some hours fiddling, I got it working.
Firstly it needs a tool to turn the cam. I made this from 75mm 6mm dia steel rod and some .8mm piano wire. Using a junior hacksaw, cut across the end of the rod and then using this cut as a guide, two other cuts along the sides about 1.5mm deep at the end. With a vice, press the piano wire into the slots and peen over. Cut off the excess wire and fit a handle or cross bar.
I found that Neopan film is about .1mm thick and backing is the same. Take the back and side off the camera. Slide a .3mm feeler gauge between the two feeler rollers and press the lever near the "dead" spool stud. The lever that is in front of the adjustable lever should jump onto the other. a .2mm should do the same but a .1mm should not. No need to wind film until this is done properly. If it is sticking, then clean the sliding parts followed by lube. Try not to lose the spring on the film winder.
- Humphrey
- Deleted
At the moment I am taking out the dark side lenses for cleaning.One of them is now out, but there is a further lens behind the diaphragm that, although i have the retaining ring out, the lens will not come out. I have tried a rubber sucker to no avail. Should it come out from the rear? It is really dirty with water marks on the shutter side.
In all probability, if you're not seeing anything on casual inspection of your negatives, the only impact those scratches will have is to lower contrast and make the lens more flare-prone when there's a light source in the frame. So carefully shade your lens and pay attention to the placement of the sun or any street lamp(s) in the scene and you'll be fine.
I cleaned the shutter and associated mechanisms with Loctite 7039 Electrical switch cleaner.
I am now adjusting the speeds but the 1 second is running at 0.860 fully advanced. I oiled the pinion bearings with shaver oil applied with a cocktail stick. Any ideas why it is running so fast? (Audacity and mike)
I am now adjusting the speeds but the 1 second is running at 0.860 fully advanced. I oiled the pinion bearings with shaver oil applied with a cocktail stick. Any ideas why it is running so fast? (Audacity and mike)
People ask about polishing and re-coating the lens on their point-and-shoot, and it is never worthwhile. However, it might be worth it to inquire about salvaging that front element.
http://www.focalpointlens.com/fp_services.html
That's not scratched, it's gouged. The rule of thumb is if you can feel it with your thumbnail it's beyond polishing.
I'd fill the scratches with India ink and hope for the best.
From Focal Point:" If a scratch is deep enough to feel with your fingernail, then it is probably too deep to repair".
Yes you should.
I suppose I should be happy with .860 as it is within 20% of 1 sec.
An underwater camera could be useful as the rain here is terrible.
At last after repeated testing and adjusting, the results are here.
1/500 250 125 60 30 15 8 4 2 1 sec
.002 .004 .008 .025 .033 .066 .125 .250 .500 1.00 desired ideal
.003 .004 .009 .017 .030 .059 .132 .262 .513 .996 actual results
Obtained with a microphone and Audacity
I found that the ideal tool for bending the detent pins was a blunt
hypodermic needle supplied with a printer cartridge refilling kit.
(used as an oiler.)
Not bad for a 1964 camera?
At last after repeated testing and adjusting, the results are here.
1/500 250 125 60 30 15 8 4 2 1 sec
.002 .004 .008 .025 .033 .066 .125 .250 .500 1.00 desired ideal
.003 .004 .009 .017 .030 .059 .132 .262 .513 .996 actual results
Obtained with a microphone and Audacity
I found that the ideal tool for bending the detent pins was a blunt
hypodermic needle supplied with a printer cartridge refilling kit.
(used as an oiler.)
Not bad for a 1964 camera?
So you've measured the duration of the shutter sounds, not how long the shutter admits light.
Yes I know, people will chime in and say it just as accurate - but based on my comparisons using a contact mike and a photocell, each read simultaneously on one trace of a dual trace oscilloscope with a common timebase it is not "just as accurate".
... but based on my comparisons using a contact mike and a photocell, each read simultaneously on one trace of a dual trace oscilloscope with a common timebase it is not "just as accurate".
So how significant is the measured difference?
So how significant is the measured difference?
Depending on the type of shutter and which speed, the accuracy varies from a decent approximation to useless.
The function of a shutter is to control the duration of admission of light to the film; measuring the duration of the sounds the shutter makes will only work - albeit not really well - at the very slowest speeds. With a focal plane shutter, the results I got were utterly useless at any speeds above the full-gate speed.
| Photrio.com contains affiliate links to products. We may receive a commission for purchases made through these links. To read our full affiliate disclosure statement please click Here. |
PHOTRIO PARTNERS EQUALLY FUNDING OUR COMMUNITY:  |