Why Were My Prints Exposed So Unevenly?

about to extinct

D
about to extinct

  • 2
  • 0
  • 98
Fantasyland!

D
Fantasyland!

  • 9
  • 2
  • 132
perfect cirkel

D
perfect cirkel

  • 2
  • 1
  • 130

Recent Classifieds

Forum statistics

Threads
198,753
Messages
2,780,387
Members
99,697
Latest member
Fedia
Recent bookmarks
9

graciemansion

Member
Joined
Sep 16, 2016
Messages
54
Location
New York
Format
Medium Format
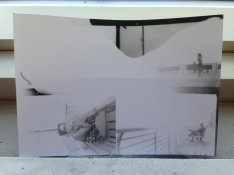
I tried last night to make contact prints for the first time, holding a lamp with a 40 watt bulb over the negative and Fomalux 312 paper in a contact print frame. Every print I made (I tried about 5 times) only had one small, bell shaped part of the image exposed. I tried different lamps and bulbs and every time this happened. For the last one, which I included as an attachment, the bell shape part developed under the developer, and then when I put it in the water bath (I use TF4 fixer) the rest of the image appeared hazily. I can't for the life of me figure out why this is.
 

Attachments

  • File_000 (2).jpeg
    File_000 (2).jpeg
    649.8 KB · Views: 451

DWThomas

Subscriber
Joined
Jun 13, 2006
Messages
4,604
Location
SE Pennsylvania
Format
Multi Format
My first thought is that looks as though the print wasn't wet quickly in the developer. Was the developer deep enough to easily submerge the print? The other question would be how far above the paper was the bulb? I usually use my enlarger as a light source and crank it up to the top of the column which puts the lens/light aperture about 25 inches above the paper. That is also a known, even, collimated beam. In bygone times to contact print on film I have been known to use a small automotive bulb hooked to a toy train transformer (!) and suspended four or five feet above the counter. That creates a relatively even illumination from a point source of light.
 

markbarendt

Member
Joined
May 18, 2008
Messages
9,422
Location
Beaverton, OR
Format
Multi Format
I think either your elbow got in the way or the paper didn't get into the developer evenly.
 

Anon Ymous

Member
Joined
Feb 7, 2008
Messages
3,661
Location
Greece
Format
35mm
What developer do you use and how long do you develop? Perhaps you "snatch" the print too early.
 

mrosenlof

Member
Joined
Feb 25, 2010
Messages
621
Location
Colorado
Format
Multi Format
Your sample looks to me like not getting developer to all parts of the surface, possibly combined with a short developing time.

You need to standardize on a developing time. Usually at least 1 minute for RC paper and double that for FB. A 40 watt bulb may actually be too bright to get a reasonable exposure time with those dev times.

Watch to be sure you're not casting any shadows on the paper while exposing.
 
OP
OP

graciemansion

Member
Joined
Sep 16, 2016
Messages
54
Location
New York
Format
Medium Format
I think I did use too little developer, about 400ml of Dektol diluted 1:1 for 1 minute. This was for 5x7 prints in 5x7 trays. Looking at the print it curls a lot, so that makes sense to me.
 

Michael Guzzi

Member
Joined
Jan 15, 2016
Messages
178
Location
Caxias do Sul/RS, Brazil
Format
35mm
Your sample looks to me like not getting developer to all parts of the surface, possibly combined with a short developing time.

You need to standardize on a developing time. Usually at least 1 minute for RC paper and double that for FB. A 40 watt bulb may actually be too bright to get a reasonable exposure time with those dev times.

Watch to be sure you're not casting any shadows on the paper while exposing.

Fomalux is a silver chloride emulsion, a true contact paper. I routinely get 60-75 seconds exposure times using a 60W bulb hanging from the ceiling about 3m above the paper. My dev time is 3 minutes, using Moersch ECO 4812.

To the OP: what do you mean with "the bell shape part developed under the developer"? Did you develop the prints face up or face down? If you developed them face up, it may be that the prints floated on the developer and left the emulsion deprived of enough developer to complete development. I usually gently stab them when developing face up, with a rubber print tong.
 

MattKing

Moderator
Moderator
Joined
Apr 24, 2005
Messages
52,877
Location
Delta, BC Canada
Format
Medium Format
How did you handle and agitate the print during each stage?
I start by placing the print face down into the solution. I then ensure that the print is fully covered by the solution. I then flip the print over and agitate regularly, making sure throughout that the print remains submerged. When 10 seconds remain in the necessary time, I pick up one corner, and then let the print drain for the remaining time, before transferring the print to the next tray.
 

Sirius Glass

Subscriber
Joined
Jan 18, 2007
Messages
50,359
Location
Southern California
Format
Multi Format
How did you handle and agitate the print during each stage?
I start by placing the print face down into the solution. I then ensure that the print is fully covered by the solution. I then flip the print over and agitate regularly, making sure throughout that the print remains submerged. When 10 seconds remain in the necessary time, I pick up one corner, and then let the print drain for the remaining time, before transferring the print to the next tray.

What he said plus more developer.
 

ic-racer

Member
Joined
Feb 25, 2007
Messages
16,544
Location
USA
Format
Multi Format
Looks like what happens when the paper gets partially submerged in fixer, prior to development.
 
OP
OP

graciemansion

Member
Joined
Sep 16, 2016
Messages
54
Location
New York
Format
Medium Format
Thanks for the help everyone! I followed those instructions and make 6 prints. They came out evenly but they're not nearly as sharp as the negatives. I read that that means there wasn't enough pressure between the glass and paper and negatives, so I'll have to take another look at my frame.
 

Leigh B

Member
Joined
Jan 17, 2011
Messages
2,059
Location
Maryland, USA
Format
Multi Format
I read that that means there wasn't enough pressure between the glass and paper and negatives, so I'll have to take another look at my frame.
You only need enough pressure to hold the negative and paper in firm contact.
This does not require an automobile jack or a hydraulic press.

You mentioned that the paper curled. The frame should exert enough pressure to flatten it uniformly.

- Leigh
 

TSSPro

Member
Joined
Feb 15, 2010
Messages
376
Location
Colorado
Format
Multi Format
I'm assuming the shapes on the paper were different for each print? This could further substantiate the developer submersion idea.
 
OP
OP

graciemansion

Member
Joined
Sep 16, 2016
Messages
54
Location
New York
Format
Medium Format
You only need enough pressure to hold the negative and paper in firm contact.
This does not require an automobile jack or a hydraulic press.

You mentioned that the paper curled. The frame should exert enough pressure to flatten it uniformly.

- Leigh

Yeah, the paper curled a lot, maybe a couple of inches up now that they've dried. This is my first time printing anything so I figured it was normal. My negatives curled a little too, but in the other direction. I found the Arista EDU 200 curled more than my HP5+ (which is what most of my negatives are).
 

markbarendt

Member
Joined
May 18, 2008
Messages
9,422
Location
Beaverton, OR
Format
Multi Format
The only time they need to be flat is during exposure
 
OP
OP

graciemansion

Member
Joined
Sep 16, 2016
Messages
54
Location
New York
Format
Medium Format
So I've taken another look at my contact printer, a Paterson model I got for free (I have no idea where it came from) that its previous owner replaced the foam with a piece of cardboard. Might that explain why my prints are blurry? Would it pay to replace it back with foam?
 

Mick Fagan

Subscriber
Joined
Sep 13, 2005
Messages
4,421
Location
Melbourne Au
Format
Multi Format
So I've taken another look at my contact printer, a Paterson model I got for free (I have no idea where it came from) that its previous owner replaced the foam with a piece of cardboard. Might that explain why my prints are blurry? Would it pay to replace it back with foam?

Most certainly. The contact frame foam should be thick enough to make placing the glass top under the little plastic clip just slightly under pressure.

I searched the web and came up with this Patterson unit, you can clearly see the foam holding the glass upwards and under slight pressure from the foam.
https://www.google.com.au/search?q=...=kpBbWMb4Bsnk0gSrna7YCQ#imgrc=ml8gjb_WTiVKIM:

I'm guessing something around the 6-10mm in thickness would be required, you don't need much pressure. But the amount of pressure required has to be enough to ensure that the film is in pressurised contact with the printing paper.

Hopefully after doing this, your woes should be eliminated.

Mick.
 

markbarendt

Member
Joined
May 18, 2008
Messages
9,422
Location
Beaverton, OR
Format
Multi Format
So I've taken another look at my contact printer, a Paterson model I got for free (I have no idea where it came from) that its previous owner replaced the foam with a piece of cardboard. Might that explain why my prints are blurry? Would it pay to replace it back with foam?
The thing that really counts in this respect is that the paper and the negative touch across the whole surface. Foam is probably better at that job but if there's no gap there's no gap regardless of the backing.

One thing you might also try is putting the emulsion side of the film down.
 

winger

Subscriber
Joined
Jan 13, 2005
Messages
3,975
Location
southwest PA
Format
Multi Format
Depending on how you're doing the contact printing, you try just putting the negatives on the paper and putting a clean piece of glass on top. Always emulsion to emulsion, too.

I do the contact prints more to have a record of the roll as a positive image and to compare exposures than for an actual print (except with 4x5 and up).
 

MattKing

Moderator
Moderator
Joined
Apr 24, 2005
Messages
52,877
Location
Delta, BC Canada
Format
Medium Format
In case it isn't clear, the emulsion side of the film should be placed in contact with the emulsion side of the paper.
 
Photrio.com contains affiliate links to products. We may receive a commission for purchases made through these links.
To read our full affiliate disclosure statement please click Here.

PHOTRIO PARTNERS EQUALLY FUNDING OUR COMMUNITY:


Ilford ADOX Freestyle Photographic Stearman Press Weldon Color Lab Blue Moon Camera & Machine
Top Bottom