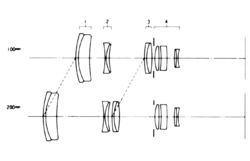
Where might one find diagrammatic formulae for lenses?

Harbour at dusk

A
Harbour at dusk

  • 0
  • 0
  • 0
blossum in the night

D
blossum in the night

  • 1
  • 0
  • 35
Brown crested nuthatch

A
Brown crested nuthatch

  • 2
  • 1
  • 52
Double Self-Portrait

A
Double Self-Portrait

  • 7
  • 2
  • 147

Recent Classifieds

Forum statistics

Threads
198,714
Messages
2,779,713
Members
99,684
Latest member
delahp
Recent bookmarks
1

David Lyga

Member
Joined
Nov 25, 2007
Messages
3,445
Location
Philadelphia
Format
35mm
I have a Sigma Zoom K f4.5, 100-200mm, M42 mount, that has a few elements out of place. The lens is otherwise fully intact and the glass is perfect, but someone messed up the alignment. Everything is there but I need to know the order and direction of some of the elements. Some of those elements are easy to figure out because they can fit only one way, but there are several that can be placed in multiple ways. If I see an accurate diagram of the elements, lined up in profile, I can do this successfully.

In general, and, hopefully, specifically for this Sigma, where does one go to find these diagrams? I have tried Google to no avail. I have contacted Sigma and am waiting but not holding my breath. - David Lyga
 
Last edited by a moderator:

ic-racer

Member
Joined
Feb 25, 2007
Messages
16,542
Location
USA
Format
Multi Format
pentax-fremdobjektive.de*wiki*images*thumb*e*e9*Sigma_MF_100-200mm_F4.5_Zoom_Multi-Coated_linsen.png

This may help.
 

Gerald C Koch

Member
Joined
Jul 12, 2010
Messages
8,131
Location
Southern USA
Format
Multi Format
David, you are the victim of what happens when unqualified people attempt lens repair. A zoom lens is a very complex design and even with full schematics you have a hard task before you. Good luck, Jerry
 
OP
OP
David Lyga

David Lyga

Member
Joined
Nov 25, 2007
Messages
3,445
Location
Philadelphia
Format
35mm
Gerald, thank you for the admonition but I assure you that I know what I am doing and have done this to many zooms in the past. And...I can get the whole thing put together as clean, or cleaner (!) than the 'clean room' used by manufacturers. I simply need the formula.

IC-RACER you just might have caused my heart to 'race' a bit faster. For this I thank you profoundly. - David Lyga
 

Tom1956

Member
Joined
May 6, 2013
Messages
1,989
Location
US
Format
Large Format
That lens lists for $10 dollars as "buy-it-nows" on EBAY, and I'm sure it's overpriced at that. Unless you're just looking for something to do. I've repaired worthless things too, just to have something to do. I doubt I'd actually shoot any pictures with it when I was finished though.
 
OP
OP
David Lyga

David Lyga

Member
Joined
Nov 25, 2007
Messages
3,445
Location
Philadelphia
Format
35mm
yes, I know. Be patient. I will have lots more to say in a few days. (I'm busy both doing tests and visiting my father in Connecticut.) - David Lyga
 
OP
OP
David Lyga

David Lyga

Member
Joined
Nov 25, 2007
Messages
3,445
Location
Philadelphia
Format
35mm
In reassembling the Sigma Zoom K f4.5, 100-200mm Macro, I have met with success. And who originally screwed up the elements? Me, but I was too ‘shy’ to admit such. IC-Racer, I almost had it right, but your diagram finalized things. Again, thanks.

Admittedly, taking apart, then reassembling a zoom lens is not for the faint-hearted. The first time I tried was a disaster. There are two helicoids: one for the focus and one for the change in focal lengths. They are each guided by a (usually) plastic pair of guides on each side of the barrel and sometimes even these guides must be dismantled, but not with the Sigma. I would like to give a few pointers to those who might attempt such. (And offer an invitation to anyone to view my lens and camera graveyard that bespeaks accurately and sadly of my failed attempts.)

First, the main difference between reassembling primes and zooms is that with the prime lenses, as long as the elements are: 1) clean, 2) aligned accurately with spacers where they should be, and 3) facing in the correct direction, all you need to do is tighten the threads and you are done, as they will be collimated correctly.

A tricky part is the thorough cleaning of the elements and assuring that no dust remains upon the glass surfaces. I use glass cleaner or household ammonia (unless lighter fluid is needed to remove sticky residue). I do NOT use alcohol because it does not remove the static charge. NOTE: There are certain ‘rare earth’ elements that cannot withstand any rubbing without leaving telltale scratches. Thankfully, these are far and few between, but one example that comes to mind is an inner rear element on the Minolta 1.4/58 PF which I have learned not to ruin again. Cleaning: I wet with a little glass cleaner the front and back of the element and then hold the element on its sides with my thumb and index finger. With the other hand I insert the fold of a clean, absorbent tissue around the element and gently turn the element until all is dry. This should do 95% of the work. Lingering dust can usually be blown away, but be careful that your lips are very dry or you might get droplets of saliva on the glass and have to start over again. You do not want to rest the element where it can acquire new dust so either put it into an unused, clean plastic food storage bag or insert it immediately into the lens body where it belongs.

Now, with zooms the reassembly is a bit trickier. Zooms, as opposed to varifocal lenses, must retain consistent focus no matter what focal length you change to. This focus parity is achieved by the rear element set maintaining a precise distance from the film plane. In other words, if you screw this element set in COMPLETELY, focus parity will fail. To determine the correct distance you must mount the camera and lens onto a tripod and focus precisely at a bright, detailed object at one extreme of the focal range and then, maintaining the identical position of the focus ring, zoom to the opposite side of the range. Is that image also in precise focus? Probably not, so you must adjust the rear element set inward or outward until focus parity is achieved. Parity achieved, you must lock in this distance. This, on most zooms, is accomplished by tightening an outer ring with threads running in the opposite direction. But on the Sigma there was only a circular bracket that was glued into position. What I did was this: I unscrewed the rear element set casing and wrapped a few rounds of dental floss around its threads. Now, as it is being screwed back in, there is adequate resistance so that when set at the proper distance, all stays that way, but, in the future, readjustment is very easy to do if that should be needed. Also, with zooms, at least with this Sigma, the front element set is also not to be completely screwed into the lens’ barrel. Its precise distance is determined by infinity focus. When the ENGRAVED infinity focus on the focus ring matches ACTUAL focus, the front element set is properly aligned. You then lock that front set in on the Sigma by tightening the three tiny set screws (just below the extended lens hood) so that the front element set can no longer be turned on its threads for adjustment inward or outward.

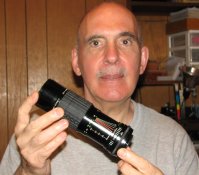
PHOTOS: The digital photo is of me holding the completed (extended) Sigma. The photos taken with the Sigma (TMX 100 film) are: 1) skyscrapers (hand-held at 1/125), 2) random doors (hand-held at 1/125), 3) macro shot (tripod, but considerably cropped) NOTE: the three black specks on the macro shot (top right of pepper can) are abrasions on the negative. The negatives are VERY sharp. I do not know if these scans (done at a copy shop) are worthy.

My, how intelligent is David Lyga! (But let’s discuss this ‘truism’ a bit further in order to completely review the accuracy of this bold, fulsome statement.)

The lens was purchased for five dollars. When bought, it was pristine and the ONLY flaw was a negligible amount of inner haze that really meant nothing, optically. But that annoyed me. So I began disassembling and trusting my memory to aid me in reassembling after the glass was thoroughly cleaned. Halfway through, I received a phone call that necessitated doing a chore. When I returned I was a bit confused but resumed work. Then the trouble started. I dropped an element onto the linoleum floor (because I did not bother to clear my workspace beforehand; thus, the workspace was too cramped). The element survived, but managed to get a minor scratch. (That seemed to negate the tiny advantage of haze removal). I then spent a whole two days (daze?) trying to reassemble the elements. I then decided that either I would trash the lens or commit myself to an institution if I spent any more time trying to rectify my utter stupidity (or…really more accurately… cupidity!) I then put out a call for the diagram: one to APUG and one to SIGMA. Apug responded; ONLY Apug. (And now, four days later, Sigma still has offered no response. STOP PRESS! SIGMA REPLY 8 July:

Hello David,
We no longer have any service records or diagrams for your lens in hard copy and the lens predates our computer database, unfortunately we cannot assist you.
Yours Truly,
Paul Pizzano
Sigma Corporation of America)

Optically, I had started to ‘get close’ towards the end but the diagram was what finally pushed all the bad omens ‘off the cliff’ and gave me a bit of respite. I then spent another half day cleaning the casing, re-cleaning all the elements, making all the adjustments, and, finally, taking the pictures. This lens is one of the sharpest I have ever tested. But how much did it REALLY cost to acquire? Five dollars? Few are as obsessed with squeezing blood out of a stone.

My, how intelligent is David Lyga! Indeed, perhaps not. - David Lyga
 

Attachments

  • skyscrapers.jpg
    skyscrapers.jpg
    369.6 KB · Views: 104
  • doors.jpg
    doors.jpg
    1.2 MB · Views: 109
  • macro.jpg
    macro.jpg
    323 KB · Views: 116
  • me holding Sigma.JPG
    me holding Sigma.JPG
    764.4 KB · Views: 95
Last edited by a moderator:

AgX

Member
Joined
Apr 5, 2007
Messages
29,973
Location
Germany
Format
Multi Format
Thank you for the instructions, David.


Admittedly, taking apart, then reassembling a zoom lens is not for the faint-hearted.

Those, who have nothing better to do: why not get you one of hose battered of no-name, or both, zoom lenses that can be got for next to nothing? And play with it a bunch of screwdrivers and spanners. Nothing to be lost.


There are certain ‘rare earth’ elements that cannot withstand any rubbing without leaving telltale scratches.

The same time they should easily be polished again with the right with the apt abrasive. Or do I overlook something?
 
OP
OP
David Lyga

David Lyga

Member
Joined
Nov 25, 2007
Messages
3,445
Location
Philadelphia
Format
35mm
Honestly, doing this is not as daunting as you think. Work slowly and TAKE NOTES, NO MATTER HOW MUCH YOU THINK YOUR MEMORY WILL SUFFICE. There are plenty of cheap lenses around. You need a set of miniature screwdrivers (I got several sets at the Dollar Store years ago). For a 'spanner wrench' I use a very pointy pair of scissors (used for cloth)! I improvise always. Through the years I have kept tiny screws of all sizes that I keep in a small sealed container. Slowly, and frustratingly, you will learn some absolutes about lenses and also some things that can be different. You will break things. You will lose ball bearings that are used for the aperture click stops. You will lose the tiny screws that support those ball bearings.Some things you will not break. Always (and I need to learn to follow my own advice here) put a clean towel underneath the lens so that if something tiny drops you will not be searching on your floor that that item.

Learn and understand that slow is better and still, no matter what, you will fail at times. And there really will be times that you spend many hours only to finally break the damn thing; but you have learned ... and no one can take that away from you. - David Lyga
 

E. von Hoegh

Member
Joined
Sep 14, 2011
Messages
6,197
Location
Adirondacks
Format
Multi Format
Honestly, doing this is not as daunting as you think. Work slowly and TAKE NOTES, NO MATTER HOW MUCH YOU THINK YOUR MEMORY WILL SUFFICE. There are plenty of cheap lenses around. You need a set of miniature screwdrivers (I got several sets at the Dollar Store years ago). For a 'spanner wrench' I use a very pointy pair of scissors (used for cloth)! I improvise always. Through the years I have kept tiny screws of all sizes that I keep in a small sealed container. Slowly, and frustratingly, you will learn some absolutes about lenses and also some things that can be different. You will break things. You will lose ball bearings that are used for the aperture click stops. You will lose the tiny screws that support those ball bearings.Some things you will not break. Always (and I need to learn to follow my own advice here) put a clean towel underneath the lens so that if something tiny drops you will not be searching on your floor that that item.

Learn and understand that slow is better and still, no matter what, you will fail at times. And there really will be times that you spend many hours only to finally break the @#!*% thing; but you have learned ... and no one can take that away from you. - David Lyga

+100.
 

Tom1956

Member
Joined
May 6, 2013
Messages
1,989
Location
US
Format
Large Format
I use snap ring pliers as spanner wrenches. And all those sets of cheapo screwdrivers are usually too thick at the tip, and that's how you chew up screws. So I file them thinner. When screws are too tight, I use the thumb of my left hard to push down very hard on the end of the little screwdriver, and a pair of piiers on the shaft to "break" the tight screw free. That way it doesn't slip out and chew up the slot. To put screws back in, I sometimes put a dab of hot glue on the screwdriver tip to hold the screw so I can start it. All self-taught hairbrain ideas.
 

ic-racer

Member
Joined
Feb 25, 2007
Messages
16,542
Location
USA
Format
Multi Format
Thanks for sharing your experience. How about some pictures also?
Here is a lens repair thread with some pictures: (there was a url link here which no longer exists)
 

E. von Hoegh

Member
Joined
Sep 14, 2011
Messages
6,197
Location
Adirondacks
Format
Multi Format
I use snap ring pliers as spanner wrenches. And all those sets of cheapo screwdrivers are usually too thick at the tip, and that's how you chew up screws. So I file them thinner. When screws are too tight, I use the thumb of my left hard to push down very hard on the end of the little screwdriver, and a pair of piiers on the shaft to "break" the tight screw free. That way it doesn't slip out and chew up the slot. To put screws back in, I sometimes put a dab of hot glue on the screwdriver tip to hold the screw so I can start it. All self-taught hairbrain ideas.

Another problem with those cheapo screwdrivers is that they are often soft. A soft screwdriver will chew a tight screw, even if it fits perfectly while a hard screwdriver will break - usually without damaging the screwhead. A light tap on the handle of a screwdriver will ofetn break a tight screw free. And the part of the screwdriver blade which fits in the slot nust be square with parallel sides, good screwdrivers are hollow gorund. Vaseline or even spit will hold a screw on the end of the driver, although if the fit is perfect it will stay there by itself.
 
OP
OP
David Lyga

David Lyga

Member
Joined
Nov 25, 2007
Messages
3,445
Location
Philadelphia
Format
35mm
Very true, both Tom1956 and E von Hoegh: I had to look hard to get the REALLY tiny screwdrivers but filing is a good idea if you cannot find small enough. (IE, filing BOTH horizontally AND at the actual blade to make it thinner.) and those tiny set screws can be monumental in frustration to remove. The best thing might be to first put a drop of lighter fluid onto the screw in order to loosen any grime embedded within. And, yes, there are times I feel that I am beginning to lose the top of the screw and then I do as Tom said: put MUCH pressure on the screw and turn SLOWLY to begin its loosening. I do wish I had more pictures to illustrate this but when I work I am so frustrated that 'swearing takes over' sometimes as I talk to myself. Removing the front element usually requires unscrewing the logo ring (I place duct tape on the logo ring, 180 degrees apart, and put the 'spanner' (my pointy scissors) firmly on the tape and press down and slowly turn counter clockwise to loosen the ring. But, sometimes, it is different where one has to unscrew the sides of the barrel instead. There is simply too much to impart with focused accuracy here but take one step at a time. Sometimes, instead of removing the front it is best to remove the rear elements. Haze usually is prone at the air space separating elements before, and after the aperture blades, thus, you can often only have to remove EITHER the front or the rear in order to get at the hazed elements.

Although I cannot guarantee to help I certainly do not mind being contacted with specific problems. Be patient as I use public computers. Also, I do not mind phoning (although, in this 'detached technological age' that might be prone to a wacky misinterpretation, so rigid have we become as a society!!!): 215.569.4949. - David Lyga
 
Last edited by a moderator:

Tom1956

Member
Joined
May 6, 2013
Messages
1,989
Location
US
Format
Large Format
For the front rings, I go to a hardware store and find a piece of pvc pipe fitting in the plumbing section, or improvise a similar correct-diameter hollow tube. Then I tear thin strips of duct tape to make a cushion on the edge of the pipe fitting. This cushion gives friction so I can push down on that lens ring to try to get a "grab" so I can start turning. Sometimes it works, sometimes it doesn't. Usually does eventually though. As for the super-tiny set screws, if you use a 50m lens turned-around-backwards, you will see that many of them actually have a very wide slot, and the cheapo screwdrivers may NOT be wide enough, and the slot therefore gets torn up beyond hope if you're not careful. I'm convinced if you send a lens off to Hassselblad or somesuch firm, they just throw away the screws and use new ones when they put your item back together. We don't have that luxury.
 

E. von Hoegh

Member
Joined
Sep 14, 2011
Messages
6,197
Location
Adirondacks
Format
Multi Format
For the front rings, I go to a hardware store and find a piece of pvc pipe fitting in the plumbing section, or improvise a similar correct-diameter hollow tube. Then I tear thin strips of duct tape to make a cushion on the edge of the pipe fitting. This cushion gives friction so I can push down on that lens ring to try to get a "grab" so I can start turning. Sometimes it works, sometimes it doesn't. Usually does eventually though. As for the super-tiny set screws, if you use a 50m lens turned-around-backwards, you will see that many of them actually have a very wide slot, and the cheapo screwdrivers may NOT be wide enough, and the slot therefore gets torn up beyond hope if you're not careful. I'm convinced if you send a lens off to Hassselblad or somesuch firm, they just throw away the screws and use new ones when they put your item back together. We don't have that luxury.

Look for sink stoppers, sometimes you can find them just the right size.
 

AgX

Member
Joined
Apr 5, 2007
Messages
29,973
Location
Germany
Format
Multi Format
My experience is that one can't have enough screwdriwers. Actually most of them would be self-modified.
 

Tom1956

Member
Joined
May 6, 2013
Messages
1,989
Location
US
Format
Large Format
Another problem with those cheapo screwdrivers is that they are often soft. A soft screwdriver will chew a tight screw, even if it fits perfectly while a hard screwdriver will break - usually without damaging the screwhead. A light tap on the handle of a screwdriver will ofetn break a tight screw free. And the part of the screwdriver blade which fits in the slot nust be square with parallel sides, good screwdrivers are hollow gorund. Vaseline or even spit will hold a screw on the end of the driver, although if the fit is perfect it will stay there by itself.

EvH, I do take issue with you on the use of grease to hold the screw on the driver. While I use that method all the time on working on machinery, autos, and the like. But when working with cameras, a wee dab of grease gets on your fingers and goes a long way. Seem like no amount of washing your fingers keeps it from getting all over the project, or it seems that way. I put a wee dab of hot glue on the driver, wait a few seconds and stick it in the screw slot. Holds tight, and after you get the screw started, the dab of hardened glue knocks right off. And no grease.
I live literally with grease and grime on my hands, but when working with cameras, it just doesn't mix at all.
 

E. von Hoegh

Member
Joined
Sep 14, 2011
Messages
6,197
Location
Adirondacks
Format
Multi Format
EvH, I do take issue with you on the use of grease to hold the screw on the driver. While I use that method all the time on working on machinery, autos, and the like. But when working with cameras, a wee dab of grease gets on your fingers and goes a long way. Seem like no amount of washing your fingers keeps it from getting all over the project, or it seems that way. I put a wee dab of hot glue on the driver, wait a few seconds and stick it in the screw slot. Holds tight, and after you get the screw started, the dab of hardened glue knocks right off. And no grease.
I live literally with grease and grime on my hands, but when working with cameras, it just doesn't mix at all.
Well, I mentioned the grease as a means without considering it's suitability for cameras. As a watchmaker, I file and stone the screwdrivers to properly fit whatever screw they're used on, if needs be. The screws are cleaned with the rest of the watch parts, the screwholes are cleaned by screwing a peg in and out, the slots are pegged clean and the screw is then replaced by placing it with a tweezers in it's hole and tightening. Wherever possible i put the slightest hint of oil on the threads, there are places in a watch where you can't do this.

I handle all small screws with tweezers, whether it's going in a watch, a camera, or whatever. Saves fumbling. I can write a short treatise on tweezers, their design and construction, if you like...:laugh: I make my own sometimes because you can no longer find some of the special types watchmakers once used.
 

BrianShaw

Member
Joined
Nov 30, 2005
Messages
16,507
Location
La-la-land
Format
Multi Format
I can write a short treatise on tweezers, their design and construction, if you like...:laugh: I make my own sometimes because you can no longer find some of the special types watchmakers once used.

I know your tongue was in your cheek... but I'd really like and appreciate that. Also a short treatise on spring puller design. :smile:
 

Tom1956

Member
Joined
May 6, 2013
Messages
1,989
Location
US
Format
Large Format
A watchmaker huh? Perfect man to ask my question. I have a Waltham pocket watch that has to be 125 years old, I'd guess. And I have to keep winding it and keep it running. Because if it stops and I have to pull out the stem, I feel like one of these times I'll break it. You have to pull on that stem so hard, practically with all your strength, and that just doesn't seem right. Otherwise it works perfectly. Inpuut appreciated.
 

E. von Hoegh

Member
Joined
Sep 14, 2011
Messages
6,197
Location
Adirondacks
Format
Multi Format
A watchmaker huh? Perfect man to ask my question. I have a Waltham pocket watch that has to be 125 years old, I'd guess. And I have to keep winding it and keep it running. Because if it stops and I have to pull out the stem, I feel like one of these times I'll break it. You have to pull on that stem so hard, practically with all your strength, and that just doesn't seem right. Otherwise it works perfectly. Inpuut appreciated.

It isn't right. Without seeing the watch I cannot tell you more.
 

Tom1956

Member
Joined
May 6, 2013
Messages
1,989
Location
US
Format
Large Format
Thanks. Guess I ought to just let it wind down and stop using it till I can afford a watchman to open it up. Probably all dried up and just raw metal-to-metal contact. Sometimes I need it though, so at those times I try to wait till it's the right time, and then wind it, so I don't have to set it. Darn nice gold watch though. Not gaudy, but very understated engraving, very fine and shallow leafwork. Thx.
 
Photrio.com contains affiliate links to products. We may receive a commission for purchases made through these links.
To read our full affiliate disclosure statement please click Here.

PHOTRIO PARTNERS EQUALLY FUNDING OUR COMMUNITY:


Ilford ADOX Freestyle Photographic Stearman Press Weldon Color Lab Blue Moon Camera & Machine
Top Bottom