Andreas Thaler
Subscriber
Because I'm currently on training leave at home and my workshop is closed, I also have time to look back on my projects.
There were about 100 in two years when I started with repairing. This excludes my more substantial general contributions to repair issues here.
I don't know if that's a good thing, but I wouldn't do it like that again because it's just too much. Anyway as an autodidact I learned a lot in this short time.
The most moving and challenging project
So I thought it would be interesting to highlight from this group the most beautiful project for me, the project that moved and challenged me the most.
This is without a doubt
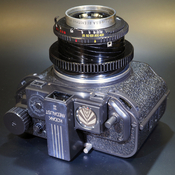
The salvation of my beautiful Nikon F3/T
I bought it from a friend in Munich in 2015.
He had obviously never used it, it had no signs of wear, the champagne-colored version.

The only error was in the LCD display in the viewfinder, where a digit was no longer fully displayed.
Over the years the LCD got worse, more digits failed and I was desperate because I didn't want to watch my most beautiful camera lose its function.
Without an LCD
that shows the shutter speeds and the plus/minus balance for manual exposure compensation, an F3 is more or less useless.
So I looked for a workshop that could replace the LCD, sent several inquiries, but only received rejections. „Sorry, no spare parts available“.
My search for an LCD was also unsuccessful.
Until one day I saw an offer on eBay that included several partially dismantled F3s that still had their LCDs. I didn't know whether the LCDs were still OK. I just had to try an exchange!
So I bought - and ventured into replacing the LCD on my F3/T.

A donor for a replacement LCD was found.
And it succeeded!
When I approached the matter after extensive research, I was very nervous. I still had only little experience with the screwdriver and, apart from the service manual, no instructions.
The left part of the F3/T’s top cover had to be dismantled and then the housing for the LCD illuminator and the LCD under the prism had to be opened.
Everything there is tiny, everything is crooked, just the genius work of Japanese engineers

The housing for the LCD block on the right
As I worked my way forward all I had to do was remove the LCD block from the contacts and insert the replacement LCD from one of the F3s.

The replacement LCD that was supposed to bring my Nikon F3/T back to full life.
When I turned on the camera, tapped the shutter button and saw - M 2000 in rich black digits, I almost fell off my chair with joy!

The most beautiful 2000 I had ever seen!
And this joy continues to this day.

 www.photrio.com
What are you proud of, what was your most beautiful photo related DIY project, or what would it be?
Tell us
There were about 100 in two years when I started with repairing. This excludes my more substantial general contributions to repair issues here.
I don't know if that's a good thing, but I wouldn't do it like that again because it's just too much. Anyway as an autodidact I learned a lot in this short time.
The most moving and challenging project
So I thought it would be interesting to highlight from this group the most beautiful project for me, the project that moved and challenged me the most.
This is without a doubt
The salvation of my beautiful Nikon F3/T
I bought it from a friend in Munich in 2015.
He had obviously never used it, it had no signs of wear, the champagne-colored version.
The only error was in the LCD display in the viewfinder, where a digit was no longer fully displayed.
Over the years the LCD got worse, more digits failed and I was desperate because I didn't want to watch my most beautiful camera lose its function.
Without an LCD
that shows the shutter speeds and the plus/minus balance for manual exposure compensation, an F3 is more or less useless.
So I looked for a workshop that could replace the LCD, sent several inquiries, but only received rejections. „Sorry, no spare parts available“.
My search for an LCD was also unsuccessful.
Until one day I saw an offer on eBay that included several partially dismantled F3s that still had their LCDs. I didn't know whether the LCDs were still OK. I just had to try an exchange!
So I bought - and ventured into replacing the LCD on my F3/T.
A donor for a replacement LCD was found.
And it succeeded!
When I approached the matter after extensive research, I was very nervous. I still had only little experience with the screwdriver and, apart from the service manual, no instructions.
The left part of the F3/T’s top cover had to be dismantled and then the housing for the LCD illuminator and the LCD under the prism had to be opened.
Everything there is tiny, everything is crooked, just the genius work of Japanese engineers
The housing for the LCD block on the right
As I worked my way forward all I had to do was remove the LCD block from the contacts and insert the replacement LCD from one of the F3s.
The replacement LCD that was supposed to bring my Nikon F3/T back to full life.
When I turned on the camera, tapped the shutter button and saw - M 2000 in rich black digits, I almost fell off my chair with joy!
The most beautiful 2000 I had ever seen!
And this joy continues to this day.
Nikon F3/T: LCD replaced
A project that has occupied me for years without being able to tackle it - for lack of a replacement display and know-how. Now it's implemented 😀 With my most beautiful F3/T (never used before), I had to watch the LCD display in the viewfinder slowly but steadily disappear. At first, only...
www.photrio.com
What are you proud of, what was your most beautiful photo related DIY project, or what would it be?
Tell us
Last edited: