Wanting to eyeball a homebuilt darkroom sink.

Escargots

A
Escargots

  • 0
  • 0
  • 0
At the Shows

A
At the Shows

  • 3
  • 0
  • 97
Easy Rider - Southern Ireland

A
Easy Rider - Southern Ireland

  • 6
  • 3
  • 157
cultural interest

A
cultural interest

  • 2
  • 2
  • 117
.

A
.

  • 6
  • 2
  • 130

Recent Classifieds

Forum statistics

Threads
186,668
Messages
2,599,895
Members
96,595
Latest member
udneykaval
Recent bookmarks
0

kwmullet

Member
Joined
Jan 3, 2004
Messages
892
Location
Albuquerque, NM
Format
Multi Format
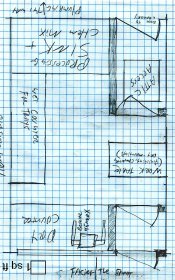
Is anyone in either the north half of Texas or the south half of Oklahoma using a homebrew wood sink in their darkroom? Sometime in the next 4-6 months, I'd like to eyeball one or more such sinks as we move and I begin my garage conversion to a darkroom. As is a common theme in such projects, I'm trying to keep costs down as much as possible, so I'll be looking at the local Habitat for Humanity store for materials, getting some Ready To Assemble cabinets from Home Depot or Lowes, and putting in wiring, outlet boxes and outlets myself so an electrician can install a GFCI circuit and attach it to what I've already installed. If I can learn enough rudimentary plumbing, I'll install the water supply and drainage piping and fixtures myself and hire a plumber to likewise inspect and attach to the existing systems.

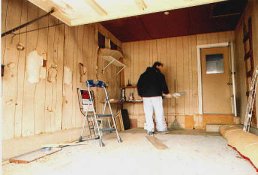
I've already gotten a dandy prefab sink from Jeremy Moore that is ideal for film processing & chem mix, but about half the size I would want for my print tray line.

cheers,

-KwM-
 

Robert Hall

Member
Joined
Aug 18, 2004
Messages
2,035
Location
Lehi, Utah
Format
8x10 Format
I went to home depot and had them cut a piece of 4x8 plywood (actually 2 for mine, as my sink is about 15 feet.) I had them cut the 1 inch plywood first by cutting 2 pieces off the short (4ft) side, 8 inches each. These are used for the end caps of the sink. Then cut 2 pieces of the long side (now 80" long) at 8 inches each. These are used as the sides of the sink. That left me with a 32 inch bottom. I had them cut the end caps to fit, around 33 1/2 inches each from the 4ft pieces (measure to be sure!) and went home and used a 20 guage nail gun and glue to hold it together. I bought a floor drain and cut a hole in one end of the sink for the drain by tracing the inside of the washer for the drain on the sink. I then used fiberglass epoxy (NOT to be used indoors!!) and covered the box on both sides with the goo. it's been fantastic, and strong. I used 2x4's to make a base for it.

Here are some images of the sink...

www.roberthall.com/dr/index.htm

I hope this gives you some idea.
 

Joe Lipka

Member
Joined
Sep 24, 2002
Messages
908
Location
Cary, North
Format
4x5 Format
That looks pretty much on what I did when I did my sink about eighteen (has it been that long?) years ago. I wound up using fiberglass fabric over the plywood, and then did a lay up of grey epoxy over that. The fancy stuff was to use Durham's Rock Hard Water Putty to avoid the perpendicular joints inside the sink to keep the fiberglass fabric from breaking.

You may not need all this, but that is what was available when I built my darkroom.

Use thick plywood. I did not, and it did warp some.
 

Flotsam

Member
Joined
Sep 30, 2002
Messages
3,221
Location
S.E. New Yor
I haven't really looked into it but if I had the space to set up a big sink I'd look into an outside-the-box idea that heard mentioned a while back.

Someone mentioned the idea of building a sink frame out of wood and taking it to one of those places that apply those spray-on pickup truck bed linings. As I say, it would take some more looking into but it sounds like a clever idea for constructing a large tray sink.
 

rbarker

Member
Joined
Oct 31, 2004
Messages
2,218
Location
Rio Rancho,
Format
Multi Format
Just to stir the pot a bit, assuming it might be filled with creative juices, I'll ask a question. Why build a sink for the print-tray line at all?

It seems to me that the whole concept dates back to the days when there was no thought given to water or power conservation, and a continuous flow of temperature-controlled water was used to keep the tray solutions at the desired temperature. In the old days, I could use 1,000 gallons of hot water every day, and it would still only cost me $9.00 per month ("flat rate") for the water and maybe $15/month for the gas to heat it. At today's rates, I'd never be able to afford doing the same thing, even if I weren't reasonably conservation conscious.

Absent the tempering water bath, the only purpose the tray sink serves is to control spills. Temperature control is easier to accomplish via controlling the temp of the ambient air (unless a cast-iron sink and water pipes are acting as a heat-sink to the ground), perhaps combined with the use of a heating pad or aquarium probe. In some 40+ years of processing, I've never spilled a full tray of anything. A couple of drops, perhaps, as prints drip when going from one tray to the next, but never any substantial amount.

So, to me, a prefab inexpensive counter top from the local building supply would seem completely sufficient for the print tray line. That's essentially what I've been doing for the last 10-15 years, and it seems to be working. Am I missing something?
 

Nige

Member
Joined
Sep 8, 2002
Messages
2,289
Format
Multi Format
Although I have a sink, I have to agree with Ralph... I've never spilt any substantial amount. I occasionly overflow a bottle when filling if I'm not paying attention (thinking about next thing to do usually). My sink has a front higher than the trays and that can be annoying at times, so I reckon you could use a flat top and if your really worried about spills, run a border of 5mm acrylic sheet (say 25mm wide, stuck down with silastic so it has a waterproof seal) around the bench as a backup measure to contain the rare accident (5mm deep by the size of the bench would hold a fair chunk of liquid) while you cleaned it up.

The one caveat to this I can think of, is how are you washing your prints? My sink has a well at the end, which is plumbed, in which I sit my wash tray (for 8x10s) or over it (larger wash tray, which drips into the well). I also use it to wash trays and equipment in.
 

Sean

Admin
Admin
Joined
Aug 29, 2002
Messages
12,101
Location
New Zealand
Format
Multi Format
i built mine from plywood and 2x4's, I used marine primer, then marine paint. After a few coats of marine paint the surface is hard like marble so it's been good (seemed more easy to do than epoxy)
 
OP
OP
kwmullet

kwmullet

Member
Joined
Jan 3, 2004
Messages
892
Location
Albuquerque, NM
Format
Multi Format
Of course, it's a lot easier to create an elaborate darkroom in my head than in the garage in question, but I'd like to populate my darkroom like I think a house should be populated with furnishings: slowly over a long period of time, adding each piece with great care and forethought. I'll get up the minimal darkroom first, then just consider the darkroom in a permanent state of growth after that.

Bringing this concept down to the sink, I'm attracted to the idea of building the sink out of wood that has *some* interesting grain structure to it, staining it (no pyro jokes, please. :smile:) with a nice cherry or walnut stain, and topping it off with five or six coats of polyurethane, so it's got a hard, glossy surface but a nice, deep grain structure and is pleasing to the eye. Then, I could echo the appearance of the sink in a display rail that goes around the entire room similar to the ones used at Lenswork.

See Dead Link Removed and search for "Display Rails".

-KwM-
 
OP
OP
kwmullet

kwmullet

Member
Joined
Jan 3, 2004
Messages
892
Location
Albuquerque, NM
Format
Multi Format
lee said:
Kev how long a sink do you need?

lee\c

I told ya' I'd get around to following up in this thread, Lee. :wink:

The plan I'm working from now calls for a 8'x2.5' "sink". After further discussion with folks, some of it in PMs, I see almost equal merit in having a slightly sloped "wet counter" with the edges built up about an inch that drains off the right side into the Kreonite fiberglass sink (38"x71") I bought at about a 98% discount from Jeremy Moore.

I've just about completed the demolition of The Garage That Would Be Darkroom (sorry, Kipling) but forward progress continues at less than a snail's pace, since the darkroom is at close to bottom in the fam's budgetary priorities.

I will be putting the new chop saw to work building a subfloor within the next few weeks, though. After that, walls, then wiring, then I get to solicit quotes on adding a GFCI circuit for the darkroom.

I was in an APUG chatroom (irc.chatcircuit.com, not the one built into APUG) one recent evening and lostone gave me a really excellent idea of how to do the ventilation. Basically, I'll be putting the fan on the *supply* side and continuously pumping multiply-filtered air into the room and exhausting it over the wet sink/counter. That way, I should be able to maintain positive air pressure and keep the room MUCH more dust-free than if I sucked unfiltered air in through the supply vent, open doors, etc. Sort of like a mini clean room.

For giggles or (in the best of all worlds) discussion I've attached a shot of the space in question when I was just starting the demolition (to give a sense of the size) and a sketch of how I'd like the darkroom to turn out.

-KwM-
 

Attachments

  • one-room-plan.jpg
    one-room-plan.jpg
    190 KB · Views: 156
  • garagedemo.jpg
    garagedemo.jpg
    20.5 KB · Views: 178

Bruce Osgood

Membership Council
Member
Joined
Sep 9, 2002
Messages
2,643
Location
Brooklyn, N.Y.
Format
Multi Format
Wet Counter

-KwM- wrote:
The plan I'm working from now calls for a 8'x2.5' "sink". After further discussion with folks, some of it in PMs, I see almost equal merit in having a slightly sloped "wet counter" with the edges built up about an inch that drains off the right side into the Kreonite fiberglass sink (38"x71") I bought at about a 98% discount from Jeremy Moore.

I built my "L" shaped wet counter 14' long with a 1" edge. This was a mistake. 1" does not protect the floor from splashing, emptying a tray or running a hose. I would suggest at least 2"-3" edge. And I hadn't considered the amount of time my arms rest on the edge when working trays so I would do it over with as wide an edge as practical. I did get the slope right: 1/4" per foot. Also, before finishing the bed with 2 part epoxy I lay down three parallel half rounds about 6" apart the full length; this lets trays, washers, Jobo, set with a 1/2' clarence on the bottom for liquids to run without puddling up.

Good luck, it's a project of love.
 
Photrio.com contains affiliate links to products. We may receive a commission for purchases made through these links.
To read our full affiliate disclosure statement please click Here.

PHOTRIO PARTNERS EQUALLY FUNDING OUR COMMUNITY:


Ilford ADOX Freestyle Photographic Stearman Press Weldon Color Lab Blue Moon Camera & Machine
Top Bottom