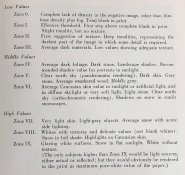
Alan, I loosely use the Zone System (Ansel would probably shame me for not adhering to the rigor he did). The Zone System is irrespective of the film or paper used to produce the final image. It's a convenient way of representing relative tonalities in the image. Therefore, film (or digital cameras) with a wider response (dynamic range) may have more subtle gradations in each particular zone than a less sensitive film/camera but the system is universal and still applicable. Here's a excerpt from Ansel Adams "The Negative" (pg.19) listing the relative meanings of the Zones:

Only a few areas in a scene need to be metered. Most photographs need a total black (Zone 0) or total white (Zone IX) to "key" the image. Additionally, the central part of the composition should have tonalities that are related appropriately to other portions of the background. Normally, you can't meter on Zone 0 (no light at all) or Zone IX (too bright) effectively. Therefore a middle tone or tones in your image must be metered. Usually a dark "something" in Zones II or III, something in the middle range (Zones IV, V, VI) and maybe a high value area (Zone VII or VIII) would be good to meter. For film, I feel Zones II & III are important as you need enough light from those areas to actually activate the emulsion. Also, the middle values are important so you render your scene appropriately. Surprisingly, you'll find that if you properly expose for shadows and your key zone(s), all the other zones will fall into place naturally. The exception is where the scene's brightness values exceed the dynamic range of your film/camera. That's where creative post-processing fits in.
My technique is:
1) Set my camera to full frame metering first
2) Set the camera to the general average settings obtained in 1)
3) Reset camera to spot metering
4) Look at the exposure meter for several key areas in the scene (some dark/shadow areas, my key subject, maybe a high value area)
5) Adjust the camera settings based on this assessment
My experience (what little I have):
Normal scenes: I've found that if the dark zones are within 2 stops of the middle zones, I set the camera for that middle zone exposure. Printing these images is fairly straight forward.
Dark scenes: I tend to set the camera on the Zone II or III exposure settings. Printing might be more difficult but generally the emulsion is exposed everywhere you need detail.
Extreme dynamic range scenes: (e.g. snow scenes, high altitude landscapes, etc.) These are tough. I tend to favor middle zone balance here. Sometimes this gives whites or shadows that lose detail. Bracketing your exposure values and burning through a series of frames is the only workaround I've found effective. Even then, it might be hard to print and require burning/dodging in some areas.
To answer your second post questions,
Does the Zone System change depending on film/camera sensor? No, I think the above description shows it to be independent.
I wasn't aware the stop ranges of sensors for digital cameras were published and not having seen what's available, I couldn't say whether it's enough to correlate to the Zone System or to a particular film. My guess would be that you could.
If using my digital camera to assist metering of my film camera, yes I favor shadow detail over highlights. If I take a picture, I know I'm likely to have blown out highlights. However, if I want a digital image of the same scene, I'll make sure to adjust and take another frame - no film wasted there!


 .
.