• Welcome to Photrio!
    Registration is fast and free. Join today to unlock search, see fewer ads, and access all forum features.
    Click here to sign up

Understanding zones/gray card usage.

Shadow play

A
Shadow play

  • 11
  • 1
  • 72

Forum statistics

Threads
201,232
Messages
2,820,911
Members
100,605
Latest member
Fishzzz
Recent bookmarks
0

RalphLambrecht

Subscriber
Allowing Ads
Joined
Sep 19, 2003
Messages
14,860
Location
K,Germany
Format
Medium Format
I'm going to suggest a small change in word usage.
"over expose" tends to imply too much exposure.
"under expose" tends to imply too little exposure.
Both tend to imply a mistake.
For clarity, it is really helpful in these sorts of discussions to instead discuss actions - we decide to "increase exposure" or to "decrease exposure" and we usually speak in terms of numbers of stops.
And, when we compare the light reflecting off of various parts of a scene, we talk in terms of stops as well.
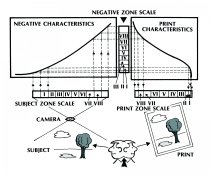
The reason to use a grey card is that it supplies a repeatable reference. The reflectivity of an 18% card is approximately the middle of what we encounter in real life. So if everything is calibrated correctly, if we meter off of a grey card (using the proper technique) then the image of any 18% tone in a scene will be recorded on the negative to a density that should print as a middle grey tone in a print, and the darker and lighter tones in the scene should print appropriately as well.
The reason we use a meter to gather information from the shadows, is twofold:
1) negative film has less room for error on the shadow side, and more room for flexibility on the highlight side. Accordingly, we meter the shadows to be sure we capture the important information there; and
2) not all scenes have a 18% reflectance in the middle. Some scenes are such that you want the middle to be darker. Other scenes are such that you want the middle to be lighter.
It is important to understand that with respect to the zone system, you don't meter to find the "darkest thing with detail". You meter the darkest thing that you want to have detail in your final output (usually a print).
Let me give you an example. I take lots of photographs in forested areas. There are lots of scenes there where there are dark shadows that I'm quite happy to render dark and free of detail in my prints.
If I am using zone system principles when metering, I'm visualizing the result I want in the print and then measuring the light reflecting back from the various parts of the scene. Those measurements tell me that if I adjust the camera exposure to place a certain part of the scene (the part where detailed shadows matter to me) at one level, the other parts will fall at other levels. My experience then tells me how the resulting negative will print in a straight print, and will give me a good idea how it may print if I also apply the printing controls available to me.
The zone system is a way of systemizing the following:
1) visualizing first, and then
2) accomplishing the vision.
It all comes back to the final output - the print.
agreed
 

Attachments

  • ZoneReproCycle.jpg
    ZoneReproCycle.jpg
    607.1 KB · Views: 116

MattKing

Moderator
Moderator
Allowing Ads
Joined
Apr 24, 2005
Messages
54,733
Location
Delta, BC Canada
Format
Medium Format
So is it safe to say that spot-metering will render you a more accurate depiction of what you envisioned?

Is that the advantage of metering the subject over a gray card?
In the case of the photo I posted up thread, the biggest advantage of using a spot meter would have been that I wouldn't have had to go swimming if I wanted to take some detailed readings from some of the smaller parts of the scene :smile:.
I didn't really need to do that though. I took an incident reading and applied some judgment and experience before setting the exposure.
I only shoot roll film and I rarely expose a whole roll on the same subject and using the same lighting. In my opinion, a full Zone System approach is only of full value if you use the development controls that form part of the system. That is impractical with the roll films I use.
If you use a grey card, you are essentially doing the same thing as using an incident meter - you are metering the light as it falls on the subject.
With the Zone System (and many other types of systems), you take one or more meter readings of the light reflecting back off of one or more parts of the subject. Those meter readings need to be interpreted, because if it was up to the meter, it would make everything middle (18%) grey. And you do not want everything middle grey. You want to set the exposure of those parts to get the non-18% tones you want.
 

thuggins

Member
Allowing Ads
Joined
Jan 12, 2008
Messages
1,144
Location
Dallas, TX
Format
Multi Format
2. In the very little experience ( a month or so) of being taught the zone system in a course, we were taught to expose for the "darkest subject you want with detail". Ok. Simple enough. Expose for the shadows/develop for the highlights.

Beware of silly rubrics. This one is an extension of the "expose slides for the highlights and negatives for the shadows" nonsense.

3. My confusion lies in this: Why don't we always just use a gray card then? Why bother with finding the darkest thing with detail, shadow, etc? Or, are you sacrificing some of these zones by using a gray card in situations where it's just too difficult to get a proper exposure/reading? Aren't we trying to "get away" from the middle gray that the camera auto-corrected to exposure wise?

You are not confused; you are far wiser than most photographers and most of the responses to questions like yours. Every scene should be metered correctly, or as you put it, to the grey card. The mark of a good photographer is to understand the light and what will and will not make a good image on film. If the scene has ten stops of range, it will not make a good picture and there is no way around that. We see proof of this every day with those god-awful, frankensteinesque d!&!+@l images where someone takes five different exposures and stitches them together in Photobox or Lightshop or whatever and is oh so proud of an image that looks so fake it would make you wretch.

Understand the scene as a whole. If there is a specular reflection, don't include it when you meter as it should look specular on the film. If you're metering bright snow or a pile of coal the meter will tell you to stop down or open up to get the detail your eyes perceive when looking at the scene.
 

Old-N-Feeble

Member
Allowing Ads
Joined
Feb 22, 2012
Messages
6,805
Location
South Texas
Format
Multi Format
Which responses here are 'unwise'?
 

Craig75

Member
Allowing Ads
Joined
May 9, 2016
Messages
1,234
Location
Uk
Format
35mm
ansel adams' The Negative is a confusing and not particularly well written book for me at least. I found Barry Thornton's Elements a far more user friendly and chilled read of many of the same concepts
 

Lachlan Young

Member
Allowing Ads
Joined
Dec 2, 2005
Messages
5,061
Location
Glasgow
Format
Multi Format
Beware of silly rubrics. This one is an extension of the "expose slides for the highlights and negatives for the shadows" nonsense.

You are not confused; you are far wiser than most photographers and most of the responses to questions like yours. Every scene should be metered correctly, or as you put it, to the grey card. The mark of a good photographer is to understand the light and what will and will not make a good image on film. If the scene has ten stops of range, it will not make a good picture and there is no way around that. We see proof of this every day with those god-awful, frankensteinesque d!&!+@l images where someone takes five different exposures and stitches them together in Photobox or Lightshop or whatever and is oh so proud of an image that looks so fake it would make you wretch.

So you're suggesting that one approach is too 'doctrinaire', and should instead be replaced by your even more restrictive doctrine? Unfortunately, a lot of the world does not fit comfortably, nor can be easily dodged & burnt to fit your vision into 6 2/3 - 7 stops. I'd suggest that you've probably seen plenty of long tonal range images, but because they've been printed convincingly by whatever means, they look 'natural'. The inside of a relatively dark building looking out through a window on to a brighter scene where detail is held to a convincing extent in both would be a case in point. That said, that sort of scene would be easiest to print via masking techniques, rather than excessive n- development so that the midtones look correct. That is unless you have the wherewithal to get your hands on lighting crew & kit so that you can squash the light into 7 stops, no matter what.

Better to have a negative that has a good compromise between shadow exposure and highlight density giving you the opportunity to interpret it as you wish in the darkroom & use dodging & burning to reinforce that. It is ridiculously easy to make a negative like this with great speed - if you use an incident meter sensibly.

Understand the scene as a whole. If there is a specular reflection, don't include it when you meter as it should look specular on the film. If you're metering bright snow or a pile of coal the meter will tell you to stop down or open up to get the detail your eyes perceive when looking at the scene.

Get an incident meter. Learn how to use it. Issues of subject reflectance become a thing of the past. The end.

ansel adams' The Negative is a confusing and not particularly well written book for me at least. I found Barry Thornton's Elements a far more user friendly and chilled read of many of the same concepts

+1 on Thornton, though he has failings too. Making an excellent negative is really very easy - especially if you are shooting negs & printing on VC paper (and much fixed grade too).
 
Last edited:

Bill Burk

Subscriber
Allowing Ads
Joined
Feb 9, 2010
Messages
9,455
Format
4x5 Format
Beware of silly rubrics. This one is an extension of the "expose slides for the highlights and negatives for the shadows" nonsense.

Laddie, don't you think you ought to rephrase that?

While these two mottos are quite popular, their meaning is quite deep.

It is like saying "Be Prepared" is a silly idea, because you can spend your entire life without a pocket knife. Sure you can go through an entire photographic lifetime without wanting to know exposure or without having to deal with what those sayings mean.

But the minute you place enough exposure in the shadows of a black and white negative... so that you can see something on the print if you want to... you begin to open doors that you might have been banging your head against otherwise.
 

Bill Burk

Subscriber
Allowing Ads
Joined
Feb 9, 2010
Messages
9,455
Format
4x5 Format
thuggins,

Sorry about the Scotticism. All the Scottish culture I know I learned from my grandfather, Star Trek and Sir Harry Lauder.

You're welcome to a contrary opinion, but I haven't seen any bad advice here.

I disagree with some of what you said, but your advice to understand the light, and understand the scene as a whole is sound advice...
 

pathdoc

Member
Allowing Ads
Joined
Apr 19, 2017
Messages
23
Location
Canada
Format
35mm
Remember that the zone system in its purest form per Adams encompasses adjustments made at the developing stage for a particular image, and is really only fully applicable to large format work. 35mm or even 120 isn't amenable to differential processing of individual frames, unless you bulk load very short rolls and fire them all off on narrowly bracketed spreads of the same scene, while digital image processing from raw files is a different beast entirely.

That being said, understanding it is still the best way not to be led up the garden path by the reflectance meter in your camera.
 

LAG

Member
Allowing Ads
Joined
Aug 8, 2016
Messages
1,006
Location
The moon
Format
Multi Format
Excuse me Corey Fehr

My confusion lies in this: Why don't we always just use a gray card then?

Is not always possible. Is not always the same gray. ...

Why bother with finding the darkest thing with detail, shadow, etc?

To secure an outcome (negative)

Or, are you sacrificing some of these zones by using a gray card in situations where it's just too difficult to get a proper exposure/reading?

Well, you'll learn it better if you think & use "tones", instead of "zones". Anyway, "sacrificing" depends on many factors, film characteristics is one of them ...

Aren't we trying to "get away" from the middle gray that the camera auto-corrected to exposure wise?

Sometimes we need to get away, sometimes we do not (that's what we tend to think, that It's "we" the wise and not the camera, ummm perhaps there's a middle gray for that too!)

...and I have not done anything with the zone system beyond camera exposure. (i.e. no development times, printing, etc.)

There are two things you must understand for a start:

1. Metering is not the same as exposing
2. The Zone System is a exposure/development relationship, not a measure/print one. You should learn both at the same time to understand it correctly. That's the middle point! The rest of the literature about the other two (measure/print) is just a matter of personals preferences.

I hope you're enjoying the experience
Best!
 
Photrio.com contains affiliate links to products. We may receive a commission for purchases made through these links.
To read our full affiliate disclosure statement please click Here.

PHOTRIO PARTNERS EQUALLY FUNDING OUR COMMUNITY:


Ilford ADOX Freestyle Photographic Stearman Press Weldon Color Lab Blue Moon Camera & Machine
Top Bottom