My understanding of the zone system:
Meter important shadow area, place on Zone III.
Meter important highlight area to determine luminance range.
Increase negative development to compensate for low contrast, decrease development to compensate for high contrast.
Make print.
Exactly right, but let me repeat, slightly simplify your text, and expand the message:
1. Meter important shadow area, place on Zone III.
2. Meter important highlight area to determine luminance range.
3. Adjust film development to compensate for subject contrast.
Dan has carefully chosen his words.
It is important to choose a shadow area that is important for the image, not just the darkest part of the subject. Zone III is where you want to clearly see texture. But be aware, Zone III is quite dark. Some Zone System practitioners recommend a placement on Zone IV instead. It's easier to visualize for them.
It's equally important to select an important highlight area to measure the overall subject brightness range (SBR). This will determine the compensation required through film development. However, this is an often misunderstood step. The objective is not to squeeze the entire SBR into the normal negative contrast range. Let me clarify this through a typical example:
Visualize a dark church interior with dark benches, light stone walls and a bright church window, hit by the sun, in the background. You would measure the benches and place them on Zone III. Then you measure the light stone walls and see that they will fall on Zone VI. Now you measure the window and see that it falls on Zone XI, way too much for your print to handle. So you compensate development with N-3, moving the window to Zone VIII. Well done? No! In this example the Zone System was misunderstood and wrongly applied. Why? What's wrong?
Well, yes, the bright window is tamed and has been moved to a printable Zone VIII. But what happened to the rest of the image? Everything is gray in gray and has turned into a very unattractive mess of dark tones without the so desperately needed midtone contrast. How could this happen? It happened because N-3 development did not just pull the window from Zone XI to Zone VIII; it pulled all other tones with it proportionally. So, the light stone wall (Zone VI) got pulled to, let's estimate, Zone IV.5. At the end of the day, you have an image with dark benches on Zone III (or less), stone walls on Zone IV.5 and then nothing until we see a window in Zone VIII. Not an attractive image, and not representing what we saw and what interested us in the first place.
What else should we have done?
Use the Zone system properly! How?
Do what Dan said, but pay attention to the word 'important' in his text.
1. Measure the dark benches and place them on Zone III.
2. Measure the bright window and realize it will fall onto Zone XI.
3. Measure a light stone wall and realize it will fall onto Zone VI.
4. Now visualize the image you want to make.
5. If you want to maintain the midtone contrast and keep the light stone walls where they are, you cannot afford an N- development.
What now?
Keep the development normal to maintain midtone contrast, and find another way to reduce window brightness (sun behind cloud, dodging card during exposure) or live with the fact that you need to burn-in the window during printing.
Sorry for the rant, but the important part of this note is:
Do not use the Zone System to squeeze the entire subject brightness range into your normal negative contrast, unless you like battleship-gray prints.
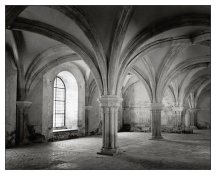
A church window example is attached.


 or may be [N-2, N-1, N, N+1, N+2] bracketing.
 Should add that the Crown & Etui both have 135mm f4.5 CZJ Tessars, the Etui's is about 10 years older and a far better lens, (The Crown had a redesigned 1932 Tessar and the glass is softer less contrast with ageing).
