Understanding zone system

Kuba Shadow

A
Kuba Shadow

  • 4
  • 0
  • 29
Watering time

A
Watering time

  • 2
  • 0
  • 50
Cyan

D
Cyan

  • 3
  • 0
  • 39
Sunset & Wine

D
Sunset & Wine

  • 5
  • 0
  • 41

Forum statistics

Threads
199,106
Messages
2,786,223
Members
99,814
Latest member
Terry99
Recent bookmarks
1

Toffle

Member
Joined
Mar 27, 2007
Messages
1,930
Location
Point Pelee,
Format
Multi Format
Here's a twist I don't think I've seen before: My aim point is mid-way between Grade 2 and Grade 3 instead of the traditional Grade 2.

I defined this by setting my upper and lower control limits by picking a negative that printed properly on Grade 2 with a moderate amount of burning, and a negative that printed well on Grade 3 with a little dodging. Naturally, I want to have my aim be in the middle.

Bruce Barnbaum makes a strong case for placing the shadows on Zone IV.
 

Bill Burk

Subscriber
Joined
Feb 9, 2010
Messages
9,323
Format
4x5 Format
Bruce Barnbaum makes a strong case for placing the shadows on Zone IV.

His video makes an important point that it is important to give shadows sufficient exposure.

I was actually talking about something different, the calibration to print grade. Grade 2 is the traditional standard. I aim between Grade 2 and Grade 3. (Because Grade 1 paper is not available).

I was wrong to bring that wild idea into this beginner's conversation. My unusual tactic is relevant only for large format on graded paper.

For roll film, I have seen advice to develop to N-1 1/2 rely on variable paper grades instead of variable development times. I would recommend following the advice of someone who has adapted the Zone System for rollfilm.
 

2F/2F

Member
Joined
Apr 29, 2008
Messages
8,031
Location
Los Angeles,
Format
Multi Format
Here's a twist I don't think I've seen before: My aim point is mid-way between Grade 2 and Grade 3 instead of the traditional Grade 2.

I defined this by setting my upper and lower control limits by picking a negative that printed properly on Grade 2 with a moderate amount of burning, and a negative that printed well on Grade 3 with a little dodging. Naturally, I want to have my aim be in the middle.

The flexibility of the ideas behind the system allows us to do things like this. I standardize on a flatter-than-normal negative by calibrating to a grade 3 paper, when I use the Zone System (not all that often any more). I started doing this simply due to the slim selection of graded materials. There are only a few grades available now. I like standardizing on grade 3 because with the graded paper I use (Emaks), it gives me the choice of using my standard grade 3, one grade below standard, and one grade above. And it also gives me negatives that will print just fine on VC paper, with plenty of room to raise contrast or lower it.
 
Joined
Dec 10, 2009
Messages
6,297
Format
Multi Format
I love the Zone System, but not a slave to it. It was invented during the days of graded paper. How does modern MG paper effect ZS users today? I use it for pre-visualization and keeping shadow detail when it's desired and keeping highlights from blowing out. I've also heard that older films with thicker emulsions tolerate N+ and N- development better. Is that true?
 

RalphLambrecht

Subscriber
Joined
Sep 19, 2003
Messages
14,658
Location
K,Germany
Format
Medium Format
... My aim point is mid-way between Grade 2 and Grade 3 instead of the traditional Grade 2. ...

Bill

You are not alone. All a matter of choice. Grade 2.5 gives a bit more midtone contrast and many people prefer that. But when you are talking 1/2-grade differences, the question becomes: How do you know what paper grade you are getting from your filter or filtration method?
 

RalphLambrecht

Subscriber
Joined
Sep 19, 2003
Messages
14,658
Location
K,Germany
Format
Medium Format
Bruce Barnbaum makes a strong case for placing the shadows on Zone IV.

John Sexton does the same. Look at both gentlemen's pictures and you don't need much more to be convinced. On the other hand, learning to visualize a Zone III also helps. Zone III is much darker than many people realize. It is a dark shadow with texture, not a shadow with full detail. If a shadow with full detail is easier to visualize for you, placing shadows on Zone IV is the right thing to do. Whatever it takes to gives shadows plenty of exposure!
 

RalphLambrecht

Subscriber
Joined
Sep 19, 2003
Messages
14,658
Location
K,Germany
Format
Medium Format
... How does modern MG paper effect ZS users today? ...

Compensating for subject contrast through film development is very similar to compensating for negative contrast with variable-contrast (VC) papers. This does not mean that VC papers have replaced the Zone System altogether. The Zone System delivers a perfect negative, and VC papers are very tolerant of less than perfect negatives. But, when used to get the most out of a mediocre negative, VC papers leave less room to adjust for local imagecontrast needs. However, when used together, Zone System and variable-contrast papers provide more creative flexibility than either one possibly could alone. For a fineart printer, this is not an either/or decision. Both are powerful tools in their own right.
 

Bill Burk

Subscriber
Joined
Feb 9, 2010
Messages
9,323
Format
4x5 Format
I standardize on a flatter-than-normal negative by calibrating to a grade 3 paper... I started doing this simply due to the slim selection of graded materials...

That's the exact reason why I did this, because I can only get grades 2 and 3.


... But when you are talking 1/2-grade differences, the question becomes: How do you know what paper grade you are getting from your filter or filtration method?

I'm using graded papers. I expect variations of 1/2 grade in either direction. I just don't want to fall off the papers.
 

Ole

Moderator
Moderator
Joined
Sep 9, 2002
Messages
9,245
Location
Bergen, Norway
Format
Large Format
I use graded papers too, but adjust the contrast by varying developer and/or toner. I have no problems getting a G2 paper behave like anything from G0 to G4!
 
Joined
Dec 10, 2009
Messages
6,297
Format
Multi Format
Compensating for subject contrast through film development is very similar to compensating for negative contrast with variable-contrast (VC) papers.
This does not mean that VC papers have replaced the Zone System altogether. The Zone System delivers a perfect negative, and VC papers are very tolerant of less than perfect negatives.
So true. One thing the Zone System has taught me is that how much more dynamic range our eyes have compared to film when it comes to pre-visualization. I've struggled with many less-than-perfect negatives in the darkroom. It's a lot of work to get an image with decent tonality with bad negatives. Spend a little time in exposing properly and processing your film right and it's more fun in the darkroom. BTW love your advice. Save me from learning the hard way :smile:
 

RalphLambrecht

Subscriber
Joined
Sep 19, 2003
Messages
14,658
Location
K,Germany
Format
Medium Format
... One thing the Zone System has taught me is that how much more dynamic range our eyes have compared to film when it comes to pre-visualization. ...

My eye/brain system is still running the old 'visualization' software. I haven't upgraded to 'pre-visualization' yet.

:smile:
 
Joined
Dec 10, 2009
Messages
6,297
Format
Multi Format
Your software beats my bewilderment with photography. Still learning after 26 years of shooting. Still more to learn. I want to master Zen and the art of analog photography.
 

PeterB

Member
Joined
Apr 3, 2005
Messages
644
Location
Sydney, Aust
Format
Medium Format
Bruce Barnbaum makes a strong case for placing the shadows on Zone IV.

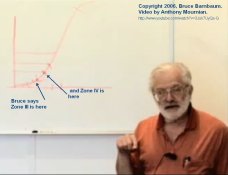
I just watched this video and wanted to chime in. Bruce claims that if you place your textured shadows on Zone III that they will be to compressed and flat. He draws the HD curve (attached)

Bruce Barnbaum and Zone IV placement.jpg

and says by putting them onto Zone IV instead that they won't be compressed because Zone IV is on the straight line portion of the HD curve.
My problem with this explanation is that it assumes that Zone III is always on the toe of the curve. This statement is likely to be the case if you have rated the film at the box speed/ISO. Bruce's solution is to overexpose by 1-2 stops and then print Zone IV down to Zone III.

This explanation tells me Bruce is assuming one is setting the film's ISO to the box speed. He doesn't appear to be encouraging one to rate the film according to the SBR using a quick and easy prescription (WBM Ed1 p. 131), or even the results of one's more elaborate testing. In fact if one chooses to calibrate their film as per the elaborate and precise method in WBM (Ed1 p. 133), the low end of Zone II is aligned with the film's speed point which is 0.17 above FB+F. This then ensures Zone III is in the straight line portion of the HD curve and no compression occurs.

It also doesn't matter whether you choose to identify Zone IV in a scene compared to the darker Zone III, neither zones should suffer compression, or flattening of the shadow details.
 
Last edited by a moderator:

2F/2F

Member
Joined
Apr 29, 2008
Messages
8,031
Location
Los Angeles,
Format
Multi Format
5. Plan to use one of your predetermined development procedures, and apply any needed EI changes to the meter (for instance, if you need N-2 processing, you may need to increase your EI a bit)

That was a typo. I meant to say decrease.
 

Bill Burk

Subscriber
Joined
Feb 9, 2010
Messages
9,323
Format
4x5 Format
If you place your shadows on Zone IV, even Zone 0 will fully separate.

And if that isn't good enough reason, it will help those cases where you saved the testing for last, played with some seriously out-of-date film, shot a questionably-lit subject and/or ran a few more square inches through your developer than you should.

Why didn't I think of that earlier when I sneered at Bruce's advice and placed my shadows on Zone II.
 

PeterB

Member
Joined
Apr 3, 2005
Messages
644
Location
Sydney, Aust
Format
Medium Format
If you place your shadows on Zone IV, even Zone 0 will fully separate.

Bill, doesn't this statement assume you have chosen a suitably low ISO ? If you rate your film at the box speed or higher, then Zones 0, I, II and probably III will be in the toe of the film's HD curve, thus undergoing compression (the lower the zone the much more compression it will suffer).
 

Bill Burk

Subscriber
Joined
Feb 9, 2010
Messages
9,323
Format
4x5 Format
Hi PeterB,

Don't take me too seriously, I'm poking fun at Bruce's enthusiasm as he makes his point that more exposure is a good thing.

When I look at my graphs, the straight line starts near my speed point (0.1 above Base+Fog).

Roughly mark the graph at 0.1 as Zone I. Mark a Zone on the graph for every other step wedge reading.

Suppose I follow Bruce and meter a dark part of my scene and place it on Zone IV. (Traditional Zone System would put on II - textured shadow). Now in my scene there would be a Zone darker (Traditional Zone I - featureless black). And a Zone darker still (Traditional Zone 0).

What I meant by my tongue in cheek comment was that Traditional Zone 0 (something two stops below my metered shadow) is going to be on the straight line portion.
 

erick

Member
Joined
Feb 29, 2012
Messages
3
Location
Brazil
Format
35mm
Hi PeterB,

Don't take me too seriously, I'm poking fun at Bruce's enthusiasm as he makes his point that more exposure is a good thing.

When I look at my graphs, the straight line starts near my speed point (0.1 above Base+Fog).

Roughly mark the graph at 0.1 as Zone I. Mark a Zone on the graph for every other step wedge reading.

Suppose I follow Bruce and meter a dark part of my scene and place it on Zone IV. (Traditional Zone System would put on II - textured shadow). Now in my scene there would be a Zone darker (Traditional Zone I - featureless black). And a Zone darker still (Traditional Zone 0).

What I meant by my tongue in cheek comment was that Traditional Zone 0 (something two stops below my metered shadow) is going to be on the straight line portion.

I've got a question concerning the placement of the zones on the graph.

The procedure you mentioned is just as described by Ansel Adams. However, I ask to myself, why should we define all the zones based on Zone I, when the reference exposure should be Zone V?

And I have another doubt concerning the concept of Zone V. How can the meter indicate the correct exposure to produce a middle gray print if the final result depends on developing and printing processes?
 

Bill Burk

Subscriber
Joined
Feb 9, 2010
Messages
9,323
Format
4x5 Format
Hi erick,

You could meter something gray, take the meter readings you get, and set them on the camera as-is. In Zone System language you "Placed" what you metered on Zone V. That's perfectly all right.

For black and white negative film... Shadows are where the film gets the least light. If you underexpose, the shadows get ruined because they get no detail on the negative. So almost everyone who uses Zone System meters shadows and places them so they get the right amount of noticeable detail.

Developing longer, such as N+2, will move light gray closer to white. And it will also move everything else a little. Like you suspect, it will move standard Zone V gray to a lighter gray. But since every tone moved in proportion this might look natural in the print - even though it is not faithful.
 

newtorf

Member
Joined
Nov 29, 2011
Messages
103
Location
SF bay
Format
35mm RF
My question is how do I use the zone system with a handheld meter instead of the camera's built-in reflective meter? Thx!
 

erick

Member
Joined
Feb 29, 2012
Messages
3
Location
Brazil
Format
35mm
Hi erick,

You could meter something gray, take the meter readings you get, and set them on the camera as-is. In Zone System language you "Placed" what you metered on Zone V. That's perfectly all right.

For black and white negative film... Shadows are where the film gets the least light. If you underexpose, the shadows get ruined because they get no detail on the negative. So almost everyone who uses Zone System meters shadows and places them so they get the right amount of noticeable detail.

Developing longer, such as N+2, will move light gray closer to white. And it will also move everything else a little. Like you suspect, it will move standard Zone V gray to a lighter gray. But since every tone moved in proportion this might look natural in the print - even though it is not faithful.

Thank you for the answer, Bill Burk,

I understand that, in practice, it's a good choice to take the shadows zones as references. However, when building the density x exposure graph, I thought that a more 'rigorous' approach would be adopted. I mean, I had thought the Zone V should be taken as reference because it is the one that may be compared to the standard middle gray card.

Thanks, anyway.
 

Bill Burk

Subscriber
Joined
Feb 9, 2010
Messages
9,323
Format
4x5 Format
Hi newtorf,

Zone System is meant to be used with a handheld meter! So just describe your meter or tell what model it is and someone here can tell you how to use it with the Zone System. Many of them work with a sticker that you can make yourself.

Spotmeters are best but if it is not a spotmeter, then you can walk right up to the thing you are metering and read very close to it (try not to put your shadow in the meter reading).

ps welcome erick and newtorf!
 

Bill Burk

Subscriber
Joined
Feb 9, 2010
Messages
9,323
Format
4x5 Format
I understand that, in practice, it's a good choice to take the shadows zones as references. However, when building the density x exposure graph, I thought that a more 'rigorous' approach would be adopted. I mean, I had thought the Zone V should be taken as reference because it is the one that may be compared to the standard middle gray card.

[With color negative film testing a gray card is used, because color development is a certain time that keeps colors in balance].

Two things you find out when doing black and white film testing: The film speed, and how long to develop.

Testing the shadow tells you the film speed. The "official" film speed tests use the shadow too. The meter relates film speed to gray Zone V.

Shadow detail doesn't change much when you develop more or less, so film speed test is a good test to do first.

When building the density x exposure graph, many of us use a 21-step Stouffer wedge, each step is a half f/stop. This gives plenty of information about everything from the shadow to the highlight. When done, you have a graph that tells you the density you get for the exposure.

There isn't a scientific way to match a paper to print on or to pick paper grade based on density of a negative. But developing your negatives so that they "fit" on a middle grade of paper gets you a negative that is possible to make a good print from.
 

erick

Member
Joined
Feb 29, 2012
Messages
3
Location
Brazil
Format
35mm
Testing the shadow tells you the film speed. The "official" film speed tests use the shadow too. The meter relates film speed to gray Zone V.

It made more sense to me, now.

When building the density x exposure graph, many of us use a 21-step Stouffer wedge, each step is a half f/stop. This gives plenty of information about everything from the shadow to the highlight. When done, you have a graph that tells you the density you get for the exposure.

I didn't know this "21-step Stouffer wedge" method, but I will do some research, then.

There isn't a scientific way to match a paper to print on or to pick paper grade based on density of a negative. But developing your negatives so that they "fit" on a middle grade of paper gets you a negative that is possible to make a good print from.

Maybe I was looking for something too scientific, in fact. But I guess the average system will work in most of the cases. Only through massive experimentation it is possible to have a more accurate control over the final result.
 
Photrio.com contains affiliate links to products. We may receive a commission for purchases made through these links.
To read our full affiliate disclosure statement please click Here.

PHOTRIO PARTNERS EQUALLY FUNDING OUR COMMUNITY:


Ilford ADOX Freestyle Photographic Stearman Press Weldon Color Lab Blue Moon Camera & Machine
Top Bottom