Troubleshooting Light Leaks in Moskva 5

Barbara

A
Barbara

  • 2
  • 1
  • 81
The nights are dark and empty

A
The nights are dark and empty

  • 10
  • 5
  • 136
Nymphaea's, triple exposure

H
Nymphaea's, triple exposure

  • 0
  • 0
  • 66
Nymphaea

H
Nymphaea

  • 1
  • 0
  • 54

Recent Classifieds

Forum statistics

Threads
198,929
Messages
2,783,307
Members
99,749
Latest member
gogurtgangster
Recent bookmarks
0

BHuij

Member
Joined
Oct 12, 2016
Messages
863
Location
Utah
Format
Multi Format
I have what I think is a rather good copy of the Moskva 5. The Industar 24 105mm f/3.5 is clean and sharp, the shutter is within 1/3 stop of nominal at nearly all speeds, and the rangefinder appears to be calibrated reasonably accurately.

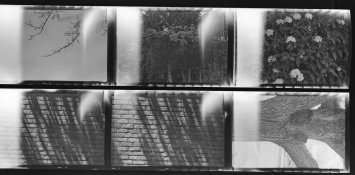
After running through a roll recently, it came out of the tank with evidence of big light leaks that ruined all but one frame, from which I managed to salvage a decent 6x6 composition.

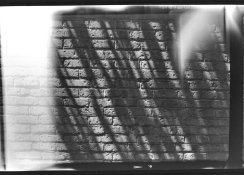
I’ve attached a couple of pictures of the negatives on the light table (inverted for your viewing convenience).

I have ruled out the bellows. They are, shockingly, free of so much as a single pinhole, and absolutely light tight.

Every frame has the large stripe on the left, which I’m guessing means perhaps I didn’t close the back properly and light got in on the right side?

Every frame also has a similar leak on the right, though not as bad and not right up against the edge. Seems like light is creeping around the pressure plate perhaps? Turns out the sliding part that covers the 6x9 frame counter window is missing its rivet; I’m hoping that plugging the resulting hole with an M2 screw will fix that and stop this leak, but I’m not 100% confident that’s where the light is getting in.

Finally, there are some odd and pretty consistent leaks on the top and bottom edges of almost every frame. They’re like a dashed line almost. Any idea what could be causing light leaks that look like that?

I’d love to get this camera properly sealed. Anyone know of any resources for how to do so once I’ve positively ID’d any areas letting in light? There don’t seem to be any foam or velvet seals anywhere in the camera. But that doesn’t mean there aren’t supposed to be :wink:
 

Attachments

  • 9666EDB6-949D-4766-82D9-628976122A71.jpeg
    9666EDB6-949D-4766-82D9-628976122A71.jpeg
    580.9 KB · Views: 114
  • 44B120AA-FC2C-4381-A633-50791FC3612B.jpeg
    44B120AA-FC2C-4381-A633-50791FC3612B.jpeg
    770.5 KB · Views: 101

MattKing

Moderator
Moderator
Joined
Apr 24, 2005
Messages
53,020
Location
Delta, BC Canada
Format
Medium Format
That is a lot of leaks!
This may surprise you, but it be preferable (for these purposes) to see the negatives un-inverted, including being able to see all the rebates, right out past the edge of the film.
 

Donald Qualls

Subscriber
Joined
Jan 19, 2005
Messages
12,303
Location
North Carolina
Format
Multi Format
The dots and dashes on the film edge are likely the interface for the 6x6 mask throwing shadows. That implies that at least some of the light came around the film edge. That missing rivet might well be the source.
 

Dan Daniel

Subscriber
Joined
Jul 4, 2009
Messages
2,887
Location
upstate New York
Format
Medium Format
One thing I suggest doing is putting the film in the camera and studying how the leaks relate to the interior of the camera itself. Sometimes this will point right to the problem area(s).

Another to do is to study the image area as if the film was sitting before or after the image opening area. Sometimes leaks can happen in the spool area and then the actual exposure happens on after or before the leak exposure. Put the film in the camera as see where the lines fall.

The hard lines make me think this is one source. Might be from the rollers before and after exposure, or at least some element of the camera outside of the exposure area.
 

flavio81

Member
Joined
Oct 24, 2014
Messages
5,069
Location
Lima, Peru
Format
Medium Format
I have ruled out the bellows. They are, shockingly, free of so much as a single pinhole, and absolutely light tight.

How do you inspect the bellows? Are you sure you're inspecting them properly?

I'll tell you how do I inspect them. I get into a very dark room and fire a flash (speedlight) inside the bellows. Any pinhole will be evident. Also i do the opposite, look inside the bellows pressing the bellows opening firmly against my face, and firing the flash outside it. I fire it at all four sides of the bellows.

Now, the big leaks I see in your negs look like light entering up from the latches at the side of the film door. I bet they're entering from those sides. You need to seal them using some black wool. Also fitting some wool on the "channels" where the film door sits in won't do any harm.

The funny patterns at the edge of the negative are (obviously) caused by the funny embossed dots that serve the purpose as film rails.
 

gone

Member
Joined
Jun 14, 2009
Messages
5,504
Location
gone
Format
Medium Format
Close the camera, put the shutter on B, extend the bellows and go into a closet w/ a few small towels and a flashlight. Try shining the light into the lens and look for leaks around the back and other areas.

Just to be sure, put the flashlight into the bellows from the back w/ the shutter closed, stuff the towels around the light, and make sure there really are no holes in the bellows (I only suggest this because my one and only Moskva 5 gave me results like you got, but it was the bellows on mine. And the back, also the sides).

I only got one good shot out of the roll w/ mine too. Maybe that's normal for those :]
 

Donald Qualls

Subscriber
Joined
Jan 19, 2005
Messages
12,303
Location
North Carolina
Format
Multi Format
I only got one good shot out of the roll w/ mine too. Maybe that's normal for those :]

That surely is not normal. I don't have any film processed yet from the "White Russian" I bought from Huss, but my previous Moskva 5 gave good results from day one; I sold it on because, without a format mask, film was relatively expensive at only 8 on a roll, and I felt I was adding movement due to the location of the shutter release.

I agree with putting the film strip back into the camera to check where the light was hitting it. Don't forget, emulsion toward the lens, image inverted. Ideally, use a strip at least three frames long, so you can see what's happening with parts of the film that were in the supply and takeup wells.
 

moto-uno

Member
Joined
Sep 28, 2009
Messages
585
Location
Burnaby, B.C
Format
Medium Format
1652654477141.png
This was my last cure for light leaks (and other problems).
A single blow with a ballpeen hammer :smile:. Did take stellar pictures on occasion though .
 
Photrio.com contains affiliate links to products. We may receive a commission for purchases made through these links.
To read our full affiliate disclosure statement please click Here.

PHOTRIO PARTNERS EQUALLY FUNDING OUR COMMUNITY:


Ilford ADOX Freestyle Photographic Stearman Press Weldon Color Lab Blue Moon Camera & Machine
Top Bottom