Troubles scanning Velvia with custom ICC profile

In flight......

A
In flight......

  • 3
  • 0
  • 78
Ephemeral Legacy

A
Ephemeral Legacy

  • 3
  • 0
  • 61

Forum statistics

Threads
200,744
Messages
2,813,275
Members
100,362
Latest member
Gert Jan
Recent bookmarks
1

pumrel

Member
Joined
Jul 1, 2013
Messages
12
Format
35mm RF
Hi,
I am really struggling to get a good scan of Velvia with my Epson V500. I am using Vuescan and also bought an IT8 target hoping it would get me much better results. The IT8 target is from Wolf Faust (coloraid.de). It should be of decent quality. I don't use Vuescan film profiling. Instead I scanned the target to raw tiff with no color changes at all. I only adjusted the lock exposure a bit. Then I scanned the target with Argyll's command 'scanin' and created an ICC profile with 'colprof'. The process is nicely summed up here. I went with display XYZ cLUT + matrix as it seems to be performing better that the others (or at least equally well).

Then I scan a Velvia film in the exact same manner as the target and apply the profile in Darktable. I would expect good results but actually applying just 'linear RGB' looks much better.

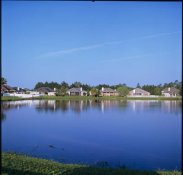
Here are some examples I get in the order - raw,velvia icc profile,linear rgb.

Scan-130909-0001.jpg
Scan-130909-0001_01.jpg
Scan-130909-0001_02.jpg

Scan-130909-0002.jpg
Scan-130909-0002_01.jpg
Scan-130909-0002_02.jpg

Scan-130909-0007.jpg
Scan-130909-0007_01.jpg
Scan-130909-0007_02.jpg

With the custom profile the colors tend to clip, there is less detail and are a bit blueish. I really cannot make head or tail of it. Is there something wrong with my workflow or the target? A custom made ICC profile should return the best results, right? :sad:
 

selmslie

Member
Joined
Apr 11, 2012
Messages
52
Location
Fernandina Beach
Format
Multi Format
Why VueScan and a custom ICC profile? It sounds like you are making this more complicated than it needs to be.

Have you ever tried the standard Epson Scan software? It is much easier to use than VueScan and gets the job done nicely. You should not need any special profiles and you can adjust colors in post processing.

As for the color rendition, if this was fresh film, properly exposed and developed, the scan should come very close to what you see in the slide.
 
OP
OP
pumrel

pumrel

Member
Joined
Jul 1, 2013
Messages
12
Format
35mm RF
Well, ICC profile should render the image substantially better as you correct the imprecisions of the scanner's color reproduction.

Of course the Epson software is not bad at all but I really like some features of Vuescan that I think make the process a lot easier. Like scanning from preview, batch (list) scanning, auto cropping film strips. Also the quality is a tiny bit better - less grainy and smoother - although it's not that apparent.

Well I'd like to get the best scans possible from my scanner and a custom ICC profile seemed to be the way to go but actually it's better without it - the third image . That's what I don't get.
 
OP
OP
pumrel

pumrel

Member
Joined
Jul 1, 2013
Messages
12
Format
35mm RF
Actually the Epson scan is much worse than all of the scans that come out from Vuescan.

Scan-130909-0001_epson.jpg

It's not as sharp at the same DPI (no filters used) and the colors are off as well.
 

L Gebhardt

Member
Joined
Jun 27, 2003
Messages
2,364
Location
NH
Format
Large Format
I've tried profiling scanners and I've never been happy with the results. I found the same thing as you - scans using the profile were rarely the best scans I could get.

I've found no sharpness issues with Epson Scan vs Vuescan (sharpening turned off for both). You do need to make sure neither is doing any interpolation of the data, so output at the scanned resolution. To me both systems have enough flaws that I would gladly take an alternative. Usually I use Epson Scan an just make raw scans.
 

selmslie

Member
Joined
Apr 11, 2012
Messages
52
Location
Fernandina Beach
Format
Multi Format
I have not shot 35mm Velvia 50 lately but I will be taking some on a trip next week. I normally scan with a Coolscan 9000 but I also have a V750.

Here are a couple of scans of the same image. Both were scanned at 4000 DPI and then reduced to 850x[n] pixels for uploading. The originals (about 38MB for the Epson and 65MB for the Coolscan) are almost equally sharp. I did not alter the colors for either image but I had adjusted the brightness for the Image version when I scanned it last June. The Epson version is straight out of the scanner using Epson Scan software just now with no retouching or adjustments.

The original is Velvia 50 taken with a Rolleiflex that I made last June just to test the camera and this film.

While this may not be a fair comparison to a V500 scanner, I think you will see very little difference in the resulting colors, which is why I said that maybe you are making this too difficult for yourself.
 

Attachments

  • Epson002_web.jpg
    Epson002_web.jpg
    45.9 KB · Views: 99
  • IMG002_web.jpg
    IMG002_web.jpg
    40.7 KB · Views: 81

iansheh

Member
Joined
Sep 12, 2013
Messages
2
Location
Vancouver, Canada
Hi Purmel,

Thanks for taking a look at my blog. My thought would be to check the initial target scan to make sure nothing is clipping after you have applied the ICC Profile. Reading over my instructions, I did not make that part of the process very clear (something I will edit asap). Try this to see if it works:

- Preview your target in Vuescan
- Outline the target area (include a little bit of grey around the target if you can)
- Click Exposure Lock and record the number
- Scan your target
- Create an ICC profile with Argylls
- Open your target scan in Darktable or Photoshop
- Apply your ICC profile to the target scan
- Take the reading of the greyscale boxes 0 and 23 to make sure they are not clipped
- If they are clipped, adjust the exposure lock in Vuescan, rescan target, and create a new ICC profile
- Repeat until you are satisfied with a final profiled target scan that is not clipped.
- The ICC profile created with the scan that is not clipped should be the closest representation of your film

Profiling is not easy. It's taking me over 2 years to finally come up with a process that works. Let me know if you have any problems, I'll try my best to help you out.

Ian
 
OP
OP
pumrel

pumrel

Member
Joined
Jul 1, 2013
Messages
12
Format
35mm RF
While this may not be a fair comparison to a V500 scanner, I think you will see very little difference in the resulting colors, which is why I said that maybe you are making this too difficult for yourself.

I know, I might be a bit too much pedantic about the colors but it drives me crazy that the colors can't be reproduced perfectly. It's just because when I look at the slide in daylight or against a lightbox it looks so beautiful and crisp, there is so much detail all over the image and the colors are stunning - at least to my eye.

You are right thought that I can see little difference in colors in your images. Although it seems that even your scan from Epson seems to be a bit reddish but not as much as the one I posted. Otherwise it is something I would be comfortable with except I can't get such close a scan as you did :blink:

@iansheh

Your post on your blog was really perfect and to the point and it reassured me in my process. I followed your advice and corrected the exposure and I think I am doing it right. I have the 'lock exposure' set at 1.33 which gets me (253,249,241) for the leftmost white patch, but the rightmost black patch is (1,0,0) and second one (2,0,0). I think it means it's clipping right? But it's impossible to scan it without either the white or black patch clipping.

I've just found out that Darktable does not apply the ICC profiles correctly - there is a bug report about it (Darktable bug #9510). So I tried the Vuescan's film profiling option and I can get this with some slight color corrections:

Scan-130911-0021_01_vuescan-applied-icc_web.jpgScan-130911-0022_01_vuescan-applied-icc_web.jpg

I also tried Photoshop and I got this which is still a bit blueish than what I see in reality:

Scan-130909-0001_ps-applied-icc_web.jpgScan-130911-0005_ps-applied-icc_web.jpg

I don't really like using Photoshop as I would always need to run it in a virtual machine as I am on Linux. Darktable is very good but this bug renders it unusable for this task. But maybe I am getting obsessed with perfection and all of the results are perfectly usable. But I think it can and should be much better.
 

selmslie

Member
Joined
Apr 11, 2012
Messages
52
Location
Fernandina Beach
Format
Multi Format
... but it drives me crazy that the colors can't be reproduced perfectly. ....
I am sure that Ian is trying to achieve the best possible result and that he has put a lot of effort into his research. He candidly admits that his initial approach to this "was completely wrong, and most of what I wrote in my post was useless." That took a lot of courage. His revised approach may have gotten him closer to his intended goal, nevertheless it is complex and I don't think that even he is completely satisfied that he as come up with a simple and effective solution.

I have two fundamental reservations:

1. Is there anything wrong with the simplest solution - straight out of the box? If it ain't broke, don't fix it and First, do no harm. You, I and others have found that a straight scan, without applying profiles, can produce superior scans with out all of the additional effort. Besides, there are two parts to the problem, the colors themselves and the combined exposure and contrast range. Add to that the quality of the light - film may have one profile for daylight and another for incandescent. Maybe the whole profile thing is more trouble than it is worth.

2. Different films have different profiles or you would not have started down this path. To try and make them all appear the same defeats some of the purpose of using different films. We might feel that Fuji may have done a better job for greens, Ektachrome for blues, Kodachrome for reds and Agfachrome for orange and brown. Rather than try to make them all look the same, we celebrated their differences as advantages and applied them to subjects that would benefit from these differences.

You still have post processing to fall back on if you feel that you need to tweak the colors, brightness and contrast as scanned.
 
Last edited by a moderator:

Doyle Thomas

Member
Joined
Oct 28, 2006
Messages
276
Location
VANCOUVER, W
Format
8x10 Format
wow, i'm glad I bit the bullet for Silver Fast. it is not a cheap solution but if you get their targets as well they have a bar code on them. lay the target on the bed reasonably square and hit calibrate. it will find the target, align it, read the bar code, find the correct color data, create the profile, and install it. that does not mean that no adjustments are needed.
 

iansheh

Member
Joined
Sep 12, 2013
Messages
2
Location
Vancouver, Canada
I'll be the first to admit that I haven't found a perfect way to reproduce film colours, and my attempts at trying to find a better -more accurate- solution are frustrating. That said, I have come to a point where I need to accept the results I have and learn to create the colours I'm looking for. Being that we've been in the consumer digital age for about a decade now, our expectations for colour are based on white-balance readings. Gone are the days where we used coloured filters or specific film to compensate for a colourcast. In some ways, when shooting and reviewing film, we have to disconnect from the advances of digital photography and use film-types for what they were made for.

@Selmslie
Both your points are bang on. If you are satisfied with the colour coming from the box solution I don't see anything wrong with that. Scanners, and their software, are created to produce the most pleasing, balanced, scans it can make. It will "correct" the white-balance, exposure, and contrast of the film. The resulting scan may not actually look anything like the film was intended to, but the scan works for what you need. There is a clip from Annie Leibovitz's documentary "Life through a lens" when she's describing pictures that she shot of her partner who was sick. When she scanned them there was a weird colourcast but she felt like the colourcast suited the mood. It worked for her.

Films were initially created for different purposes. Want warmer portraits shoot Kodakchrome, want cooler portraits shoot Fujichrome. A lot of dynamic range, shoot Portra NC (which was my favourite colour neg film back in the day). Super smooth neutral black and white, shoot Ilford PanF 50. They are all designed to meet a specific need of a photographer. As you said, celebrating their differences as advantages I feel is the best way to use the film.

@Pumrel
Trying to balance clipping of white and black is hard. For initial scans and profiling, I tend to protect my whites so I know where I am with high-light detail. As long as I am not reading black at 0,0,0 I am ok with it.

To be honest, the results you got from Photoshop look like what I expect Velvia to produce. The saturated cooler hues that create a slightly higher contrast. The scans with Vuescan profiling (Vuescan actually ignores 3rd-party profiles) don't have the Velvia colours. With Fujichrome there will always be a cooler blue hue to them. The only Fujichrome that is more balanced is Astia, since being discontinued it's ridiculously hard to find. The colour discrepancy you are seeing from film to scan might be the caused by the light you're using to view each medium. Daylight shadow vs full sun. Light table might not be 100% balanced. Monitor calibration. Converting analog to digital always has it's losses.

It seems like the colour you're trying to achieve is warmer than the colours being produced from your scans. I shoot a lot of Provia and as much as I love the colours and saturation for travel or landscape images, it's not exactly what I want for portraits. To get the warmer tones I take down the saturation by just a touch, then bring down the mid-tone blue curve to add some red. Give it a try, it might just work for you.

@Doyle
I'm jealous at how easy it is to apply profiles in Silver Fast!
 

selmslie

Member
Joined
Apr 11, 2012
Messages
52
Location
Fernandina Beach
Format
Multi Format
…. Scanners, and their software, are created to produce the most pleasing, balanced, scans it can make. It will "correct" the white-balance, exposure, and contrast of the film. …
Both Epson Scan and Nikon Scan provide a pretty good default mode and you can override a lot of settings easily. I just prefer to take care of these adjustments, if necessary, in post processing after I deal with the inevitable healing of dust and other defects in the film.

My only issue with the Epson is that focusing is manual and the holders are flimsy compared to the autofocus and robust (and expensive) holders for the Coolscan. But I got the Epson to scan 4x5 and use the Coolscan for 35mm and 120 since it is slightly better and actually a little easier to use, just not as fast.
 

Alan Klein

Member
Joined
Dec 12, 2010
Messages
1,067
Location
New Jersey .
Format
Multi Format
Well, ICC profile should render the image substantially better as you correct the imprecisions of the scanner's color reproduction.

Of course the Epson software is not bad at all but I really like some features of Vuescan that I think make the process a lot easier. Like scanning from preview, batch (list) scanning, auto cropping film strips. Also the quality is a tiny bit better - less grainy and smoother - although it's not that apparent...


I use a V600 with Epson's scan software but its very close to how the V500 works. My unit auto crops and I can scan after a preview scan. Why are you unable top do that with your Epson software? I don't know what batch (list) scanning is. Maybe you can explain that.

If Vuescan is providing "sharper" less grainy and smoother results, that's a function of Vuescan's post scan adjustments. There are no differences in the scans between Epsen and Vuescan as the scanner mechanics are the same. It's all in Vuescan's or Epsen's post processing which you could do yourself with Photoshop after an Epson "flat" scan. Adjust the colors as you thinkl look best. Nobody's going to sit there and say it doesn't match the original colors on the chrome. You'll never match them anyway.

These Velvia's 50 are from medium format from years ago. Some were scanned flat with all asjustment in Photoshop Elements afterwards. Some were scanned with auto adjustments by Epsen's scanner software with minor adjustment made in Elements. Which ones match the original colors of the slides? I don't know. Do you? (Probably none, but who cares?)

Flickr Search: velvia


These are more modern Velvia 100's in medium format.
Flickr Search: velvia100
 
OP
OP
pumrel

pumrel

Member
Joined
Jul 1, 2013
Messages
12
Format
35mm RF
I am really sorry I am replying after such a delay. I haven't been notified about new posts so I thought nobody replied yet. Must have been my mistake.

I use a V600 with Epson's scan software but its very close to how the V500 works. My unit auto crops and I can scan after a preview scan. Why are you unable top do that with your Epson software? I don't know what batch (list) scanning is. Maybe you can explain that.

Actually there might be one important thing I forgot to mention and it could be the answer to your question. I am using Linux and the Epson scanning software is really basic. Here's an image so you have a better picture.
i-scan_linux.jpeg

So it seems that the Epson software under Windows is more advanced which would explain the different experiences we exchanged. And the Velvia pictures on Flickr have similar tones as mine so my workflow might not be actually that bad.

I follow that the mechanics of the scanner are the same and Epson software and Vuescan should work the same but I am not allowing any postprocessing in Vuescan + I scan raw and do the rest in Darktable or others. Also I don't mean it's dramatically different. It's actually not different at all. Only when I pixel peep and such a difference has no importance for me at all. It's because of the others options I use Vuescan and maybe when you see how the Epson software looks under Linux you'll see what I mean.

@Pumrel
Trying to balance clipping of white and black is hard. For initial scans and profiling, I tend to protect my whites so I know where I am with high-light detail. As long as I am not reading black at 0,0,0 I am ok with it.

To be honest, the results you got from Photoshop look like what I expect Velvia to produce. The saturated cooler hues that create a slightly higher contrast. The scans with Vuescan profiling (Vuescan actually ignores 3rd-party profiles) don't have the Velvia colours. With Fujichrome there will always be a cooler blue hue to them. The only Fujichrome that is more balanced is Astia, since being discontinued it's ridiculously hard to find. The colour discrepancy you are seeing from film to scan might be the caused by the light you're using to view each medium. Daylight shadow vs full sun. Light table might not be 100% balanced. Monitor calibration. Converting analog to digital always has it's losses.

It seems like the colour you're trying to achieve is warmer than the colours being produced from your scans. I shoot a lot of Provia and as much as I love the colours and saturation for travel or landscape images, it's not exactly what I want for portraits. To get the warmer tones I take down the saturation by just a touch, then bring down the mid-tone blue curve to add some red. Give it a try, it might just work for you.

Thank you very much for your view on my scans. I haven't really scanned many rolls of Velvia so basically didn't even know how good a scan I could get so an opinion of somebody else really helps a lot. It seems to me now that I really should be satisfied with my scans as they are. I shouldn't really sweat it that much I guess.

2. Different films have different profiles or you would not have started down this path. To try and make them all appear the same defeats some of the purpose of using different films. We might feel that Fuji may have done a better job for greens, Ektachrome for blues, Kodachrome for reds and Agfachrome for orange and brown. Rather than try to make them all look the same, we celebrated their differences as advantages and applied them to subjects that would benefit from these differences.

I can see your point and I agree completely. I am really not trying to make it look perfect or all the same. I understand that films are different and I love what I see when I look at the Velvia slides. I was just trying to make the scans look the same as I see them "in real". (or as I think I see them)

You're right that applying profiles, calibrating the scanner and all the hassle is a bit bothersome but I just didn't like the scans out of Epson software. But maybe I should just buy a slide projector.
 

Alan Klein

Member
Joined
Dec 12, 2010
Messages
1,067
Location
New Jersey .
Format
Multi Format
Ahh. A slide projector. The last time I pulled mine out to set up a slide show, my relatives made up some excuse why they had to go home early before the dessert. You're better off scanning them and then surprising them with a slide show on the HDTV! Unless you'd rather have their dessert portions too.
 
Photrio.com contains affiliate links to products. We may receive a commission for purchases made through these links.
To read our full affiliate disclosure statement please click Here.

PHOTRIO PARTNERS EQUALLY FUNDING OUR COMMUNITY:


Ilford ADOX Freestyle Photographic Stearman Press Weldon Color Lab Blue Moon Camera & Machine
Top Bottom