Totally different results from labscan and vuescan with Natura1600 (and other films)

Forum statistics

Threads
198,321
Messages
2,772,944
Members
99,593
Latest member
StephenWu
Recent bookmarks
0

ericdan

Member
Joined
Feb 28, 2014
Messages
1,359
Location
Tokyo
Format
35mm RF
labscan.jpg
my_scan.jpg

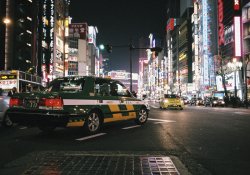
The first image was scanned by my lab and the second one is a result of Vuescan and ColorPerfect.
I locked the film base color after reading it from the film leader then scanned the film raw, with no adjustments in VueScan and converted the tif to positive in ColorPerfect using it's profile for Natura1600 film. It was considerably darker, so I added a stop of exposure in Ps. But still, my scan is nowhere close to being as vivid as the labscan.
Am I doing something majorly wrong here?

Thanks!
 

ctscanner

Member
Joined
Feb 6, 2007
Messages
1,153
Location
Willimantic,
Format
35mm
The last time I was in Vuescan I seemed to recall there was at least a couple of Slide Film profiles. You might want to see what kind of results you would get with this approach.
 

wiedzmin

Subscriber
Joined
Jan 22, 2012
Messages
113
Location
New Jersey
Format
Multi Format
I like your version better, it looks more natural ( at least on mine calibrated monitor ). Lab version has more contrast and less details in highlights than yours. Attached is your file + I added curve in PS and clicked on auto.

Natura1600.jpg
 
OP
OP
ericdan

ericdan

Member
Joined
Feb 28, 2014
Messages
1,359
Location
Tokyo
Format
35mm RF
Thanks, maybe I should try to give it some curve adjustment in Ps next time.
I wonder what the guys in the lab do. Probably just hit 'auto' on their controls, too.
 

wiedzmin

Subscriber
Joined
Jan 22, 2012
Messages
113
Location
New Jersey
Format
Multi Format
1) lock exposure and set film base color in vuescan during linear scan
Perfect Slide & Negative Scans | VueScan Professional | Scanning | ColorPerfect
Video tutorial Vuescan Professional

2) ColorPerfect
remember to crop leaving only image, no scanner holder frame, or not exposed part of the film
https://www.youtube.com/watch?v=MboXvbNOi70

I do slight adjustments using White and Black + white balance + adjust clip if necessary

3) If you want to make additional adjustments or remove dust etc. you can use PS or Lightroom
 
OP
OP
ericdan

ericdan

Member
Joined
Feb 28, 2014
Messages
1,359
Location
Tokyo
Format
35mm RF
still not much luck with scanning on the Opticfilm 8100. After emailing Ed from VueScan I found out that this scanner only supports input values of integers for exposure control. No wonder my scan's are not coming out right. I noticed that 'lock exposure' simply doesn't do anything on this scanner unless you go over 2 at which point it blows out highlights.
 

Lamar

Member
Joined
Dec 22, 2008
Messages
375
Location
Georgia, USA
Format
35mm
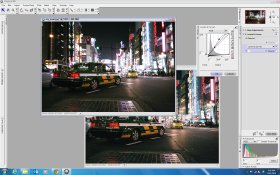
Don't try to make this too complicated. Locking exposure and film base when you start a roll is good, I use those options most of the time. Just make sure you get the black point and white point set correctly for each image then get close with the color balance, either manual or auto or right click on a neutral grey point. Forget about all the film options and just use the color negative default of generic color negative. Scan and save as a a jpg (or tiff if you wish) then edit the tone curves in a good image editing program to suit what you want. In many cases the individual color curves will need to be non-linear to get the desired result. See the screen cap below. I used Nikon Capture to edit your scan to look similar to the lab scan you like. Yours is on top and you can see I tweaked the green and blue color curves and then did quite a bit of twisting on the tone curve to get the contrast up. It's really quite simple once you get the hang of it and you don't need to screw around with color profiles that aren't really accurate or representative anyway...... VueScan is an awesome tool and offers much more than other scanning software that I have used but you need to know how to get the best out of it then know when to move on to your image editor.

ScreenCopForPicMod.jpg
 
Last edited by a moderator:

Lamar

Member
Joined
Dec 22, 2008
Messages
375
Location
Georgia, USA
Format
35mm
Lock exposure and lock film base color are more about getting multiple shot's color to look the same. If you don't have a series of shots that have to have identical color I find it simpler to just scan and move on without messing around with those options so not having those available to you is not an insurmountable handicap. Even if you do have a series that needs to all match you can tweak the color balance in the manner shown above and get them matching, it will take just a bit more time in post scan processing. Don't get discouraged. It takes a while to figure this scanning out and it can be frustrating but with a little practice you'll get up to speed. I've gone through this learning curve as well and you will get all sorts of advice. Find what works best for you then tweak that process to suit your taste and equipment as you progress.

still not much luck with scanning on the Opticfilm 8100. After emailing Ed from VueScan I found out that this scanner only supports input values of integers for exposure control. No wonder my scan's are not coming out right. I noticed that 'lock exposure' simply doesn't do anything on this scanner unless you go over 2 at which point it blows out highlights.
 
OP
OP
ericdan

ericdan

Member
Joined
Feb 28, 2014
Messages
1,359
Location
Tokyo
Format
35mm RF
Lamar, I tried again and don't really get close.
First one is the lab scan, second is my scan.

Linear tiff with MakeTiff
ColorPerfect inversion with white balance adjustment
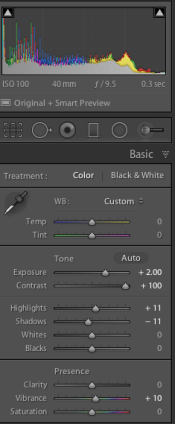
then added the adjustments in the screenshot in Lr. But still my photo looks flat compared to the lab scan.
I tried adding medium contrast curves in each of the channels, but that doesn't work either.

any other suggestions or tips?

colorPerfect1.jpg
colorPerfect2.jpg
Screen Shot 2014-06-25 at 11.15.34 PM.png
 

Lamar

Member
Joined
Dec 22, 2008
Messages
375
Location
Georgia, USA
Format
35mm
Some of it may be their scanning equipment. It may get better raw data to start with. I think if you can play a bit with manually tweaking points on the tone curve you can make it look a good bit better. It takes some practice. I don't use Lr so I don't know its capabilities. I use DxO Optics Pro and Capture NX. Both allow me to do whatever I need to the tone curves. In addition DxO has some great tools for getting the most out of shadows and highlights without loosing detail.
 
OP
OP
ericdan

ericdan

Member
Joined
Feb 28, 2014
Messages
1,359
Location
Tokyo
Format
35mm RF
I've tried scanning the same frames with an opticfilm 8200 as linear raws and then converting them with colorperfect. That yielded much better results for negatives. Slides are still better with the dslr. Don't know why. I just set the white balance to custom on a blank frame and shoot the entire roll with that white balance. The photos look really close to what I see on the light table. With the opticfilm scanner I don't get anything nearly as good for slides.
 
Photrio.com contains affiliate links to products. We may receive a commission for purchases made through these links.
To read our full affiliate disclosure statement please click Here.

PHOTRIO PARTNERS EQUALLY FUNDING OUR COMMUNITY:


Ilford ADOX Freestyle Photographic Stearman Press Weldon Color Lab Blue Moon Camera & Machine
Top Bottom