Thoughts on my DIY print washer plans - Diagram Inside

IMG_7114w.jpg

D
IMG_7114w.jpg

  • 2
  • 0
  • 42
Cycling with wife #1

D
Cycling with wife #1

  • 0
  • 0
  • 36
Papilio glaucus

D
Papilio glaucus

  • 2
  • 0
  • 28
The Bee keeper

A
The Bee keeper

  • 1
  • 4
  • 152
120 Phoenix Red?

A
120 Phoenix Red?

  • 7
  • 3
  • 156

Recent Classifieds

Forum statistics

Threads
198,182
Messages
2,770,745
Members
99,573
Latest member
A nother Kodaker
Recent bookmarks
0

clineco

Member
Joined
Sep 7, 2011
Messages
34
Format
Medium Format
Hi All -

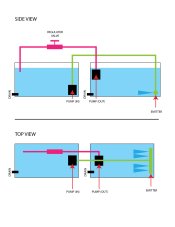
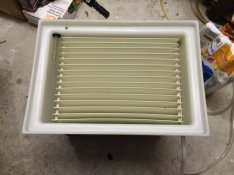
I'm on a shoe string budget for a print washer and have most of the items laying around the garage. I'm pretty new to fiber base printing and wanted to get some pro feedback on my washer before I attempt to build it. Attached is the diagram of what I'm thinking. Basically it would run off 2 small aquarium pumps (purchased here: http://www.harborfreight.com/158-gph-miniature-submersible-fountain-pump-68396.html) The rest of the fixings would be build from pvc or dripline. In the end it should cost me about $30. I'd love to hear critiques as I know nearly nothing about this sort of thing.
 

Attachments

  • PRINT-WASHER.jpg
    PRINT-WASHER.jpg
    90.7 KB · Views: 898

tkamiya

Member
Joined
Oct 3, 2009
Messages
4,284
Location
Central Flor
Format
Multi Format
I'm not sure if I understand what you are trying to do.

All washer does is to have water come in at a slow rate and drain out the excess. There is really no need for a pump or a double chamber system you have. Water coming in from faucet will provide the IN part of the flow. A simple overflow will be out. Rest, you'll need to devise a system to keep prints from sticking from each other.

If you have a tank, you could have series of plastic sheets separated about 3/4". Setup a siphon or a drain hole so that water does not go above say 1" below the top edge of your tank. That's all you need. That's what commercially made washer does.

I'll be glad to take some detail pictures of mine and send it to you, if you think that'll help.
 
OP
OP
clineco

clineco

Member
Joined
Sep 7, 2011
Messages
34
Format
Medium Format
I'm not sure if I understand what you are trying to do.

All washer does is to have water come in at a slow rate and drain out the excess. There is really no need for a pump or a double chamber system you have. Water coming in from faucet will provide the IN part of the flow. A simple overflow will be out. Rest, you'll need to devise a system to keep prints from sticking from each other.

If you have a tank, you could have series of plastic sheets separated about 3/4". Setup a siphon or a drain hole so that water does not go above say 1" below the top edge of your tank. That's all you need. That's what commercially made washer does.

I'll be glad to take some detail pictures of mine and send it to you, if you think that'll help.


Fair enough. :smile:

First off, pics would be awesome, if you have time. Thank you very much.

So here's what I was trying to do.

The dual chamber set up is because I don't have a sink available in my darkroom.

I've also read (at least I thought I've read), that the water from the input does not necessarily need to be fresh (new) water all the time? So I thought this dual chamber set could be ideal for conserving some water, even if I had to refill it. Again, anybody please correct me if I'm misguided on this.

As for the pumps, I figured they could be had cheaply enough, that it would facilitate in the constant flow of water and could easily be regulated. (again, I don't have a sink handy).

Another option would be to run a garden hose into my garage (darkroom), but that's just an extra task to deal with during cleaning.

Again, Thanks for the feedback!
 

tkamiya

Member
Joined
Oct 3, 2009
Messages
4,284
Location
Central Flor
Format
Multi Format
Yes, the incoming water needs to be fresh.

Idea of this is, you have paper saturated with chemical of all sorts. As you soak that paper in water, chemical slowly diffuses out of the paper into the water. So that water needs to be removed. If you circulated it back, depending on amount of total water used, the level of contamination will never go below certain level. Flow of water need not be that much, by the way. I can get you the rate from somewhere but I just turn the inflow of water so steady stream of water is coming out of outlet.

This is what I do. I don't have running water in my darkroom. So when I have my paper ready for wash, I take it to my garage. Hose is coming in from outside faucet into just inside of my garage door. The drain pipe goes to outside. This is quite adequate for me. I print very slowly, especially on fiber. It's not much of a chore to put the print in tray, take it to garage, and put it in washer and turn on the water.

Let me get the pictures for you. I'll be right back.

Of course, you could do this in bathtub, or anywhere water and drain is available.
 
Joined
Jan 16, 2010
Messages
1,685
Location
Atlanta, GA
Format
Medium Format
Lowest cost print washer is a nice clean tray. Give the prints a good hypo clearing, and then put them two to a tray, face to face. Change the water about five times, agitating periodically and flipping the stack each time. A bit of work, but I've been washing prints this way for decades. I have a print washer but never seem to get more than 4 or 5 good prints from each darkroom session so it always feels a bit of a waste to pull out the big dog.

I think we maybe obsess over "archival" a bit too much. The main danger is in incomplete fixing. I have prints that were batch washed in one of those big freaky classroom print washers (along with a bunch of people's prints who probably never heard of hypo-clear) over 20 years ago and they are perfect.
 

tkamiya

Member
Joined
Oct 3, 2009
Messages
4,284
Location
Central Flor
Format
Multi Format
OK, got some rather poor but hopefully helpful pictures.

This is my washer. It can take 11x14 paper and paper goes in between the slots you see. The whole slot thing goes into the tank and be submerged in water once the tank fills.

Please see IMG_0340. That is how it looks when insert is taken out. Note a horizontal tubing at top of the image. That tubing has holes along the length. Water comes in from the tube attached to this thing as you can see on very right of the image. Water squirts out toward the print through these holes.

Once the water fills, it flows to left of the image where there is a drain hole. There used to be a tube attached to this thing where end of that tube rested at the bottom of left side. So the idea was, water from top left flows across the tank and drains at the bottom left. Which then is piped to the drain pipe on left top by siphoning action.

IMG_0341 is from drain side. Please remember, longer tube was attached to this stub so it rested at bottom of the tank.

IMG_0342 is the insert. This is just a stack of plastic kept apart by certain distance by spacers. There is a long tube going across as you can sort of see. The texture of these plastic sheet is NOT smooth to prevent prints from sticking. This whole thing goes into the tank. Water squaring out of that tube in the first image travels along the length of the sheet. Those holes are alined with the spacing between sheets.

IMG_0344 is how two parts looks for size comparison.

Let me get another image so you can see how they fit together.
 

Attachments

  • IMG_0341.JPG
    IMG_0341.JPG
    43.1 KB · Views: 893
  • IMG_0340.JPG
    IMG_0340.JPG
    48.9 KB · Views: 706
  • IMG_0344.JPG
    IMG_0344.JPG
    48.5 KB · Views: 600
  • IMG_0342.JPG
    IMG_0342.JPG
    43.7 KB · Views: 755

tkamiya

Member
Joined
Oct 3, 2009
Messages
4,284
Location
Central Flor
Format
Multi Format
This is how two pieces fit together. Supply side is on your right. Drain side is on your left. Again, an extension was attached to the drain before, so water will go across from top right to bottom left.

Now, take a look at the drain pipe and note, there is a small hole on the pipe. That hole is an air vent. It kind of sort of helps water flow better on the outlet side.

To be honest, the drain side does not work all that well. Occasionally, flow rate is too high or the pipe gets air lock and over flows. Hole on the lip is another drain hole. But that doesn't help much either. So water flows out of entire top side of the tank.
 

Attachments

  • IMG_0345.JPG
    IMG_0345.JPG
    96.4 KB · Views: 947

tkamiya

Member
Joined
Oct 3, 2009
Messages
4,284
Location
Central Flor
Format
Multi Format
This thing came with some heavy plastic rods. What those do are to prevent paper from floating up. It goes perpendicular to the print and rests on top of the slats.
 

tkamiya

Member
Joined
Oct 3, 2009
Messages
4,284
Location
Central Flor
Format
Multi Format
By the way..... I can get just as good of a wash in a tray. For prints larger than 11x14, I just put a tray outside my garage, then use garden hose to slowly flow water into it and let it overflow. 30 minutes of it will get paper washed adequately.

<edit>
Parker basically said the same thing... Yeah, no need to complicate. Only thing you need to really do is to have plenty of water flowing across the paper, and do that without damaging the print.
 
Last edited by a moderator:
OP
OP
clineco

clineco

Member
Joined
Sep 7, 2011
Messages
34
Format
Medium Format
Great information guys. You've saved me a lot of work. I've seen a lot of images across the web, but the explanation of the contraptions was very helpful. Thanks again.
 

removed account4

Subscriber
Joined
Jun 21, 2003
Messages
29,833
Format
Hybrid
there used to be a company in rochester called "fine art photo supply"
they sold a kit ( it was plastic pipe with slots cut in it and plexi sheets that slid into them"
and what i think was a siphon.

https://web.archive.org/web/20040423204718/http://fineartphotosupply.com/printwashers.htm

basically you bought a fish tank on your own and slide the sheets in there so you can soak your prints
and wash them, it was pretty nice and easy to make on your own ....
 

Todd Barlow

Subscriber
Joined
Aug 9, 2004
Messages
497
Location
Ontario
Format
Multi Format
DIY Vertical Print Washer

Photos of my DIY Vertical Print Washer are on Flickr:
https://www.flickr.com/photos/c330shadowcatcher/sets/72157629185153709/

Based on my fibre base paper workflo I leave the prints in a holding bath until I am done my session. Then I rinse all in fresh water, place in Kodak Hypo Clearing Agent and then into the vertical washer. The water is fresh and I circulate with the pump in bound on the right and it sucks up the water with the tube from the top, but it just recycles the water. I have done the HT2 test and after 30 minutes in the Vertical washer the prints are good but I wash for a total of 60 minutes. Current literature indicates that it is not fresh running water that is needed but rather time for the fix to difuse into the wash water.

Best regards

Todd
 
OP
OP
clineco

clineco

Member
Joined
Sep 7, 2011
Messages
34
Format
Medium Format
OP
OP
clineco

clineco

Member
Joined
Sep 7, 2011
Messages
34
Format
Medium Format
there used to be a company in rochester called "fine art photo supply"
they sold a kit ( it was plastic pipe with slots cut in it and plexi sheets that slid into them"
and what i think was a siphon.

https://web.archive.org/web/20040423204718/http://fineartphotosupply.com/printwashers.htm

basically you bought a fish tank on your own and slide the sheets in there so you can soak your prints
and wash them, it was pretty nice and easy to make on your own ....

Sorry for the double post...

Very nice. Thank you. Man they didn't give that thing away. Great pics for reference.
 

Neal

Subscriber
Joined
Dec 3, 2004
Messages
2,018
Location
Chicago, West Suburbs
Format
Multi Format
Dear clineco,

One last tip (if it was posted above I apologize but I didn't notice it), put the washer in a room with a sink and carry the prints in. I use two trays of water in the darkroom, then carry the print rinsed in that tray to my utility room where I rinse under running water, then into a bath of hypo clearing agent, then another spritz of water, then into the print washer. Each print sits while the next one is being processed.

Neal Wydra
 

David Allen

Member
Joined
Nov 6, 2008
Messages
991
Location
Berlin
Format
Med. Format RF

Rom

Member
Joined
Sep 27, 2010
Messages
121
Location
Lyon - Franc
Format
Multi Format
Photos of my DIY Vertical Print Washer are on Flickr:
https://www.flickr.com/photos/c330shadowcatcher/sets/72157629185153709/

Based on my fibre base paper workflo I leave the prints in a holding bath until I am done my session. Then I rinse all in fresh water, place in Kodak Hypo Clearing Agent and then into the vertical washer. The water is fresh and I circulate with the pump in bound on the right and it sucks up the water with the tube from the top, but it just recycles the water. I have done the HT2 test and after 30 minutes in the Vertical washer the prints are good but I wash for a total of 60 minutes. Current literature indicates that it is not fresh running water that is needed but rather time for the fix to difuse into the wash water.

Best regards

Todd

Thanks for sharing ! I was thinking to try to make one like this during freedays at the end of the year. So thanks a lot, really inspirative.
 
OP
OP
clineco

clineco

Member
Joined
Sep 7, 2011
Messages
34
Format
Medium Format
Before you proceed, I would strongly recommend reading the very thorough research on all aspects of print washing conducted by Martin Reid - the founder of Silverprint in London.

Both parts can be found on the UK Film and Darkroom Users website:

http://www.film-and-darkroom-user.org.uk/forum/showthread.php?t=296&highlight=vortex

http://www.film-and-darkroom-user.org.uk/forum/showthread.php?t=344&highlight=vortex

Bests,

David.
www.dsallen.de

Great info. Thanks!
 

Ghostman

Member
Joined
Dec 5, 2011
Messages
504
Location
Switzerland
Format
Multi Format
If ever you see a print washer you'll ask yourself why they are so damned expensive. You could easily make one.
 

Trey

Member
Joined
Dec 24, 2007
Messages
91
Location
NYC
Format
35mm
For years I've just used an old cracked tray that I poked holes into. I set it on top of an inverted tray and let the water flow from whatever the source is, taping up holes if the water runs slowly and un-taping them if it's a quick flow. I'll see if I can find a picture.
 

tkamiya

Member
Joined
Oct 3, 2009
Messages
4,284
Location
Central Flor
Format
Multi Format
If ever you see a print washer you'll ask yourself why they are so damned expensive. You could easily make one.

I think it's an ultimate case of low production & high overhead issue. I bet only few sells a month at best.

I was lucky enough to get one from an excess inventory of an local art school. Otherwise, I'd made one by myself. In fact, this thread is motivating me to make one for 16x20.
 

polyglot

Member
Joined
Jun 12, 2009
Messages
3,467
Location
South Australia
Format
Medium Format
Clearly you need *some* fresh water to wash the fixer out, but the main thing is diffusion out of the paper. You just need the water to be significantly cleaner than the paper and since the diffusion rate goes down as the paper gets cleaner, the rate at which you need to add fresh water goes down.

For those of us paying $5+/kL for water and on rationing, a pump to keep the washer agitating (and therefore the diffusion rate high - no accumulation of a stagnant surface layer) without needing to use the supply to keep the water moving over the paper is a real feature. 5L+/min for an hour is just not reasonable IMHO unless you live somewhere soggy - that's more than our 4-person-household-and-garden's entire daily water consumption.

A bunch of water-changes in a big tray is still the cheapest option, especially if you're not in a hurry. It's what I currently do using the bathtub, until I pull my finger out and make a powered washer - maybe in a couple more years. Maybe I should just throw an aquarium pump in the bath and call it done!
 
OP
OP
clineco

clineco

Member
Joined
Sep 7, 2011
Messages
34
Format
Medium Format
Before you proceed, I would strongly recommend reading the very thorough research on all aspects of print washing conducted by Martin Reid - the founder of Silverprint in London.

Both parts can be found on the UK Film and Darkroom Users website:

http://www.film-and-darkroom-user.org.uk/forum/showthread.php?t=296&highlight=vortex

http://www.film-and-darkroom-user.org.uk/forum/showthread.php?t=344&highlight=vortex

Bests,

David.
www.dsallen.de

this is some great info, very interesting read. Thanks for the links
 
Photrio.com contains affiliate links to products. We may receive a commission for purchases made through these links.
To read our full affiliate disclosure statement please click Here.

PHOTRIO PARTNERS EQUALLY FUNDING OUR COMMUNITY:


Ilford ADOX Freestyle Photographic Stearman Press Weldon Color Lab Blue Moon Camera & Machine
Top Bottom