• Welcome to Photrio!
    Registration is fast and free. Join today to unlock search, see fewer ads, and access all forum features.
    Click here to sign up

the (my) process of making a portrait...

Bookcase detail

A
Bookcase detail

  • 0
  • 0
  • 0
Cone and Hoop

A
Cone and Hoop

  • 1
  • 0
  • 29

Forum statistics

Threads
202,760
Messages
2,845,223
Members
101,512
Latest member
FastFred
Recent bookmarks
0

gandolfi

Member
Allowing Ads
Joined
Jan 28, 2005
Messages
1,820
Location
Denmark
Format
Large Format Pan
In a recent thread ("on technique") I mentioned this:
"the chosen technique should be closely integrated in the subject matter - so in the end, we're not looking at a photograph, but on an image."

This was not understood - and thought as a lenguage/translation mistake, but it wasn't...

It was suggested, that we all are photographers in here, so...

The "problem" is, that I don't consider my self a "photographer"... I see my self as an image maker in lack of better words..

To illustrate this I am here telling you a little about my current challenge:

I am to (try to) make an "official" portrait of the headmaster at my school, from when I was a student here (30+ years ago). If successful, they are to be hanged together with all the previous portraits of the headmasters from 1872 and foreward.

This is maybe the most difficult task I have ever set my self.. The whole idea, that I should make such portraits for the furture to see, is intimidating..

I am teacher in photography here, so the photography was of course my choise of technique...
However, not quite:
I decided not to make photographs of the couple, but want to make a schetchy like photograph/painting/drawing.....(an image rather than a photograph)

And I have the tool to do it: bromoil printing.
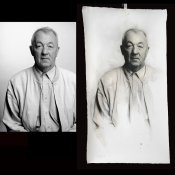
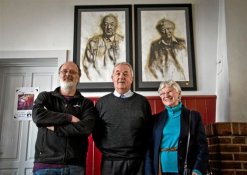
I have now photographed the sweet couple (Frederik and Birthe), and just finished applying liquid emulsion on rather big heavy paper (50x100cm)...

So far so good - now comes the difficult part: the bromoil printing...

first of all, I have never done such big bromoils before - and just the bleaching out process was quite a challenge, as my trays are not nearly big enough (and the chemistry used is rather poisonous.......)

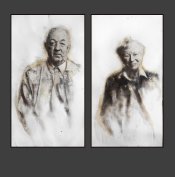
But I think I managed /still alive). The bleached image looks little strange - I am hoping it will be ok - or I have to start all over..

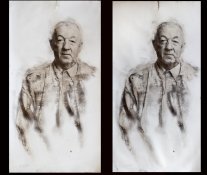
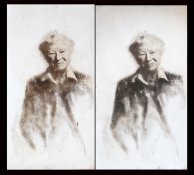
I made a faint pencil drawing around the main areas I wanted in the pictures, and then I applyed the emulsion kind of rough and "random"..

I have taken a snap of both the original straight portraits, and the pictures as they appear as liquid emulsion prints...

Tomorrow, I'll see if the oil will work with me or not.. and submit my results - good or bad...

I am doing this "incognity", as I want to just not tell the school if I fail....:cool:
 

Attachments

  • frederik1.jpg
    frederik1.jpg
    241.2 KB · Views: 312
  • birthe1.jpg
    birthe1.jpg
    161 KB · Views: 281
I think you are on the right path here, Emil. :smile:
Are these just small test "prints" ?? They look awesome. Almost like a very detailed sketch.
 
I think you possibly might be referring to tone-line conversion, or bas-relief. Get a copy of Ralph Hattersley's book "Photographic Printing" and check out chapter 19.
BTW, the word is incognito, not incognity, but you were close!
 
Looks great! Bromoil, of course it's right for them.

I don't have experience at it but I have "The Keepers of Light" by William Crawford.

So you bleach, wash the bleach out, fix (fresh fix for each batch of prints) to remove silver bromide created in the bleaching, wash fully, dry completely then resoak in water to swell the emulsion for inking.

The next part is hardest because you need skunk hair or bear hair for the brush...
 
Outstanding.
I personally like the male sitter example as maybe this process may be more suited to the masculine form but it's impossible to tell from the web rez images.

Would love to see the real thing when you're finished and I bet they will hang for many years.
How long will these last? (archival)
I'm unfamiliar with the process.
 
Looks great! Bromoil, of course it's right for them.

I don't have experience at it but I have "The Keepers of Light" by William Crawford.

So you bleach, wash the bleach out, fix (fresh fix for each batch of prints) to remove silver bromide created in the bleaching, wash fully, dry completely then resoak in water to swell the emulsion for inking.

The next part is hardest because you need skunk hair or bear hair for the brush...

I have that book too... but it doesnt explain what happened - normally the whole image more or less dissapears - here some silver remained and some parts looked quite yelloish in colour..

I am working with liquid emulsion, and as I remember W Crawford was talking about "normal" papers...
I think I might have put too much emulsion on the paper at places... then yelloish patches will appear.. (the light can't penetrate all the way through the emulsion - leaving unexposed (and fixed?) silver in the image....

...
Bruice: "How long will these last? (archival)
I'm unfamiliar with the process. "

As long as any oil paint (as that is what I am using to "redevelop" the image...)
 
Beautiful Bromoil images. The process looks like the right choice.

Here are a couple of resources on Bromoil:
David Lewis "The Art of Bromoil & Transfer"
Gene Laughter "Bromoil 101"
"Gryspeerdt & the Bromoil Process" - DVD
 
Beautiful Bromoil images. The process looks like the right choice.

Here are a couple of resources on Bromoil:
David Lewis "The Art of Bromoil & Transfer"
Gene Laughter "Bromoil 101"
"Gryspeerdt & the Bromoil Process" - DVD

thank you - but they are not made into bromoils yet.....

And I highly doubt neither D Lewis or G Laughter are dealing with bromoil made with liquid emulsion....

the only reference (very short and not great, but with recipies for bleaching) I have ever seen is in the book "Silver Gelatine" by Martin Reed...

Apart from my girlfriend, I have never seen any others doing it seriously... (some students of mine, of course, but apart from those....?)
 
I can't help with your bleach issue, but I have faith in you. Your images always inspire me. Good luck.

Will you be inking with a brush?
 
judging from your other bromoils i am sure
these will be beautiful once you get the kinks out of the process ...

maybe your bleach solutions have trouble penetrating all the emulsion ?
or your fixer / hypo isn't strong enough ?

your school is very lucky ( and your students are too ! )

john
 
Last edited by a moderator:
This is where I wish I had taken the time to experiment, so I could help from a base of experience.

I hope yellow will take the bromoil and the part of the image that wouldn't bleach will remain as a permanent silver image. With the addition to your bromoil ink, I bet it will be beautiful.
 
This is where I wish I had taken the time to experiment, so I could help from a base of experience.

I hope yellow will take the bromoil and the part of the image that wouldn't bleach will remain as a permanent silver image. With the addition to your bromoil ink, I bet it will be beautiful.

hoping that too - time will tell..

thanks all
 
next step

well - yesterday I inked the images for the first time, and as I deared, the inking was hard work....

(BTW: I don't use brushes for liquid emulsion bromoils, but spunges..)

The images turned out too flat - so I left them to dry over night, and now I have just added some more blacks into the images..

Too much? I am unsure (the images submitted here are actually higher in contrast than the originals..)

Maybe tomorrow, I'll add some warmth to the images.. maybe some more pencil drawings, or maybe I'll tone them in coffee (I think the white background is a little disturbing - makes the contrasts higher..)

Again: time will tell - I havn't given up .. yet......:whistling:
 

Attachments

  • fre.jpg
    fre.jpg
    221.1 KB · Views: 173
  • bir.jpg
    bir.jpg
    266.1 KB · Views: 164
almost there....

(I uploaded the image in the gallery too...)


now added some strong coffee to give warmth...

so what about the background - that's my main concern now..

Leave is as is, or change it and then maybe destroy the whole...:blink:
 

Attachments

  • par.jpg
    par.jpg
    188.3 KB · Views: 162
UPDATE:

First a BIG thanks for all the kind and helpfull comments!

Now I have finished the two images- matted and framed them.

..and showed them to my headmaster and her husbond.

Images clearly accepted. I am happy....
 
...and now it is official...

unveiled last saturday with the precense of the models...

(One should think I was the headmaster with that pose.... gotta work on that..)

this pic made the papers, so it is offficial I guess....
 

Attachments

  • mig frederik birthe.jpg
    mig frederik birthe.jpg
    39.2 KB · Views: 161
I thought they were brilliant when you shared their creation with us. They look even better in context.
 
Photrio.com contains affiliate links to products. We may receive a commission for purchases made through these links.
To read our full affiliate disclosure statement please click Here.

PHOTRIO PARTNERS EQUALLY FUNDING OUR COMMUNITY:


Ilford ADOX Freestyle Photographic Stearman Press Weldon Color Lab Blue Moon Camera & Machine
Top Bottom