-
Welcome to Photrio!Registration is fast and free. Join today to unlock search, see fewer ads, and access all forum features.Click here to sign up
- Home
- Forums
- Analog Workflow Forums (100% Analog/Traditional)
- Analog Equipment
- Instant Cameras, Backs and Film
You are using an out of date browser. It may not display this or other websites correctly.
You should upgrade or use an alternative browser.
You should upgrade or use an alternative browser.
The Impossible Project: 22 March 2010
-
A
- Thread starter Ektagraphic
- Start date


Recent Classifieds
-
For Sale Noblex Pro 6/150 E2 Medium Format Panoramic Camera
- Started by jbprichard
-
For Sale BRONICA EC BODY AND METERED VIEWFINDER for parts or repair
- Started by Simon Benton
-
For Sale BRONICA EC 6x6 TLR WITH 2 LENSES and 2 BACKS
- Started by Simon Benton
-
For Sale Billingham Hadley One Full Padded Insert (Olive)
- Started by logan2z
-
For Sale Darkroom Equipment For Quick Sale
- Started by oficinouno
Forum statistics
Another tip* Keep in mind that part of the development is triggered by light. Right when the photo comes out of the camera you must protect it from light but after between 60-90 seconds ( I find 75 is good) you must flip over the photo to allow light to get to it so it can finish its process. If you leave the print out of the light for more than 90 it will come out overexposed.
Where did you hear this? I've not heard this at all. Surely when TIP says "triggered by light" they mean the initial exposure before being rollered...
Because mine go directly into something dark within seconds of being ejected and they stay there for 5 minutes until they are fully done developing - no peeking.
The Polaroid way was to use the decline of alkalinity for bleaching the protective dye. As such process takes place by time, in light, the light could erroneously considered the cause of the process.
The dyes were indicator dyes that became colorless as the pH became neutral or acid.
PE
The only way I'll ever get to try this is to have it shipped to a mate in the US and have them pop it in the post to me - every time I try to buy from Impossible they tack on some ridiculous postage for Australia. Sorry, I know full well it doesn't cost them $50 to mail me a pack of film.
It's not an error, it's how polapremium/impossible have always calculated shipping if you're outside the US or europe.
It's not an error, it's how polapremium/impossible have always calculated shipping if you're outside the US or europe.
3$ a shot would really eat into my beer budget.
Oh geeze. I really want to go to that. I have to do theatre stuff 20 miles away in the afternoon though. Might be a close run thing...
Rather misplaced praise, i think.
All credits to the IP for trying to get going what Polaroid let go.
But it's not as if they are clearing new paths, breaking new grounds. They're not conserving something that would otherwise be lost either.
As things stand today, they are still way short of doing what Polaroid once did, and what Fuji still does a lot better.
So kudos for what they are doing, but in the Grand Scheme of photographic things, they are not that note- or 'award-worthy'.
Good to see this public recognition.
When one finds oneself working toward a very difficult goal - especially in the public glare - sometimes a well-placed pat-on-the-back or words of encouragement can help with that effort. People are people, after all.
Ken
Good to see this public recognition.
When one finds oneself working toward a very difficult goal - especially in the public glare - sometimes a well-placed pat-on-the-back or words of encouragement can help with that effort. People are people, after all.
Ken
I'd be a lot more likely to give TIP praise for a mediocre product if they didn't surround it with all of the marketing/flashy BS that just increases the price but does nothing for the quality of results. In fact I give more credit to Ilford for manufacturing the emulsion rather than TIP playing the cozy little product game.
The elephant in the room here is that TIP play the marketing game quite well. Personally, as long as the product works well, just give it to me in a recycled army boot without all of the mind-games.
perkeleellinen
Subscriber
The elephant in the room here is that TIP play the marketing game quite well.
Hence the award from a press association.
Hence the award from a press association.
Hence more burning of energy without anything useful coming from it.
Having finished my first set of eight test photos I thought I'd post a few observations for those have yet to give this new film a try.
First the global stuff. The camera is a non-folding Dead Link Removed. I also tested the Polatronic 2350 handle-mount electronic flash unit. Both camera and flash are fully functional and in near new condition, albeit around 30 years old. They were well stored but dusty and required a thorough exterior cleaning. The camera interior, however, was pristine.
The film is the Impossible PX 100 Silver Shade/First Flush. I purchased two packs intending to use the first for testing only. This first pack exhibited the delamination issue reported by Impossible – the so-called "LLP" problem.
Because of this, all eight of the photos show the characteristic "thumb-gouge" at the top of the frame, and the side edges ("rails") on the backsides separated to greater and lesser degrees on each frame.
This separation resulted in goo deposits on the pod rollers which may have had the effect in later frames of causing uneven goo distribution and uneven development. However, some of the unevenness did appear to self-mitigate over several days. After sitting out for a week the third frame showed almost no evidence of banding, even though it was very apparent at the time of exposure. But the second frame was not so lucky.
And on that subject of white specks, I did see them. But they were not nearly as intrusive as I had believed they might be. To be honest, they were a bigger problem when I scanned for sharing than when I held and looked directly. This turned into a non-issue for me.
Finally, scan settings were determined for the first photo. All of the others were scanned identically, so coloration may be compared directly. The first scan was eyeball-matched as close to the original as possible (on my uncalibrated CRT monitor). The only enhancement was sharpening to bring out a similar level of detail to the original. Since this is a CRT, the sharpening may appear excessive on an LCD.
Here are the individual frames,

Photo #1: Two wicker chairs in front of a stone fireplace. This very first effort was using the Polatronic flash. The chairs were there to supply fine detail. Of the eight photos this is one of three I classified as relatively successful. Given the current material constraints, there is good detail in the wicker. And given that detail, it appears the sonic rangefinder did its job.

Photo #2: A pickup truck in front of a mountain cabin. An overcast day resulted in a red light underexposure warning by the camera. The lens is only f/9.4, so this was not unexpected. Turning the lighten/darken wheel had no effect, so I reset it to center position and exposed anyway. The frame popped out and I walked it into the cabin and placed it into an old Kodak Velox 4x5 paper box for darkness. It was, however, immediately exposed to light from the overcast sky for perhaps 30 seconds beforehand. And the ambient temperature that day was in the low 50s F. Unknown to me the rollers already had some goo from Photo #1.

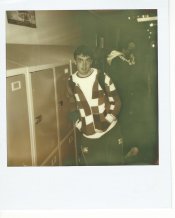
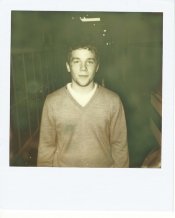
Photo #3: No model release, so I can't ID this fellow. Camera was tripod-mounted and shutter released using the air bulb shown. Exposure was also via the on-camera flash. Camera was carefully manually focused for the measured distance. The higher effective shutter speed of the flash again helps to show good detail, this time in the sweater. This is the second of the three "successful" photos.

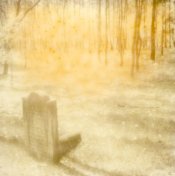
Photo #4: A mottled-light picture of forest detail on a sunny day, my first outdoor attempt. Exposure wheel set to the middle. The popped frame was exposed to the bright blue sky for maybe 10 seconds before making it into the darkness of the Velox paper box. Ambient temperature here was around mid-40s F outside, low-60s F inside. I knew this, but just wanted to try it anyway. (A bit overly light I'd say... but the thumb-gouge came out great!)

Photo #5: A small out building in bright sunlight. This is the worst of the eight. Or the best of the delamination failures. Take your pick. Exposure wheel set to middle. Camera handheld and positioned in shade. The white blob on the right originally showed tracer tracks similar to the artifact on the upper edge, but they eventually faded to white. Temps were in the low 60s F. Have no idea of the sequence of events that caused this. However, this frame was immediately shielded from light (within 1-2 seconds) by grabbing and sticking it under my jacket until it was deposited indoors into the magic Velox box. All of these Velox-darkened developments were for 5-10 minutes before any peeking.

Photo #6: Emboldened by a finally visible image in the above third try outdoors, I tried again a few minutes later. (Note the shadow progression.) Same as above I shielded the popped frame within 1-2 seconds and dropped it into the box. There were no differences between #5 and #6. Except, of course, for the goo factor. After #1 the unevenness had appeared to be improving. Maybe the deposited goo was wearing off? Don't know for sure. But the huge delamination of #5 seemed to recharge the mess and this following frame was really badly banded.

Photo #7: While there were obviously too many things going on to isolate single variables in a run of only eight frames, seemingly the most repeatable issue was the amount of light hitting the frame when it popped from the camera. So I took a few minutes and constructed a small nearly light-tight dark box from black matt board and black construction paper, held together by black photo tape. This time I set the exposure wheel to maximum darken and attached this tiny portable "darkroom" box to the front of the camera. This frame shows the effect of that darkened exposure setting along with virtually no additional ambient light striking the freshly popped frame. Finally some density, but also an odd new artifact – that vertical section of greater density on the left side.

Photo #8: So with only one frame left, finally my best guess. Again mottled bright sunlight in a blue sky. Temps in the low to mid 60s F. Exposure wheel returned to the default middle. No ambient light at all on the freshly ejected frame. (You can see the blurred front edge of the little box at the bottom.) Ten minutes development in darkness before peeking. Somewhat self-cleaned rollers, so only slight banding which self-mitigated almost completely. (Just guessing on that cause-effect relationship.) Voila. The third relatively successful image. And the first successful outdoors one.
Temporary conclusions drawn from all of this after spending US$21, plus shipping for these eight frames?
(1) Definitely a work in progress. Not there yet for casual users. But lots of fun for someone who likes to tinker. And, and least for me, fun enough to anxiously await the next PX 100 iteration. Instant pictures. How cool is that? I wonder if some enterprising soul might someday figure out a way to do the same thing electronically? Ya' think?
(2) Impossible claims the delamination issue ("LLP") is fixed. Hopefully that would fix the blobs. And if I'm guessing right, that may also help solve the banding problems. And the roller cleanup tasks. Next to the exposure issues, these were the biggest problems.
(3) Hanging a mini-darkroom off the front of the camera will be necessary for at least my second pack of this iteration of PX 100. But obviously it can't be a long-term solution. Even a few seconds ambient light, especially when mixed with cold temps, seems to have a large effect which manifests as apparent overexposure. Impossible says reduced light. I'm thinking no light might actually be the best.
(4) For me those temperature range requirements (63F-75F) are only going to be satisfied for a couple months each summer.
(5) Density and color continue to change over days. The sepia becomes more so. And banding during this time seems to minimize. Note that photos #4 through #8 were made on the afternoon I posted this so they have yet to grow into their true sepia color.
(6) My best results were when exposing with the electronic flash. Possibly because ambient light levels were therefore already low on the ejected frame. And also possibly because I was indoors where the temperature was already regulated into the required range. And the faster effective shutter speed of a flash enhanced fine detail.
(7) The process is probably best suited to a minimalist aesthetic. At the least to bold, identifiable subject matter. Or experimentation.
None of the above is at a variance with Impossible's published information to date. Although I have noticed their published speed for this film creeping upwards. It says 100 on the box. On their website I saw it as 125. And in their PDF instruction manual it says 150.
They say to shield from light, although the degree of shielding seems to require more than they suggest, even factoring in colder temps. They say temps affect results. And they say there was a lamination problem, even offering credit refunds for it. No surprises, really. I got my money's worth.
So the bottom line question is: Will I buy more of this stuff? Yep. I think so. Too interesting to walk away from now. I want to see where this goes.
Is The Impossible Project an assured success? A done deal? Nope. I don't think so. Not yet anyway. At least not for the class of photographers that normally hang out here.
Could they eventually be a success with this stuff? Again, don't know. But I'm intrigued enough to want to find out. And so I will exercise my patience in pursuit of that goal.
And no, I won't be pestering them for a few dollars back because of the delamination issue. I'd rather they put that money back into their product research.
Ken
First the global stuff. The camera is a non-folding Dead Link Removed. I also tested the Polatronic 2350 handle-mount electronic flash unit. Both camera and flash are fully functional and in near new condition, albeit around 30 years old. They were well stored but dusty and required a thorough exterior cleaning. The camera interior, however, was pristine.
The film is the Impossible PX 100 Silver Shade/First Flush. I purchased two packs intending to use the first for testing only. This first pack exhibited the delamination issue reported by Impossible – the so-called "LLP" problem.
Because of this, all eight of the photos show the characteristic "thumb-gouge" at the top of the frame, and the side edges ("rails") on the backsides separated to greater and lesser degrees on each frame.
This separation resulted in goo deposits on the pod rollers which may have had the effect in later frames of causing uneven goo distribution and uneven development. However, some of the unevenness did appear to self-mitigate over several days. After sitting out for a week the third frame showed almost no evidence of banding, even though it was very apparent at the time of exposure. But the second frame was not so lucky.
And on that subject of white specks, I did see them. But they were not nearly as intrusive as I had believed they might be. To be honest, they were a bigger problem when I scanned for sharing than when I held and looked directly. This turned into a non-issue for me.
Finally, scan settings were determined for the first photo. All of the others were scanned identically, so coloration may be compared directly. The first scan was eyeball-matched as close to the original as possible (on my uncalibrated CRT monitor). The only enhancement was sharpening to bring out a similar level of detail to the original. Since this is a CRT, the sharpening may appear excessive on an LCD.
Here are the individual frames,
Photo #1: Two wicker chairs in front of a stone fireplace. This very first effort was using the Polatronic flash. The chairs were there to supply fine detail. Of the eight photos this is one of three I classified as relatively successful. Given the current material constraints, there is good detail in the wicker. And given that detail, it appears the sonic rangefinder did its job.
Photo #2: A pickup truck in front of a mountain cabin. An overcast day resulted in a red light underexposure warning by the camera. The lens is only f/9.4, so this was not unexpected. Turning the lighten/darken wheel had no effect, so I reset it to center position and exposed anyway. The frame popped out and I walked it into the cabin and placed it into an old Kodak Velox 4x5 paper box for darkness. It was, however, immediately exposed to light from the overcast sky for perhaps 30 seconds beforehand. And the ambient temperature that day was in the low 50s F. Unknown to me the rollers already had some goo from Photo #1.
Photo #3: No model release, so I can't ID this fellow. Camera was tripod-mounted and shutter released using the air bulb shown. Exposure was also via the on-camera flash. Camera was carefully manually focused for the measured distance. The higher effective shutter speed of the flash again helps to show good detail, this time in the sweater. This is the second of the three "successful" photos.
Photo #4: A mottled-light picture of forest detail on a sunny day, my first outdoor attempt. Exposure wheel set to the middle. The popped frame was exposed to the bright blue sky for maybe 10 seconds before making it into the darkness of the Velox paper box. Ambient temperature here was around mid-40s F outside, low-60s F inside. I knew this, but just wanted to try it anyway. (A bit overly light I'd say... but the thumb-gouge came out great!)
Photo #5: A small out building in bright sunlight. This is the worst of the eight. Or the best of the delamination failures. Take your pick. Exposure wheel set to middle. Camera handheld and positioned in shade. The white blob on the right originally showed tracer tracks similar to the artifact on the upper edge, but they eventually faded to white. Temps were in the low 60s F. Have no idea of the sequence of events that caused this. However, this frame was immediately shielded from light (within 1-2 seconds) by grabbing and sticking it under my jacket until it was deposited indoors into the magic Velox box. All of these Velox-darkened developments were for 5-10 minutes before any peeking.
Photo #6: Emboldened by a finally visible image in the above third try outdoors, I tried again a few minutes later. (Note the shadow progression.) Same as above I shielded the popped frame within 1-2 seconds and dropped it into the box. There were no differences between #5 and #6. Except, of course, for the goo factor. After #1 the unevenness had appeared to be improving. Maybe the deposited goo was wearing off? Don't know for sure. But the huge delamination of #5 seemed to recharge the mess and this following frame was really badly banded.
Photo #7: While there were obviously too many things going on to isolate single variables in a run of only eight frames, seemingly the most repeatable issue was the amount of light hitting the frame when it popped from the camera. So I took a few minutes and constructed a small nearly light-tight dark box from black matt board and black construction paper, held together by black photo tape. This time I set the exposure wheel to maximum darken and attached this tiny portable "darkroom" box to the front of the camera. This frame shows the effect of that darkened exposure setting along with virtually no additional ambient light striking the freshly popped frame. Finally some density, but also an odd new artifact – that vertical section of greater density on the left side.
Photo #8: So with only one frame left, finally my best guess. Again mottled bright sunlight in a blue sky. Temps in the low to mid 60s F. Exposure wheel returned to the default middle. No ambient light at all on the freshly ejected frame. (You can see the blurred front edge of the little box at the bottom.) Ten minutes development in darkness before peeking. Somewhat self-cleaned rollers, so only slight banding which self-mitigated almost completely. (Just guessing on that cause-effect relationship.) Voila. The third relatively successful image. And the first successful outdoors one.
Temporary conclusions drawn from all of this after spending US$21, plus shipping for these eight frames?
(1) Definitely a work in progress. Not there yet for casual users. But lots of fun for someone who likes to tinker. And, and least for me, fun enough to anxiously await the next PX 100 iteration. Instant pictures. How cool is that? I wonder if some enterprising soul might someday figure out a way to do the same thing electronically? Ya' think?
(2) Impossible claims the delamination issue ("LLP") is fixed. Hopefully that would fix the blobs. And if I'm guessing right, that may also help solve the banding problems. And the roller cleanup tasks. Next to the exposure issues, these were the biggest problems.
(3) Hanging a mini-darkroom off the front of the camera will be necessary for at least my second pack of this iteration of PX 100. But obviously it can't be a long-term solution. Even a few seconds ambient light, especially when mixed with cold temps, seems to have a large effect which manifests as apparent overexposure. Impossible says reduced light. I'm thinking no light might actually be the best.
(4) For me those temperature range requirements (63F-75F) are only going to be satisfied for a couple months each summer.
(5) Density and color continue to change over days. The sepia becomes more so. And banding during this time seems to minimize. Note that photos #4 through #8 were made on the afternoon I posted this so they have yet to grow into their true sepia color.
(6) My best results were when exposing with the electronic flash. Possibly because ambient light levels were therefore already low on the ejected frame. And also possibly because I was indoors where the temperature was already regulated into the required range. And the faster effective shutter speed of a flash enhanced fine detail.
(7) The process is probably best suited to a minimalist aesthetic. At the least to bold, identifiable subject matter. Or experimentation.
None of the above is at a variance with Impossible's published information to date. Although I have noticed their published speed for this film creeping upwards. It says 100 on the box. On their website I saw it as 125. And in their PDF instruction manual it says 150.
They say to shield from light, although the degree of shielding seems to require more than they suggest, even factoring in colder temps. They say temps affect results. And they say there was a lamination problem, even offering credit refunds for it. No surprises, really. I got my money's worth.
So the bottom line question is: Will I buy more of this stuff? Yep. I think so. Too interesting to walk away from now. I want to see where this goes.
Is The Impossible Project an assured success? A done deal? Nope. I don't think so. Not yet anyway. At least not for the class of photographers that normally hang out here.
Could they eventually be a success with this stuff? Again, don't know. But I'm intrigued enough to want to find out. And so I will exercise my patience in pursuit of that goal.
And no, I won't be pestering them for a few dollars back because of the delamination issue. I'd rather they put that money back into their product research.
Ken
Last edited by a moderator:
Great review Ken  This film has a very vintage feel, I kinda like it.
This film has a very vintage feel, I kinda like it.Took my first two shots with the PX-600 in a 600 camera yesterday. I really like it. Just some first observations: (-)a few white spots, (+)very nice sepia colouring, (+)resolution/sharpness seems better than my last Polaroid 600 colour pack. I still have to think of a good way to protect the photo from light immediately after it is ejected. That might improve the shots.
I will shoot some more before sharing some examples.
I will shoot some more before sharing some examples.
I don't even shoot this film but I must say Ken's review is excellent and informative.
Just went to this Impossible Project's online store. They show both PX100 and PX600 as out of stock. Anyone know what's going on.
Just went to this Impossible Project's online store. They show both PX100 and PX600 as out of stock. Anyone know what's going on.
could be good news. It's not like they're going to discontinue it without warning like some others.
I don't think that's it, not with them opening stores and such. My guess and hope is that they are refining the product and we are past the first flush. I noticed they said they had some problems with developer leaking. Thye are probably coming up with the solution thus the "out of stock".
They sold out of the first run of most of the films. I don't know how big their production run was, but the film seemed to be pretty popular. It was marketed through lomo, Urban outfitters and some other places.
See this thread for discussion on fading...
http://www.flickr.com/groups/px100/discuss/72157623867314463/
http://www.flickr.com/groups/px100/discuss/72157623867314463/
darkosaric
Member
Have any users experienced fading in the shadow areas on this new film? I have attached two scans which show fading a few days after taking the shoots. They looked fine originally.
Original picture (px100):
Dead Link Removed
Picture after 4 weeks - attached :\
Attachments
Looks like either a shutdown problem or a drydown problem. These are typical in integral packs. I'm sorry to see it happen. They apparently just didn't have things right with this material from the looks of things.
PE
PE
| Photrio.com contains affiliate links to products. We may receive a commission for purchases made through these links. To read our full affiliate disclosure statement please click Here. |
PHOTRIO PARTNERS EQUALLY FUNDING OUR COMMUNITY:  |