The (Canon) F-one-kenstein project...

Frank Dean,  Blacksmith

A
Frank Dean, Blacksmith

  • 8
  • 5
  • 61
Woman wearing shades.

Woman wearing shades.

  • 1
  • 1
  • 68
Curved Wall

A
Curved Wall

  • 6
  • 0
  • 87
Crossing beams

A
Crossing beams

  • 10
  • 1
  • 109
Shadow 2

A
Shadow 2

  • 5
  • 1
  • 79

Recent Classifieds

Forum statistics

Threads
198,842
Messages
2,781,730
Members
99,725
Latest member
saint_otrott
Recent bookmarks
0

Andreas Thaler

Subscriber
Joined
Nov 19, 2017
Messages
4,863
Location
Vienna/Austria
Format
35mm
Excellent! 👍

I can fully understand all of this, but for my part I'm trying to put something aside.

I did most of the projects I presented here last year. Almost all within a day. When I add it all up, I'm shocked. But I learned a lot from it. If COVID hadn't caught me before Christmas, it would have continued like this. And for me, one burnout is enough.

That's why I'm slowing down now, see my current X-700 renovation project 😌

Enthusiasm is fuel, energetic but also dangerous 👻
 

Andreas Thaler

Subscriber
Joined
Nov 19, 2017
Messages
4,863
Location
Vienna/Austria
Format
35mm
On the other hand, the more practiced you are, the faster you work and it's less stressful.

Finding the right size is difficult 🙃

Sorry, OT OVER
 
OP
OP
Laurent

Laurent

Subscriber
Joined
Oct 15, 2004
Messages
1,829
Location
France
Format
Multi Format
Excellent! 👍

I can fully understand all of this, but for my part I'm trying to put something aside.

I did most of the projects I presented here last year. Almost all within a day. When I add it all up, I'm shocked. But I learned a lot from it. If COVID hadn't caught me before Christmas, it would have continued like this. And for me, one burnout is enough.

That's why I'm slowing down now, see my current X-700 renovation project 😌

Enthusiasm is fuel, energetic but also dangerous 👻
Thanks! I try to work on my ADHD, if I start too many projects I know I'll fail, so I try to keep a balance between boredom and burnout...

So, today was a short day as I did many other things (including posting several packages that will free room in my drawers and also some budget for other projects (so many cameras awaiting a saviour 😎).

Anyway, I did manage to get the mirror box out again. It's MUCH easier when the camera in unwound, lesson learned!

First thing is that my lubrication is not the cause of the aperture preview lever being lazy again. Not sure this is good news since it means I have to find the actual cause. I suspect the Matsuba lever and aperture striker have something to do with it. Initially the striker was not getting back to its rest position, and I thought something was bent. I think I'll put the mirror box back again with some grease in this area, to see if I find evidences of friction.

The other thing was to replace the wire I've cut previously (I could have just soldered it to the other part but since I have good reasons to doubt of the wiring, I'll try to check all wires and make sure they are in the right place)

So I "unrouted" the wire to get it free: remove the small hook that keeps it in the right curve on the left side of the camera and remove the metal part that protects the aperture following mechanism as it blocks the wire on its path.

MirroxBox_ChangeWire_1.jpg


The wire is easily removed, and unsoldering it is quite easy. Would be easier if I wasn't too lazy to remove the reed contacts from the camera, but it's very doable.

New wire in place, just had to get rid of all the solder remaining in the hole (desoldering pump was not invented for no reasons), then solder it.

MirroxBox_ChangeWire_4.jpg


Next, route it back to the other side of the camera: through the front panel, with the other one. Then around the lens mount. I left some slack so that it does not get too much tension later.

MirroxBox_ChangeWire_2.jpg


Through the front panel to the back of the mirror box.

MirroxBox_ChangeWire_5.jpg


Then put the aperture lever protection back, and the wire goes under the hook...

MirroxBox_ChangeWire_6.jpg


That's it for today, I hope tomorrow I'll find a solution to replace the self-timer until I have a replacement part of a way to fix the spring. My son will be a key part of this tack I guess...
 
OP
OP
Laurent

Laurent

Subscriber
Joined
Oct 15, 2004
Messages
1,829
Location
France
Format
Multi Format
What I find amazing is the level of knowledge of the camera all of this gives. I'll never look at it the same way now.
 

Andreas Thaler

Subscriber
Joined
Nov 19, 2017
Messages
4,863
Location
Vienna/Austria
Format
35mm
The Japanese engineers had created something ingenious that still works after more than 40 years. I am amazed every time I see the inside of these cameras.
 
OP
OP
Laurent

Laurent

Subscriber
Joined
Oct 15, 2004
Messages
1,829
Location
France
Format
Multi Format
My Kodak is close to 100 years old (I think it dates from 1926...) and works...
 
OP
OP
Laurent

Laurent

Subscriber
Joined
Oct 15, 2004
Messages
1,829
Location
France
Format
Multi Format
So, today's task was to get the top covers back to an acceptable shape, so that they could 1) be put back in place 2) allow proper functioning of the counter and backdoor opening mechanism.

I first prepared a wooden form that was close enough to the inside shape so that I could hammer the metal back in place.

The form is quite simple: a 31mm wide piece of wood, with angles cut at the right angle.

MeasureAngle.jpg


I'm now able to put the cover on the form and start working it back

Fomr_InPlace.jpg


The covers were badly impacted:

Form_Left_Top.jpg


Form_Left.jpg


Right_Right.jpg


A combination of hammering (with a wooden dowel as an intermediate) and some sheer pressure from a vice were able to put the covers almost back to shape.

Pressure_Right.jpg


Right_Right_After.jpg


At the end they look better.

Final_Front.jpg


Final_Top.jpg


Final_Back.jpg


Final_Bottom.jpg


More importantly, I was able to put them back AND check the counter and backdoor opening work better...

CoversInPlace_AV.jpg


CoversInPlace_AR.jpg


Since the mirror box is removed, and the camera unwound, I did not try to wind the mechanism, but set the counter to an arbitrary number before putting the covers back, and checked it went back to "S" when I opened the door.

The camera will not earn a beauty price, but it may well be a working camera at the end !
 
OP
OP
Laurent

Laurent

Subscriber
Joined
Oct 15, 2004
Messages
1,829
Location
France
Format
Multi Format
One caveat: in the process, I accidendly dislodged the small piece that displays the speed indicator and needles in the finder.

DisplayPiece.jpg


Time to wonder at the design: the small green wheel rotates by the action of a cable that is moved by the speed selector on the other side of the camera! Sorry, the image is fuzzy, my "smart" phone is not very good at closeup...

SpeedWheel.jpg


When the piece is in the right place, it looks like this (this is also a note to myself for remounting time)

BAckInPlace.jpg


So that's it for today on this camera.

This morning, I also did a sanity check of my projects for the self timer. It seems feasible to block the lever in the self-timer direction while keep it working fine for the aperture simulation. My technical expert (aka my son) plans to put the timer on one of the fancy machines they have at school so that we can make a fake mechanism that will couple to the lever and keep it upright.

I even thought this could give us room to put a little converter to regulate the battery voltage to 1.35 v exactly... Will keep this in the back of my mind.
 
OP
OP
Laurent

Laurent

Subscriber
Joined
Oct 15, 2004
Messages
1,829
Location
France
Format
Multi Format

Andreas Thaler

Subscriber
Joined
Nov 19, 2017
Messages
4,863
Location
Vienna/Austria
Format
35mm
How do you assess the condition of the F-1 inside? Corrosion, dirt, status of lubrication, wear of mechanical parts, any visible weak points?

Such a long and well-used camera can also be used as a study object in terms of the success of the design over decades of use.
 

Andreas Thaler

Subscriber
Joined
Nov 19, 2017
Messages
4,863
Location
Vienna/Austria
Format
35mm
There is an excellent book by Günter Richter from 1977 with 360 pages on the Canon F-1. You can also learn a lot of details about the technology. It may also have been translated into languages other than German. Available antiquarian.

 
Last edited:
OP
OP
Laurent

Laurent

Subscriber
Joined
Oct 15, 2004
Messages
1,829
Location
France
Format
Multi Format
How do you assess the condition of the F-1 inside? Corrosion, dirt, status of lubrication, wear of mechanical parts, any visible weak points?

Such a long and well-used camera can also be used as a study object in terms of the success of the design over decades of use.
Hi Andreas,

a quick assessment would be that I don't see obvious signs of wear, but these cameras seem to have been lightly used (they both have some minimal brassing, so I'd assume some care was taken when storing/using them)

The donor camera was bought as defective, and had several issues (some still exist)
- lubricant became sticky (e.g. in the mirror box, the aperture simulation mechanism being the most obvious)
- hard to operate backdoor lock, partly due to a bent top cover, and partly to very dry mechanism
- defective self timer, due to a broken spring. This jammed the camera shutter release and removing it solves the issue.
- unability to mount a lens due a jammed/blocked aperture striker, apparent cause seems a bent matsuba lever (there are some signs of friction on the main casting, I still have to improve this, even if it seems to work fine)
- shutter capping at high speeds, still pending investigation

The only weakness I can see if this self timer spring, but I guess this is exceptional and may be due to some other abuse.

The camera was clearly dismantled before, as a missing screw, some stripped heads, some unexpected wiring color seem to indicate.

All the mechanical parts I could see show signs of use (shiny areas at friction points) but no obvious wear.

The camera had some corrosion but I'd assume this is due to poor storage as it's mainly located on one area (left part of the camera, including the backdoor lock, flash and CAT contacts, and partly under the camera baseplate.

An amazing piece of engineering, I think
 
OP
OP
Laurent

Laurent

Subscriber
Joined
Oct 15, 2004
Messages
1,829
Location
France
Format
Multi Format
This week-end has been an interesting one. I'm still making my way around this mirror box, and also investigated the general status of the camera.

Since I lost trace of where the different wires were going, I opened my other F1, for a quick comparison. Obviously I found where the wires would go, and understood my mistake: the camera was wired correctly but I did not find the right wire to unsolder. Anyway, since it was strangely routed, I'd had issues to get it out so I think I did the right thing.

So I replaced the white wire by a brand new one.

Comparing the cameras was instructive, as it shows the F1n is not just a cosmetic revamping of the Old one:

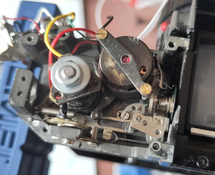
For example the "power control" system is very different, reeds are used in the new one instead of flat contacts (which look quite dirty by the way...)

F1n_RewindSide.jpg

F1n power control.

F1_Old_RewindSide.jpg

F1 old power control. Contacts have been cleaned with IPA, there was a lot of CRUD there.

The underside look similar but one can see differences nonetheless, it would be interesting to know why there are made and what they bring.

F1_Vs_F1n.jpg


The F1n is at the top, the cameras are not in the same state, but it's easy to see the rewind button is locked differently for example.

Cameras were not in the same state because... I discovered there are many ways to jam a F1. I struggled the whole afternoon trying to put the mirror box back in place (and realize I'm not sure what worked at the end) . The lever at the top which confirms the mirror is up so that the shutter can be released is accessible using a small probe inserted near the speed control knob. Zydaric's recommendation to half-wind the mechanism is good (this is also how I jammed the camera...)

Even if I know I'll have to remove the mirror box again, I took the opportunity to remove crap from the camera using compressed air. For this, I put the back in place, and shielded the shutter with a piece of business card (yes it's a shameless plug for my company ;-) that's all I had)

CleanInside.jpg


Curtains are still dirty, I dont know how I could get them clean. May try a sensor swab or something like this.

To finish in beauty, since the box is back in place, I did not resist putting the prism rails back, and try focusing using the other F1's screen... Looks nice to me, so I guess the question is more when the camera works again than if it can work again...

A special note for @Andreas Thaler : I found some wear in the camera, which tells something about how much it was used I think. It's on the lever that locks the aperture striker (I did not investigate other places at the moment) and is quite obvious...

ApertureStrikerWear.jpg

Edit: a quick check shows the F1n has no visible wear in this place. S/N of the old one is 208345, the "F1n" is 653205.


I'm waiting for a "A" screen that I'll dedicate to this camera, as it was the initially fitted screen, and the "E" one will go back to the other one, for which it was the "normal" screen. And still looking for a prism at a decent price, or a parts camera if any crosses my way...
 
Last edited:
OP
OP
Laurent

Laurent

Subscriber
Joined
Oct 15, 2004
Messages
1,829
Location
France
Format
Multi Format
thanks @Andreas Thaler !

I forgot to mention I was able to check the meter side of the camera. Report looks mixed, but I think it's still positive: despite lots of rust in the area, and some CRUD, the galvanometer still works, as I could check using the battery tester. One big issue is the slider that transmits speed to the other side is non functional, and this is due to the galvanometer being unable to move freely.

At the moment I'm unable to locate the "scribe line" that should help putting it back, but I guess I'll have to choose between keeping a non functioning meter (which interferes with the speed knob as it blocks the slider which itself blocks the cam) or taking the risk of a removal for cleanup, with the risk of being unable to put it back in the right position.

I guess the choice is obvious when stated that way. At worst I guess I could make a mark myself so that I can put the galva back in the right place, and maybe calibrate it more finely afterwards...
 
OP
OP
Laurent

Laurent

Subscriber
Joined
Oct 15, 2004
Messages
1,829
Location
France
Format
Multi Format
Even if "RTFM" is definitely not a good answer (I'm working on compassion, and in the IT field this "answer" is used way too much), I could at least use it for myself.

Rereading the issues of Camera Craftman pointed me in the right direction, and I can even locate it on the photographs of the most recent F1. So I guess I have no excuses and will proceed to fixing (or attempting to fix) the galvanometer system.

Edit: I did indeed find it on the donor camera.

ScribeLine.jpg


So I'll read the manual again to understand how to remove this part properly, and lubricate after proper cleansing...
 
Last edited:
OP
OP
Laurent

Laurent

Subscriber
Joined
Oct 15, 2004
Messages
1,829
Location
France
Format
Multi Format
My respect as you fight your way through this mechanical jungle! 🛠️
Thanks! The fact is I love it, even if it's discouraging from time to time...

These days I've been struggling with stubborn screws, with more or less success.

The camera is full of corrosion on the left side, so I removed the meter and the rewind shaft for a much needed cleanup. I did this without unhooking the cable that actuates the "speed disk" (the speed indicator that shows in the finder), mostly because it did not want to come.

This is the left side before cleanup

LeftSideBare_CRUD.jpg


The whitish area close to the finder is some white corrosion powder that almost welded the galvanometer to the main casting. I used a fiberglass pencil to remove this, plus some compressed air to get the dust out. It's better now

LeftSideBare_Clean.jpg


(and focus is better also )


The meter had the same powder below it, same treatment and it's better.

The rewind shaft has a detent to stay in the right position, and the screw is rusted to death. Since the part is easy to handle, I won't try negotiation, Dremel + flat screw driver will get the screw out and I'll replace it.

Speaking of replacement, one of the two screws on the galvanometer "bridge" refused to unscrew, and the head got badly stripped (they are brass). So I drilled my way through it, then drilled further with a smaller bit (1.5mm for the head, then 1mm). It's easy as the brass is much less hard than the main casting. Replacement tap and screws are on their way (believe it or not, I had no smaller tap than 2mm. Now I'll have 1, 1.2, 1.4, 1.6). No good images of this part at the moment...
 
OP
OP
Laurent

Laurent

Subscriber
Joined
Oct 15, 2004
Messages
1,829
Location
France
Format
Multi Format
I received the screws and taps yesterday, so I'm no longer blocked.

I rethreaded the two holes using the tap in my fingers, as it was more a cleansing that a real tapping.

Replacing the rewind shaft support is easier when the meter mount is out of the way, and I found I can casually block it in the mirror box

ReplacingRewind.jpg


One mistake I did (no images) is that I found easier to replace the shaft support without the shaft, then I've put the meter in place... only to discover the ball bearing and its spring are impossible to put back in place. So I removed the meter again, then placed the bearing, its spring and the screw.

RewindBallBearing.jpg


Here you can see the ball, the screw is lower, just above the big red wire. The post that's almost in the way holds the meter "bridge".

Everything back in place, just have to put the link transmitting the "speed + ISO" information, and the spring that pulls the whole thing (meter + link + speed/ISO cam sensor from the other side), and it works again...

MeterBackInPlace.jpg


(yes both screws are new, the old one started to look strange and I don't want to have to drill it as I did with her sister*) The spring and link can be seen on the bottom of the image. What is not visible is the cord which moves the finder speed indicator. It is not on the pulley yet (the pulley is visible behind the "large" hole at the bottom right of the image.

Two dentist's probes do wonder for this, it's only a matter of patience. I have to see my dentist again, I'm sure he has more of these tools ready to discard, and I have use for them...

Next task: resolder the meter wire (the meter fell... clumsy me!) and pray that it works again (I'm not sure about the needle operating properly, and the best way to test will be using the battery tester)

Current question: I read on another forum some guy had recalibrated his OM1 to use 1.5V batteries by reindexing the meter mechanism. The OM1 seems a different beast (always dreamt of one, now that I have seen this iit's even more desirable) but the principles are the same, so may be I could have a 1.5V F-one-kenstein... Since everything is resistance driven, I guess linearity can be assumed, so pivoting the galvanometer could be an elegant solution...

I also have to decide if I start trying to adjust the speeds of if I remove the mirror box AGAIN to try to lubricate the shutter's axles...


* yes, in French, a screw is gramatically female, and a bolt grammatically male...
 

Attachments

  • MeterBackInPlace.jpg
    MeterBackInPlace.jpg
    192.3 KB · Views: 15
OP
OP
Laurent

Laurent

Subscriber
Joined
Oct 15, 2004
Messages
1,829
Location
France
Format
Multi Format
I suck at taking notes, so most of the time I rely on my memory (which still serves me fine on these subjects), as well as on the photos. I can sometimes use my ADHD to my profit, as the camera can be seen as a whole set of exciting smaller mechanisms, and the novelty of each issue keeps entertaining my brain.

Most of the time mechanical objects have an inner logic which can be found (stated another way: if I forget something, most of the time some reflexion makes me able to find the proper way to reassemble things)

I'd love to be able to draw proper diagrams of the camera, as I find drawing is the very best way to document such things. I should get back to practicing drawing.

I find the Camera Craftsman to be invaluable in this aspect, especially their in depth analysis of the F1, it gives the keys to the inner logic of the device. (And I'd love to get my hands on the diagrams Phot'Argus published when they were still alive, which are both beautiful and informative, see for example their test of the M6: Collection-Appareils-TestM6.
 

Andreas Thaler

Subscriber
Joined
Nov 19, 2017
Messages
4,863
Location
Vienna/Austria
Format
35mm
I suck at taking notes, so most of the time I rely on my memory (which still serves me fine on these subjects), as well as on the photos.

Same with me 👍

It is important to me that all disassembled parts are on the table in the order in which I removed them. So I don’t use any little jars for groups of parts.
 
Last edited:
Photrio.com contains affiliate links to products. We may receive a commission for purchases made through these links.
To read our full affiliate disclosure statement please click Here.

PHOTRIO PARTNERS EQUALLY FUNDING OUR COMMUNITY:


Ilford ADOX Freestyle Photographic Stearman Press Weldon Color Lab Blue Moon Camera & Machine
Top Bottom