Testing Baby Speed ..

Recent Classifieds

Forum statistics

Threads
199,351
Messages
2,790,152
Members
99,878
Latest member
kur1j
Recent bookmarks
1

peter k.

Member
Joined
Nov 27, 2011
Messages
1,404
Location
Sedona Az.
Format
Multi Format
Purchased a 2.25 x 3.25 Baby Speed, inexpensively, and basically sold for parts although its functioning.
I have taken a shot of a rock wall, at an angle to check focus of the lens and its ground glass.

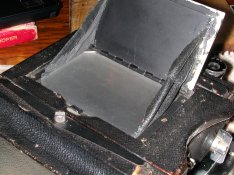
The ground glass looks like it may be original, as it has 45* corners, but compared to my other 3x4 and 4x5 ground glass, its not as clear. I gently washed it and let dry. Its bright enough, but with a loop the focus is not sharp as it is in the others.

I took a test shot with its 90 mm Graphex Optar W.A. lens, and focused on a B&W printed Digital Dog target on poster board, as clearly as I could on the ground glass and got the result below. Not very sharp.

So one question is, is it the ground glass or lens?
So having another 90mm lens, thought I swap lenses and try that.

Taking the existing lens and lens board off the camera, found that on the back there was screw that was screwed in, but to long.. and removed it. The other screw must have been broken off, for someone went in there and tried to drill it out. They drilled through the round flat circular plate, which I suspect is what holds the lens to the lens board, where the screw had been.
Oh my!
Looking down into the hole, you can still see a bright brass reflection, which may have been caused by th e tip of the drill bit as it started into another part of the lens. But the screw seems to be pretty well drilled out. The hole is also a little oblong, like they tried to the drill rest of the screw out as if they had started off centered. I think they stopped drilling when they realized they had gotten through the plate.

Now there are three other holes in the back of this plate, and you can see the lens board through them. There are also scars of where someone has tried to use a screw driver or something to push and rotate the round circular plate counter clockwise. Evidently it has not worked, for I tried a little pressure, and nothing is moving.

So finally another question:
Am I correct that this flat circular plate needs to be rotated to take the lens off the lens board, and if so which is the correct direction.

Rock Wall Test.jpg
 

shutterfinger

Member
Joined
Feb 25, 2013
Messages
5,020
Location
San Jose, Ca.
Format
4x5 Format
So one question is, is it the ground glass or lens?
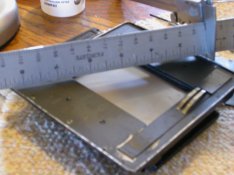
The film plane of the film holder, roll film holder, and ground glass ground side should all be at the same position from the camera back frame. The specification is .197 inch ± .007 inch. Take the back off and measure the distance using a straight edge and measure at multiple positions.
Am I correct that this flat circular plate needs to be rotated to take the lens off the lens board, and if so which is the correct direction.
I haven't a clue what you are talking about. The shutter case at the back/lens board side of the shutter or is it a mount flange stuck on the shutter??
Post a picture of it even if its from your portable Alexander's nuance device. (hint:cell phone)
 
OP
OP
peter k.

peter k.

Member
Joined
Nov 27, 2011
Messages
1,404
Location
Sedona Az.
Format
Multi Format
The film plane of the film holder, roll film holder, and ground glass ground side should all be at the same position from the camera back frame. The specification is .197 inch ± .007 inch. Take the back off and measure the distance using a straight edge and measure at multiple positions.

I haven't a clue what you are talking about. The shutter case at the back/lens board side of the shutter or is it a mount flange stuck on the shutter??
Post a picture of it even if its from your portable Alexander's nuance device. (hint:cell phone)

Are you talking about removing the spring back only or the whole back?
Here's a picture of the lens from the rear...
DSCN0238.JPG
 
Last edited:

Jim Jones

Subscriber
Joined
Jan 16, 2006
Messages
3,740
Location
Chillicothe MO
Format
Multi Format
The round flat plate with several holes is a lens flange. It was originally intended to be screwed to the front of a lens board by the three large countersunk holes. Using lens flanges on the back of the lens board as in your case is often done as a matter of convenience. If there was a screw in one of the smaller holes, it may have been intended to keep the lens flange from rotating as the lens was screwed into it. Beware, some lenses have a small screw protruding from their rear to prevent the lens from rotating on the lens board. If so, to remove the lens, your lens flange must be unscrewed. This obviously has been attempted before. You can try unscrewing the lens from the lens board and lens flange, but don't use too much pressure in case there is that protruding screw on the back of the lens. If this doesn't work, you'll have to unscrew the flange. Since the lens flange isn't pristine, you need not worry about adding a few more scrapes to it.
 
OP
OP
peter k.

peter k.

Member
Joined
Nov 27, 2011
Messages
1,404
Location
Sedona Az.
Format
Multi Format
You see in the picture, in the three larger holes there are no screws, holding it to the board, and the one smaller screw is out, the other drilled, maybe out, maybe not.
So remains the question, counterclockwise is the correct direction to try and unscrew the lens flange?
 

shutterfinger

Member
Joined
Feb 25, 2013
Messages
5,020
Location
San Jose, Ca.
Format
4x5 Format
You see in the picture, in the three larger holes there are no screws, holding it to the board, and the one smaller screw is out, the other drilled, maybe out, maybe not.
So remains the question, counterclockwise is the correct direction to try and unscrew the lens flange?
Yes its standard right hand threads, right to tighten, left to loosen. Stick a adjustable spanner in any two of the holes in the flange, grip the shutter and turn them opposite each other so that each is turning left when viewed looking into it.

Are you talking about removing the spring back only or the whole back?
The small spring mounted panel is the "focus panel". It holds the ground glass. The back is the complete frame that separates from the camera body. Make sure when measuring the straight edge is on edges of the back that are equal height and that the focus panel does not move back from the back. Some cameras have uneven back edges the Graphic should not.
 

Dan Fromm

Member
Joined
Mar 23, 2005
Messages
6,839
Format
Multi Format
OP, you took the ground glass off and washed it. Fine, wonderful. Did you put it back with the matte side facing the lens? If not you'll never get good focus on film.
 
OP
OP
peter k.

peter k.

Member
Joined
Nov 27, 2011
Messages
1,404
Location
Sedona Az.
Format
Multi Format
OP, you took the ground glass off and washed it. Fine, wonderful. Did you put it back with the matte side facing the lens? If not you'll never get good focus on film.
So true, but yes the glass is on correctly...
 
OP
OP
peter k.

peter k.

Member
Joined
Nov 27, 2011
Messages
1,404
Location
Sedona Az.
Format
Multi Format
The specification is .197 inch ± .007 inch. Take the back off and measure the distance using a straight edge and measure at multiple positions.

Ok took the back off.. and looking at the metal back that the spring back is attached to, its uniform, unbent, but no where near depth of a little more than 3/16 of an inch. (3/16" = .1875) Its very close to a 1/16" The wooden back that it is attached to is in fine shape.
Alas, all I can demise, is I'm still not getting where you mean to measure.
Sigh... :cry:
 

shutterfinger

Member
Joined
Feb 25, 2013
Messages
5,020
Location
San Jose, Ca.
Format
4x5 Format
1. there is only one camera back. the back has two parts A. the the frame and B. the focus panel.
2. with the back laying camera side up draw two imaginary lines through the center of the ground glass, one horizontal and one vertical. This gives the ground glass 4 sections.
3. place a straight edge across the top half of the ground glass and measure from the top edge of the straight edge to the center of the ground glass quadrant. Move to the other quadrant and measure to the center of that quadrant. Move the straight edge to the bottom half of the ground glass and repeat. You should now have 4 measurements that should be the same. if they are not the same repair the focus panel so that they are.
4. install a film holder in the back as it would be if on the camera using a scrap sheet of film installed with the dark slide removed.. repeat the measurement procedure of step 3.
ALL Measurements of steps 3 and 4 should be the same. If they differ more than the 1/2 the thickness of a sheet of film either side of the ground glass depth there is a problem with the back or ground glass mounting.

Clear?
 
OP
OP
peter k.

peter k.

Member
Joined
Nov 27, 2011
Messages
1,404
Location
Sedona Az.
Format
Multi Format
NO!
Take the back off and measure the distance using a straight edge and measure at multiple positions.
Onto another effort of Mystic translation of a camera that Shutterfinger can only image, not see ... :pinch:
to hopefully reveal the true measurement sequence described for the novice 'Lost in Space' AKA... "My name...is José Jiménez" and I am a space cadet. (If you remember this line, from Ed Sullivan, ur an old 'art to)
DSCN0246.JPG

"Take the back off..." Pop open the Ground Glass hood, and remove the curtain on each side... then, "measure the distance using a straight edge and measure at multiple positions."
Hmmm.. that can't be right.. its better but closer to 2/16" ...

Oh for heaven sakes: DA!!!!
Space Cadet has landed.. If I .."Take the back off..." by removing the spring back... and flip it over, with the matte side up... "measure the distance using a straight edge and measure at multiple positions."
Then at last the 3/16+" comes to light... one can only measure diagonally to get an accurate measure off the center of the ground glass, as between the corners on all four sides, the wood narrows down then back up to the other corner ...
All these measurements where equal.. although difficult to get.. and not as accurate to the point of ".197 inch ± .007 inch" What are you using to measure with? Even with my dial caliper, its difficult. Dug back in the past and got an old Stainless Steel ruler from the 60's, that started its measure right at the end.. without a space, and that helped.
Looking good on all 5 points.. 4 corners and center.

Then, before I replaced the Spring Back, had to remove the center screw on the right hand side, that would be under the spring back, in the location where the film holder will be inserted.
With the Spring Back back on, the back removed and flipped over again with the matte side up, and with the film holder in, with scrap film, and dark side removed... its well over 3/16+", as the thickness of the steel back, and its 90* external edge that dovetails with the wooden back has been added. When using a straight edge across the complete back assembly, its much more than 3/16" of course.
So where have I gone wrong this time?
But the measurements where equal distance on all 5 points, so all seems to be well for the ground glass test, unless you see an error in my procedure.

DSCN0248.JPG

Question...
Summery.. Measuring just the the film holder edge to scrap film surface, with the dark slide out, is the correct distance, of .197 that you are referring to. This has to match the distance of the spring back when it is removed, to the ground glass. This distance has to be maintained of course, across its full surface, for the Ground Glass to be accurate, in its portrayal of the film surface, within the film holder, when we focus.

Then to further clarify, we may take the the back of the camera off to verify that nothing has been bent, broken ect, on the metal back and wooden camera body, by proving that that distance should also be the same is to the scrap film, for all five points and consistent.

Do I have it at last?

If so, Thank you...for you for your patience with a space cadet. :smile:
 

shutterfinger

Member
Joined
Feb 25, 2013
Messages
5,020
Location
San Jose, Ca.
Format
4x5 Format
Well if your measurements as shown in picture 2 of this post are the same for both the ground glass and holders with film in them then all is good. .197 ± .007 is where the film surface should be from the edge of the film holder and therefore the depth in the focus panel that the ground side of the ground glass should be as the focus panel and film holder rest against the same surface on the back frame.

Now verify that the focus panel is being held firmly in place against the back frame when no film holder is installed. If it is not retension/reform the springs so that it does. If it is being held in place then "Baby's" diaper has been changed so move on to the lens.
Please clarify which lens, I'll see if I can find a diagram for it so that it can be verified to have a correct assembly.
 

Jim Jones

Subscriber
Joined
Jan 16, 2006
Messages
3,740
Location
Chillicothe MO
Format
Multi Format
Picture 2 shows an error in measuring. The correct procedure is to remove the two screws that hold the springs on the outside of the focusing panel, and remove that panel. Measure from the face of the panel to the ground glass, the so-called "T" distance. According to the ANSI/PIMA IT3.108-1998 American National Standard, it is 0.0197". +/- 0.007 inches for film holders. However, the T distance is from the face of film holders to the film holder septum, which would be to the BACK of the film, not the emulsion. This discrepancy is disregarded by most photographers.
 
OP
OP
peter k.

peter k.

Member
Joined
Nov 27, 2011
Messages
1,404
Location
Sedona Az.
Format
Multi Format
Picture 2 shows an error in measuring. The correct procedure is to remove the two screws that hold the springs on the outside of the focusing panel, and remove that panel. Measure from the face of the panel to the ground glass,...
Yes you are correct, and that's what I did, (no picture), read under Oh for heaven sakes: DA!!!!
But with what I had to measure.. film in or out.. wouldn't make any difference
 
OP
OP
peter k.

peter k.

Member
Joined
Nov 27, 2011
Messages
1,404
Location
Sedona Az.
Format
Multi Format
Now verify that the focus panel is being held firmly in place against the back frame when no film holder is installed.
Yes, I am aware of that, and they are firm..

Lens was stated in post #1, its a 90 mm Graphex Optar W.A.

Got this lens off the lens board, and installed a different 90mm lens.. took another test shot with the same Ground Glass, same wall, but different lens, going off to develop it now.
It seemed that focusing the image was easier and sharper.
Same film, same exposure, close to the same time in day.
 
OP
OP
peter k.

peter k.

Member
Joined
Nov 27, 2011
Messages
1,404
Location
Sedona Az.
Format
Multi Format
90 mm Graphex Optar W.A. lens. Cropped Re scan of first image Post#1 no editing.

#05.2  -2x3- RckWall Graphex Optar .jpg


Changed lens .. Rapax Wollensack 31/2 90mm f6.8 Raptar #839831
Today's shot on same tripod, same height, location and distance from this target.
Duplicated the same frame size on the previous scan, and cropped same size to 2x3" with no editing.
The only difference between the lenses, besides the name ect, this one has a flash connection, the other does not.
Same camera, same ground glass used to focused on.

#06.2  -2x3- RckWall RapaxLens  .jpg


So its the lens.. now why?
What do I look for?

This is really interesting...
 

Dan Fromm

Member
Joined
Mar 23, 2005
Messages
6,839
Format
Multi Format
Peter, I just read this thread from the beginning and found no mention of the aperture(s) at which you took your test shots. What did you do?

Rhetorical question: Peter isn't the first person to post complaints about poor image quality. And his post isn't the first to get responses that focus on misplaced ground glass and defective film holders. I've had intermittent problems with poor image quality and so far all have been due to operator error. I don't start blaming the lens until I've eliminated causes of operator error. Understand, I've decided that some of my lenses are pretty poor, but only after repeated test shots as well controlled as possible. I've yet to encounter an off-spec roll holder or camera back/focusing panel. So why does everyone look there first and not at the operator?
 
OP
OP
peter k.

peter k.

Member
Joined
Nov 27, 2011
Messages
1,404
Location
Sedona Az.
Format
Multi Format
Hmmmm... Interesting:
From
http://www.cameraeccentric.com/html/info/wollensak_14.html
page 53...
It shows at top of page, in chart, that the f/5.6 is labeled for 2x3 and 3x4.

Lower the in another chart for the f/6.8 which both lens are that we are testing with, it is shows for 3x4 only.
Could this be the problem???

Yet, they are both f/6.8, and the Raptar has a better image, on the 2x3 which were testing.

~~~
Next effort...

Holding the both the Optar and Raptor to light source, the 'look' of both of them for scratches, ect looked equal to me, who really doesn't know what he is really looking for.

Then... On the Optar, the bad dog no bone lens of the day, took both the front and back off.. and although they looked ok, cleaned them, with proper solution and cloth, replaced them, made sure they where screwed all the way on, and took another look and compared to the 'better' Raptar on the camera through the ground glass.
Nothing has changed, the Raptar has better focus.

Now what?

In link to Camera Eccentric it shows there are two lenses on each half. (above link, page 52)
Should I dismantle to verify it has correct assembly?
How could they be incorrectly assembled, there are just two parts, to each lens? One external and one internal. There so small, how could they 'fit' in their holders if they were not correctly assembled?
 

Dan Fromm

Member
Joined
Mar 23, 2005
Messages
6,839
Format
Multi Format
Peter, the f/5.6 lenses on p. 53 are telephotos, not wide angle lenses. They are available in focal lengths of 8", 10" and 15", not 90mm.

The 90/6.8 wide angles are 4 elements in 4 groups double Gauss types, not telephotos.

Wollensak QC wasn't the best. You've found out that one of your 90/6.8 wollies is better than the other. Use the good one and be happy.
 
OP
OP
peter k.

peter k.

Member
Joined
Nov 27, 2011
Messages
1,404
Location
Sedona Az.
Format
Multi Format
Ah.. thank you on the note about the f/5.6
and yes I agree, I have taken the better 90mm off its 3x4 lens board and it has found its new home on the 2x3.

But it perplexes my curiosity, how a lens, which looks the same when you view the glass, is not as good as the other.

My anal analytical has a hard time excepting this without some understanding of a reason. :getlost::errm::cry:
 

shutterfinger

Member
Joined
Feb 25, 2013
Messages
5,020
Location
San Jose, Ca.
Format
4x5 Format
There are 4 pieces of glass in two barrels. The two pieces of glass in the front should be identical to the two pieces of glass in the rear but I'll bet they are not due to manufacturing tolerances or someone like me trying their hand at polishing.
If you can remove the lens elements from their barrels I would do so looking at the spacing of the innermost elements first then swaping the innermost elements all within the bad lens. Only make outside measurements on the good lens.
Someone unlike me may have disassembled the lens and reassembled it incorrectly or with the elements transposed.
 

Jim Jones

Subscriber
Joined
Jan 16, 2006
Messages
3,740
Location
Chillicothe MO
Format
Multi Format
I agree with Dan's comments about the 90mm f/6.8 isn't one of the great wide angle lenses. The instructions that came with my Optar 90mm f/6.8 said, "Like most Wide Angle lenses it is recommended the lens be stopped down to f/11 or smaller for critical definition." I usually used it at f/22. Sharpness may deteriorate due to diffraction when stopped down further. For tests on both the Optar and Raptar versions of this lens, see http://www.hevanet.com/cperez/testing.html. Different samples of these lenses may give widely different results. It might be informative to test both of your lenses over a range of apertures.
 
Photrio.com contains affiliate links to products. We may receive a commission for purchases made through these links.
To read our full affiliate disclosure statement please click Here.

PHOTRIO PARTNERS EQUALLY FUNDING OUR COMMUNITY:


Ilford ADOX Freestyle Photographic Stearman Press Weldon Color Lab Blue Moon Camera & Machine
Top Bottom