Taylor Hobson Cooke Anastigmat repair/modification

R..jpg

A
R..jpg

  • 0
  • 0
  • 5
WPPD25 Self Portrait

A
WPPD25 Self Portrait

  • 7
  • 1
  • 76
Wife

A
Wife

  • 5
  • 1
  • 106
Dragon IV 10.jpg

A
Dragon IV 10.jpg

  • 4
  • 0
  • 94
DRAGON IV 08.jpg

A
DRAGON IV 08.jpg

  • 1
  • 0
  • 63

Recent Classifieds

Forum statistics

Threads
197,889
Messages
2,766,436
Members
99,495
Latest member
Brenva1A
Recent bookmarks
0

Steve906

Subscriber
Joined
Mar 2, 2015
Messages
95
Location
Leicester England
Format
Multi Format
Following a photrio conversation with members Ian Grant and Digital Wendy I took on the task of restoring iris operation to the
6 3/8" Taylor Hobson Cooke Anastigmat mentioned in this post :-
The main problem being that the iris ring did not turn and the lens was well and truly stuck in the lens board.
The Lens initially took a little convincing but came out of the board with little fuss.
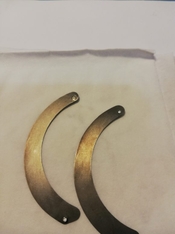
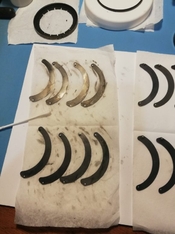
The iris leaves were just visible inside so applying any force to attempt movement could easily damage leaves/pins. Complete disassembly being the only option.
Initially all looked good
lsmall16.jpg
lsmall13.jpg
lsmall12.jpg

On removal it became apparent one pin had parted company with its leaf.
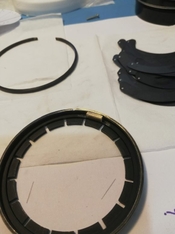
With leaves and glass removed it was possible to attempt movement of the iris ring -
lsmall10.jpg

But Nothing worked, many options were tried with oil, acetone, heat, cold etc. etc..
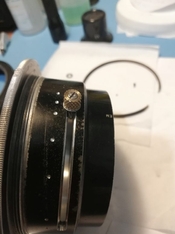
to the point I was fearing damaging the main body metalwork. Having many years experience of getting things undone I decided other options were required. Short of turning off the iris ring, which I concluded was aluminium to aluminium thread that had seized due to corrosion/galling, and manufacturing a replacement, there were few options left.
I suggested adding and additional slot through the iris ring to access the slotted drive ring.
lsmall09.jpg
 

Attachments

  • lsmall07.jpg
    lsmall07.jpg
    34.3 KB · Views: 101
  • lsmall05.jpg
    lsmall05.jpg
    47.8 KB · Views: 84
  • lsmall03.jpg
    lsmall03.jpg
    47 KB · Views: 86
  • lsmall02.jpg
    lsmall02.jpg
    48.1 KB · Views: 91
  • lsmall08.jpg
    lsmall08.jpg
    66.7 KB · Views: 83
  • lsmall01.jpg
    lsmall01.jpg
    59.7 KB · Views: 89
OP
OP

Steve906

Subscriber
Joined
Mar 2, 2015
Messages
95
Location
Leicester England
Format
Multi Format
PT 2

This was agreed and the job began -
lsmall08.jpg
lsmall07.jpg

Leaf cleaning and new brass pin fitted - originals were aluminium.
lsmall05.jpg
lsmall04.jpg

Measuring for new index marks and setup for new slot.
lsmall02.jpg
lsmall03.jpg

New thumbscrew made and brass block added to strengthen new thread.

Loose Front glass was cemented in, it was originally rolled in.

Other glass cleaned and re-fitted.

Downside is the lens has to be preset before attaching to camera and focus has to be established when stopped down or before presetting.

Hopefully however this lens will have many more years of use :smile: and not just a f2.5!!
 

Digital Wendy

Member
Joined
Feb 21, 2014
Messages
74
Location
Oxford UK
Format
Multi Format
@Steve906 Has done an amazing piece of work here.
Lens is sparkly and useable and now with added DoF!
Not quite ready for new 'in use' pictures as there is still some leather work to be replaced.
My photographic abilities have not lived up to the lens this weekend. ( Disappointing processing results yesterday). I'll keep working on that too.
 

Digital Wendy

Member
Joined
Feb 21, 2014
Messages
74
Location
Oxford UK
Format
Multi Format
In practice this lens is so fast that I can focus perfectly well at f4. The compromise without the accessible aperture adjustment, while unconventional, is entirely workable.
The camera will never be 'point and shoot' so my slow photography is now even slower 🙂.
@Ian Grant too, who also helped with this project.
 

Ian Grant

Subscriber
Joined
Aug 2, 2004
Messages
23,242
Location
West Midland
Format
Multi Format
Good to hear the lens is now usable at apertures other than f2.5 :D

It's going to be interesting seeing some images made with the lens. Well done Steve.

Ian
 

Digital Wendy

Member
Joined
Feb 21, 2014
Messages
74
Location
Oxford UK
Format
Multi Format
Finally produced a respectable 1/4 plate image with my 'new' lens.
Nothing special - mainly testing DoF at F16.
Proves to me that I'm making progress with processing too. My next portraits could be spectaular 🤞. (Particularly as I now have some Ilford film)
All suggestions and critisisms are very welcome. I'm so happy to be making progress.
.
Huge thanks to everyone here who has been so helpful and encouraging with this project.
.
Next issue - scanning negatives larger than 60mm wide. But that's a whole new thread!
 

Attachments

  • SaltersReading.png
    SaltersReading.png
    662.1 KB · Views: 101

Digital Wendy

Member
Joined
Feb 21, 2014
Messages
74
Location
Oxford UK
Format
Multi Format
If you look at the top message on this thread you will see that it links to another thread about the shutter and other bits on this same Thornton Pickard Ruby Deluxe camera reflex camera.

 
OP
OP

Steve906

Subscriber
Joined
Mar 2, 2015
Messages
95
Location
Leicester England
Format
Multi Format
Finally produced a respectable 1/4 plate image with my 'new' lens.
Nothing special - mainly testing DoF at F16.
Proves to me that I'm making progress with processing too. My next portraits could be spectaular 🤞. (Particularly as I now have some Ilford film)
All suggestions and critisisms are very welcome. I'm so happy to be making progress.
.
Huge thanks to everyone here who has been so helpful and encouraging with this project.
.
Next issue - scanning negatives larger than 60mm wide. But that's a whole new thread!

Nice to see it coming together. I never realized how difficult it is to get any DoF on large format, that is an extreme test though 🙂.
 

Digital Wendy

Member
Joined
Feb 21, 2014
Messages
74
Location
Oxford UK
Format
Multi Format
. . . that is an extreme test though 🙂.

Yes indeed! Very clear illustration for future reference. It truly is a portrait lens so I need more volunteers.
Couple of other, more usual, images did not expose correctly. Don't yet know why . . .
Still lots to learn and I am SO enjoying having this camera working properly 😃.
 

filmtested

Member
Joined
May 6, 2025
Messages
1
Location
Canada
Format
Large Format
PT 2

This was agreed and the job began -
View attachment 319159 View attachment 319160
Leaf cleaning and new brass pin fitted - originals were aluminium.
View attachment 319161 View attachment 319162
Measuring for new index marks and setup for new slot.
View attachment 319163 View attachment 319164
New thumbscrew made and brass block added to strengthen new thread.

Loose Front glass was cemented in, it was originally rolled in.

Other glass cleaned and re-fitted.

Downside is the lens has to be preset before attaching to camera and focus has to be established when stopped down or before presetting.

Hopefully however this lens will have many more years of use :smile: and not just a f2.5!!

How was the front element held in place? I need to swap mine out, but I'm not exactly sure what you mean by "rolled in." Thanks!
 
OP
OP

Steve906

Subscriber
Joined
Mar 2, 2015
Messages
95
Location
Leicester England
Format
Multi Format
How was the front element held in place? I need to swap mine out, but I'm not exactly sure what you mean by "rolled in." Thanks!
IIRC access to the front glass was from the inside of the body, maybe the front ring could not be removed?
Rolled in refers to a thin section of metal that is bent over the glass all around the edge, this had split and broken away in places.
If you are going to replace the glass with one from another lens with a different problem be aware that at Taylor Hobson each glass element would be selected (and or adjusted) to suit the other other elements creating a matched set. It will probably be very close but it may not give the expected quality.
Depending on the actual problem you have, it may be an idea to consider other options?
 

Ian Grant

Subscriber
Joined
Aug 2, 2004
Messages
23,242
Location
West Midland
Format
Multi Format
How was the front element held in place? I need to swap mine out, but I'm not exactly sure what you mean by "rolled in." Thanks!

I have numerous old TTH lenses, they never used "Rolled In" front elements. I've seen the lens in this thread a few times, and it's retained b from the threaded front, like my own Cooke Triplets.

Ian
 
OP
OP

Steve906

Subscriber
Joined
Mar 2, 2015
Messages
95
Location
Leicester England
Format
Multi Format
That's probably true Ian. I of course know it wasn't rolled in from the front. I do remember fixing it by cementing from the inside. there was a very thin section of metal that had parted company with the main body in several places. The glass element had nothing to be tightened onto if indeed the front ring could have been moved. The glass was loose behind the front ring because it could move past the lip originally intended to support it by several millimeters.

I presume I surmised that the effort to move the front (no spanner holes or slots and with heavy paint and aluminium to aluminium threads possibly seized as with the iris ring and with nothing for the glass to seat against anyhow) that the best cause of action was that taken.
Without the lens in front of me it's hard to say. The pictures I have are not of this aspect of the lens. I'd really like to see it again now.

I was just trying to answer filmtested's question as to what I meant. I wonder if he can confirm if he has an identical lens and if he succeeded in removing the glass?

Steve.
 
Photrio.com contains affiliate links to products. We may receive a commission for purchases made through these links.
To read our full affiliate disclosure statement please click Here.

PHOTRIO PARTNERS EQUALLY FUNDING OUR COMMUNITY:


Ilford ADOX Freestyle Photographic Stearman Press Weldon Color Lab Blue Moon Camera & Machine
Top Bottom