Step Wedge for Toning Experimentation?

blossum in the night

D
blossum in the night

  • 1
  • 0
  • 30
Brown crested nuthatch

A
Brown crested nuthatch

  • 2
  • 1
  • 44
Double Self-Portrait

A
Double Self-Portrait

  • 7
  • 2
  • 139
IMG_0728l.jpg

D
IMG_0728l.jpg

  • 7
  • 1
  • 101

Recent Classifieds

Forum statistics

Threads
198,711
Messages
2,779,665
Members
99,684
Latest member
delahp
Recent bookmarks
0

brian steinberger

Subscriber
Joined
Jan 5, 2007
Messages
3,007
Location
Pennsylvania
Format
Med. Format RF
I finally got around to making some test wedges on Ilford warmtone RC paper so I can do some toning experiments. I had a stouffer TP 4x5 21-step tablet that I've had for a while now. I put it in the enlarger to expose it onto a 5x7 piece of paper at around 4x6. After a few tests to get the contrast right, I ended up dialing in grade 00 and the step wedge was still too dense to produce full range of tones.

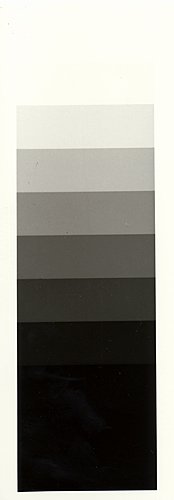
So what I did was take just one side (the thinner side) of the step wedge and increased contrast to make an 11 step wedge with tones from black to white. I could also rotate the paper after each exposure and get two wedges on one piece of 5x7 paper.

There has to be an easier way to do this. I would like to produce wedges similar to Tim Rudman's in his toning book. I saw stouffer has a nice step wedge that is 1/2" x5" but I would want to enlarge the wedge to make the step wedges bigger on paper.

How has anyone else done this? My way is not bad, I guess, but I would like more steps. See mine here.
 

Attachments

  • Step Wedge WT.jpg
    Step Wedge WT.jpg
    51.5 KB · Views: 86

dancqu

Member
Joined
Sep 7, 2002
Messages
3,649
Location
Willamette V
Format
Medium Format
How has anyone else done this? My way is not bad,
I guess, but I would like more steps.

Your and my method are very similar. From a 6x6 21
step wedge I project upon a 5x7 sheet. I may rotate
thereby checking for two exposure times. The 6x6
is divided into two bars, each 11 steps. What
could be easier? Dan
 

ann

Subscriber
Joined
Sep 10, 2002
Messages
3,336
Format
35mm
i have a whole series of these sitting around in the lab someplace.

i made 8x10 sheets, exposured as i would any 4x5 negative. Very easy
 

Dan Henderson

Member
Joined
Feb 6, 2005
Messages
1,880
Location
Blue Ridge,
Format
4x5 Format
I made some of these awhile back, using the wedge that is only about 1" wide by 6" or so long. Rather than enlarge the wedge I just contact printed it, and could get 8 or so wedges out of 1 sheet of paper. That seemed much simpler, and showed me what various papers, toners, and developers could do.
 

BobNewYork

Member
Joined
Jan 1, 2008
Messages
1,067
Location
Long Island,
Format
Medium Format
When I use the step wedges I usually project them onto the paper because it more closely resembles "real world" conditions. To test paper from scratch I start with a mid grade contrast, usually 2.5) and get an exposure that gives me the available tonal range somewhere in the middle - i.e. showing a few max black and paper base white steps at each end. Once I've got that I then test the other grades using exactly the same exposure. This way I can determine the contrast range for each filtration, (count the steps) and the relative speed of the paper compared to the middle grade, (count the step difference for the first, off-white step.) To test toners, I still use the same exposure, tone the wedge and then compare it to the untoned step wedges in the same way.

I'm just setting my darkroom up again and I intend to select a "standard" paper from which I'll to the step wedges. Then as I try new papers I'll do the same thing but keep notes as to the contrast and speed variance from my standard. This way, if I have a successful print on one paper and want to try another, or try toning, then I only have to adjust for the speed and contrast differences noted to reprint it without test strips etc.

It's quite quick once you nail the initial mid-grade exposure. You can print for each grade, one after the other and process them in two batches, or all together if you want. For toning assessment, I'll print two wedges of each grade - one for straight, one for toning.

Just make sure you keep clear notes on the back of each step wedge. It only needs to be paper and grade - but without it you have a bin full of beautifully exposed, (and totally useless,) step wedges. Any guesses how I know this:D:D

Bob H
 
OP
OP
brian steinberger

brian steinberger

Subscriber
Joined
Jan 5, 2007
Messages
3,007
Location
Pennsylvania
Format
Med. Format RF
Thanks guys for the responses. I guess I just don't understand why a step wedge (TP 4x5) would be so dense that it couldn't fit onto the range of photographic paper even at it's lowest grade. I guess it's just to represent all possible densities that are possible on film for other densitometry purposes.

I do like Dan's idea of the 1x6" step wedge and then contact printing them. Where did you find a wedge that size Dan? If nothing else I'll keep doing what I'm doing.
 

Martin Aislabie

Subscriber
Joined
Nov 17, 2007
Messages
1,413
Location
Stratford-up
Format
4x5 Format
I went a slightly different way

I dispensed with my Step Wedge and just exposed a sheet of paper with increasing amounts of exposure.

No negative in the Neg carrier, I took a sheet of 10x8 and started with a small enough exposure not to generate any tone, then in classic test strip manner I progressively increased the exposure to move from pure paper white to full back in 23 steps.

I know its 23 steps, as I used an RH StopClock in test strip mode and it will only do 23 steps (don't know why)

Once I had processed the sheet of 10x8, I cut into 1 inch strips.

One strip was left untoned; the others were toned for a range of times in the same bath of toner (15s, 30s, 1m, 2m, 4m, 8m & 16m)

When washed and dried, I was then quickly able to assess the effects of time on the toning effects against each other and the unprocessed strip

I was also able to compare different sheets of paper - although the stripes didn’t line up exactly, the starting tones would match and I just had to count the steps.

Generating the test sheets was slow but the comparison process was remarkably easy.

Martin
 

BobNewYork

Member
Joined
Jan 1, 2008
Messages
1,067
Location
Long Island,
Format
Medium Format
Thanks guys for the responses. I guess I just don't understand why a step wedge (TP 4x5) would be so dense that it couldn't fit onto the range of photographic paper even at it's lowest grade. I guess it's just to represent all possible densities that are possible on film for other densitometry purposes.

The 21 steps is 10 1/2 stops - more than the range of any current paper and I would think it's by design. So no you won't get a differentiation with all the strips. But the step wedge will cover the range of any paper you use.

The reason I project the step wedge is because that's what I'll do when I'm actually printing. This way flare and anything to do with with the lens is taken into account. I'm not honestly sure how much of a difference it makes - but that's my story and I'm sticking to it:D:D

Bob H
 
OP
OP
brian steinberger

brian steinberger

Subscriber
Joined
Jan 5, 2007
Messages
3,007
Location
Pennsylvania
Format
Med. Format RF
Good idea Martin. I don't have an f-stop timer, but it would still be easy to get get even half stops or whatever increment you wanted. This might be worth looking into for me.

Bob, I'm sure you're right as regards to enlarging the step wedge as opposed to contact printing it. So are there any step wedges available that are made for enlarging and offer an f-stop range that will fit photographic paper from one end to the other?
 

dancqu

Member
Joined
Sep 7, 2002
Messages
3,649
Location
Willamette V
Format
Medium Format
Bob, I'm sure you're right as regards to enlarging the step
wedge as opposed to contact printing it. So are there any
step wedges available that are made for enlarging and
offer an f-stop range that will fit photographic paper
from one end to the other?

Well you might take a pair of scissors to your 21 step step
wedge. If 21 steps are discernable on the paper the paper
grade is 000000 +/- a grade or two. Grade 00 will display
some where around 12 to 14 steps.

At least steps 1 and 2 must be the same black. Expose
the paper accordingly. If steps 1 and 2 are the same black
and step 3 a mite lighter count that 2 to 3 edge as the first
edge. Count all edges. Edge count minus 1 equals the step
count. Grade 00 should count as mentioned.

Edge counting is David Vestal's recommended method
for grade determination. That is if a reflection
densitometer is not at hand. Dan
 

fschifano

Member
Joined
May 12, 2003
Messages
3,196
Location
Valley Strea
Format
Multi Format
The reason I project the step wedge is because that's what I'll do when I'm actually printing. This way flare and anything to do with with the lens is taken into account. I'm not honestly sure how much of a difference it makes - but that's my story and I'm sticking to it...

I've done it both ways Bob, and there is a difference between projecting the step wedge and contact printing the thing. The differences are not that great, at least with the enlarging lenses I'm using, to justify burning that much paper to test for paper grades, filtration, and relative paper speed, or anything else. I use either the Stouffer T3110 (contact only), or the TP120-21 (projection or contact) and have no trouble accounting for the slight discrepancy. Speed points are usually within 1/3 stop. Contrast determinations are within 1/2 grade or less. By using contact prints of the step wedges, I can make 10 exposures with the T3110 or 8 with the TP120-21 from a singe 8x10 sheet of paper. Paper costs too much for me to be wasting it by making gorgeous enlargements of step wedges.
 

BobNewYork

Member
Joined
Jan 1, 2008
Messages
1,067
Location
Long Island,
Format
Medium Format
..... Paper costs too much for me to be wasting it by making gorgeous enlargements of step wedges.

I hear you. I must admit I haven't done a step wedge yet that I want to mat and frame:tongue:

I'm sure I read about the "real world" stuff somewhere and it made some sort of intuitive sense - so that's what I did. I've always printed by diffusion too so I wonder if it would make more of a difference with a condenser head.

Bob H
 

nworth

Member
Joined
Aug 27, 2005
Messages
2,228
Location
Los Alamos,
Format
Multi Format
When I experiment with print developers or toners, I like to have both a step tablet image and a print from a standard, familiar negative. Since I am not going to publish, neatness doesn't count. I just tear a sheet of paper in half and make my prints. I mark the backs with a litho crayon before I expose them so I can tell one from another. I don't usually keep them for long, but filing a 5X8 sheet would be pretty simple. Why try to complicate things by trying to look like a fancy publication?
 
Photrio.com contains affiliate links to products. We may receive a commission for purchases made through these links.
To read our full affiliate disclosure statement please click Here.

PHOTRIO PARTNERS EQUALLY FUNDING OUR COMMUNITY:


Ilford ADOX Freestyle Photographic Stearman Press Weldon Color Lab Blue Moon Camera & Machine
Top Bottom