Spotting prints

Recent Classifieds

Forum statistics

Threads
198,707
Messages
2,779,590
Members
99,682
Latest member
desertnick
Recent bookmarks
0

BetterSense

Member
Joined
Aug 16, 2008
Messages
3,151
Location
North Caroli
Format
35mm
I hate to even start, since I would rather just cross my fingers and try to keep my negatives spot free. But, I have at least one negative that has a spot in the emulsion. I see that Freestyle has various sizes of brushes, and dyes, and also has pens. What kinds of kit equipment do you find the most useful?
 

2F/2F

Member
Joined
Apr 29, 2008
Messages
8,031
Location
Los Angeles,
Format
Multi Format
Hi,

Freestyle has a nice set of six spot tones that is very reasonably priced and includes a storage box. I suggest the six, because every paper has a different tone, and it also helps to match toners. I have always heard that here is no such thing as a *truly black* dye in existence. All spot tones will have at least a tiny bit of a tint (variations of blue, brown, green, purple, etc.). It especially shows up in spot tone, where you water it down a whole lot to use it.

I would also get a fine-tipped brush. I have never needed anything else. You don't paint the stuff on. I have had the best success placing very tiny, light colored drops on bit by bit (by bit by bit by bit by bit....); simulating grains, building up to the right tone of grey gradually using a light tone, and filling any defects with a lot of tiny spots, rather than filling a defect entirely on one or a few passes. It is like exacting surgery, not painting. It takes forever, but the results are worth it.

Also, be sure to judge your work from a normal viewing distance. The goal is not to perfectly eliminate every defect and perfectly blend every repair so it looks exactly like silver, but just to make them unnoticeable to viewers. If you are judging your work with your eye right up against the print, or under a magnifier, you will be endlessly frustrated and will actually probably end up overdoing it in the quest for seamless perfection.

Additionally, even one drop of the stuff will last you a VERY long time. Get a plastic palette with six little cups from an art store. When you get the spot tone, you can put a drop in each cup; each from a different bottle of spot tone. Let it dry and stow it for later use. Then you don't even need to open the bottles until you have used up all that is there. The set will likely outlive you, me, and everyone else on APUG.

I usually have to mix to get the right tone. Usually I mix neutral (which is actually *quite* blue IMO) with sepia or selenium to match Ilford Warmtone FB glossy or Emaks. Even for Oriental paper, I still need to warm up the "neutral" spot tone.

Yet another thing: Start saving your reject prints for practice, if you don't already. You should always make practice runs on reject prints first, IMO.
 
Last edited by a moderator:

2F/2F

Member
Joined
Apr 29, 2008
Messages
8,031
Location
Los Angeles,
Format
Multi Format
Hi,

My kit is six bottles. it was $17.99. It includes everything in the kit to which you linked, plus Sepia Tone. Honestly, I can't see myself ever using Blue Black, Olive Tone, or Brown Tone, except perhaps very mildly as mixers or on heavily toned prints. It is too bad the five bottle kit got rid of Sepia Tone as opposed to Blue Black or Olive Tone.

If you call Freestyle, they may still have the six bottle kit. It is called Marshall's Spot All (Kit 6BT). The side of the box says MS6BT and BKA. The SKU below the bar code is 96727 51704. They do mention that the kit on the Website replaces another kit, however the number they list cannot be found on the kit that I have, so maybe it replaces another kit.

They also may have a three bottle kit, and you can certainly purchase individual bottles. Ask them what all they carry when you are on the phone. I would say the essentials are Neutral Black and Sepia Tone. You can probably mix most of the tones you need using those two.

BTW, now that I have my kit out, I can see that my favorite brush is called an 18/0, and I like the one with a fat handle. I don't think most recommend a brush this fine, but it is my favorite. I also have 5/0, 3/0, and 00, but they never see any use.
 
Last edited by a moderator:

fschifano

Member
Joined
May 12, 2003
Messages
3,196
Location
Valley Strea
Format
Multi Format
I must have gotten the last of the "Spotone" branded spotting dyes from before they went out of business. The new stuff is marketed by Marshalls now, and is called "Spot All." Whatever. This stuff lasts a long time because a very tiny bit is all you need. Water it down a lot, lighter than the lightest tone you'll need and then, like 2F/2F wrote, apply it in tiny little spots, little by little, until the spot is no longer obvious. Over do it and it gets really ugly, really fast. Fortunately, you can reverse it. Simply soaking the print in clean water will remove the dye in 10 minutes or so. Of course, you need to dry it and start over. Resin coated papers are tricky to spot, since they repel water from everywhere except the gelatin. Spotting fiber based papers is, by comparison, a piece of cake.
 

archphoto

Member
Joined
Dec 14, 2008
Messages
960
Location
Holland and
Format
4x5 Format
I started out with putting some dye onto a piece of plasic, smear it out a bit and let it dry.
Then I would take a 0000 brush with short hairs and build-up the spots needed.
Removing dye is a pain, it is better to layer it and let it dry inbetween.
Use distilled water to wet your brush and dried dye.
Protect the part of the print that you are not working on with a piece of paper.

That is all I believe.

Peter
 

MattKing

Moderator
Moderator
Joined
Apr 24, 2005
Messages
52,836
Location
Delta, BC Canada
Format
Medium Format
The pens can be effective too. I've got a set of Spot-Tone pens, and they work better for me than the dies and a brush, but that has more to do with me,than them.

Spotting is in my mind the only justification for digital :smile:.

Matt
 

BobNewYork

Member
Joined
Jan 1, 2008
Messages
1,067
Location
Long Island,
Format
Medium Format
2/F's point about judging from a normal viewing distance is crucial. When you first try spotting using a magnifier you tend to overdo it. My first few times ended up being days! I read somewhere once that if you're not careful, you end up trying to spot the grain out of the entire print! By my early experience that's no so far fetched!

Bob H
 

Jan Pietrzak

Member
Joined
Jul 8, 2003
Messages
240
Location
New Mexico
Format
Large Format
Spotting, I don't want to do it, but I have to.

Part 1 is good spotting materials Spot-tone is no more. So Marshalls is trying to fit the bill. In the work that I, my friends, and students have done. Marshalls just is not the thing. Some of us have seen color shifts in time or after dry mounting, so not good. So in working with Freestyle we looked for a new product. Only it was not new, just not a photo item. Peerless products have been around for a long time. And I feel that they are some of the best for spotting.

First they come dry or wet, sheets or liquid. I have used them my self and also in the classroom. They work. For you student types they even make a student kit. (developed by Ford Lowcock SMC and myself SMC/GC)

Part 2 a good brush again Freestyle sent me some brushes to try and did we find brushes I liked the Loew-Cornell ones just pick one or two from the catalog 10/0 or 18/0 are my choice to use.

Part 3 a good work space with good light and I use clip on fold up magnifiers on my regular glasses. That works just great for me.

Oh the last part, put on some good music and get a glass of (ok if you don't drink). And just get to it

Jan Pietrzak
 

yardkat

Member
Joined
May 24, 2006
Messages
172
Location
Salt Lake Ci
Format
Multi Format
The pens can be effective too. I've got a set of Spot-Tone pens, and they work better for me than the dies and a brush, but that has more to do with me,than them.

Ditto. I have much better luck with the pens, even on toned prints. I have the Marshalls set, and find that the colored dyes are really difficult. Trying to match those things to the tone of the prints usually ends up looking worse than if I had just used the plain colored one. I had an ancient bottle of Spottone which I liked way better than the Marshalls, but sadly I dropped it on the floor and it broke. :sad:
I think the idea isn't to match exactly the tone, but just to obscure the dustspot (at viewing distance) so that your eye doesn't automatically go to the white spot on the print.
 

Anscojohn

Subscriber
Joined
Dec 31, 2006
Messages
2,704
Format
Medium Format
I hate to even start, since I would rather just cross my fingers and try to keep my negatives spot free. But, I have at least one negative that has a spot in the emulsion. I see that Freestyle has various sizes of brushes, and dyes, and also has pens. What kinds of kit equipment do you find the most useful?
*******
Spotone and spit.
 

Chazzy

Member
Joined
Jan 17, 2004
Messages
2,942
Location
South Bend,
Format
Multi Format
I have extremely poor fine motor skills. Think the pens might be less fiddly for me than a teeny brush and dyes?
 

Monophoto

Member
Joined
Aug 27, 2004
Messages
1,689
Location
Saratoga Spr
Format
Multi Format
Forget "kits". Purchase a fine artists watercolor brush. I have a collection that I've collected at art store sales. #5/0 is the most useful, but broader brushes are sometimes useful.

I use Spotone, but it is no longer made. Marshall's offers a set of dyes that are just as good.

Spotting dyes usually come in a set of six colors - you generally only need the neutral and slightly warm colors. Mix the dyes in minute quantities using an eyedropper - a bottle of dye will last a very long time (my Spotone bottles are over 30 years old). But don't get too hung up on matching colors - the major objective of spotting is to 'minimize local contrast' according to David Vestal. The objective is to make the white spots less white compared with the gray areas around them.

I mix a few drops of dye on a white plastic palette - you can buy small white plastic dishes in art supply stores that are perfect for this. I use a white plastic container that formerly held makeup. Vestal uses a china saucer that he bought at a garage sale. Let the drops dry. Then, use a brush moistened in distilled water with a drop of photoflo to pick up some of the dried dye. Smear that bit of dye on another spot in the palette to make a gray spot. Repeat this process to generate a range of gray smears from very faint to slightly grayer than black. These smears can be used many times, and can be renewed as needed.

Use magnifiers (cheap drugstore reading glasses work just fine) to examine the print carefully with strong light. Examine a spot, and note the shade of gray that surrounds it - pick up a bit of dye using your moistened brush in a shade that is slightly whiter than the surrounding gray, and with a stippling effect, apply a series of dots of dye in the spot. If your light is directional, you can use the shadow of the brush to help you get the tip of the brush exactly where you want it to be in the spot - just bring the tip of the brush together with the shadow of the tip on the spot you are trying to correct. If you use a dye smear that is slightly lighter than the surrounding gray, then you can simply progressively add more spots until the spotted dye is dark enough.

Apply dye until it becomes difficult to differentiate between the spot and the surrounding gray when viewed under bright light and with your magnifiers. Then, when you look at the print with normal light and without magnifiers, the spot will no longer be obvious. Again - the objective is to reduce local contrast so that the bright white spot doesn't stand out.

To steady your brush hand, rest it on the print, using a piece of paper towel to protect the print from oils from your hand. Have a second paper towel that you hold in your other hand and use as a blotter.

Spotting is tedious, but it causes you to get up close and personal with your print. Frankly, sometimes the challenge is to know when to stop - - - you really don't need to spot the white spaces between the silver grains making up the image.
 

Mick Fagan

Subscriber
Joined
Sep 13, 2005
Messages
4,421
Location
Melbourne Au
Format
Multi Format
Charles, I think you could do some serious spotting with either a pen type thingy or a brush and the liquid Spotone type of product. You just need to fabricate a small spotting aid.

Take a flat piece of timber, say 75mm high by 15mm deep and 600mm long. At each end add a small spacer underneath, say 75mm high by 15mm deep by 50mm long, these are the feet. Attach some felt or something like that to the bottom of the feet, this aids in lessening scratches on your desk, or glass, or whatever.

The idea is to have your print flat, then you place your timber just above the area you need to spot, ensuring you straddle the print. You rest your hand on the timber, within reason, you should to be able to comfortably spot to the best of your ability.

I cannot tell you how easier it is with something like this, the effect is similar to using a tripod with your camera.

Mick.
 

Rick-in-LB

Member
Joined
Aug 16, 2008
Messages
57
Location
Long Beach C
Format
35mm
The sad this is I just got done spotting prints for class. Freestyle also sells a sheet of spotting dyes that works fine. The recommendation about the 5/0 brush is a good one. Make sure to "spot" not brush the imperfection. Also like mentioned let it dry before dabbing more dye. Another recommendation that I found is a little goes a long way. Don't try to do the whole picture in one sitting. Yes it is a pain and frustrating but you will get over it One last item, block your print with a piece of white paper so you can use the paper to get your tint/tone to where you need it to be before applying it to your print. Match it then apply it. Like Louie said "the objective is to reduce local contrast so that the bright white spot doesn't stand out".

Rick
 

RalphLambrecht

Subscriber
Joined
Sep 19, 2003
Messages
14,641
Location
K,Germany
Format
Medium Format
I hate to even start, since I would rather just cross my fingers and try to keep my negatives spot free. But, I have at least one negative that has a spot in the emulsion. I see that Freestyle has various sizes of brushes, and dyes, and also has pens. What kinds of kit equipment do you find the most useful?

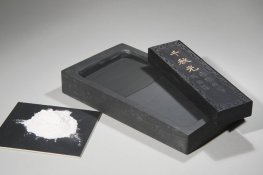
Thanks to good friends, I have enough Spotone to last me into the year 2561. I used SpotAll from Marshall's as well and it worked for me just as well. The only think, I'm not touching again are the lacquers from Schminke. However, keep in mind, Spotone is little more than ink. I'm convinced that a good drafting ink and a bit of gum arabic will work just as well. You could go the Edward Weston way and get yourself some dry India or China ink and mix as much as you need with gum arabic. I have tried that, it it works perfectly.
 

Attachments

  • ChinaInk.jpg
    ChinaInk.jpg
    116.1 KB · Views: 116

Toffle

Member
Joined
Mar 27, 2007
Messages
1,930
Location
Point Pelee,
Format
Multi Format
I might be in the minority here, but I actually find spotting prints to be a relaxing, almost therapeutic activity. In fact, sometimes I'll get a really bad print out of my discard boxes (which I never actually discard :rolleyes: ) and spend a half hour spotting happily away. As others have said, it is really easy to over do it. I prefer just to diminish the glaring white of dust specks rather than totally eliminate them. After awhile, you get a feeling for how much is enough, and learn to stop before you've made a mess of your print.

Cheers,
 

RalphLambrecht

Subscriber
Joined
Sep 19, 2003
Messages
14,641
Location
K,Germany
Format
Medium Format
I might be in the minority here, but I actually find spotting prints to be a relaxing, almost therapeutic activity. In fact, sometimes I'll get a really bad print out of my discard boxes (which I never actually discard :rolleyes: ) and spend a half hour spotting happily away. As others have said, it is really easy to over do it. I prefer just to diminish the glaring white of dust specks rather than totally eliminate them. After awhile, you get a feeling for how much is enough, and learn to stop before you've made a mess of your print.

Cheers,

I agree, if you put your mind to it (being able to put your brain on autopilot helps), spotting can be relaxing and highly rewarding. It is amazing how much difference one can make with so little change.
 

Nige

Member
Joined
Sep 8, 2002
Messages
2,316
Format
Multi Format
I usually spot my print upside down... the print upside down, not me! It stops you looking at the picture and lets you concentrate on the tones. Once I'm happy, I give it to the Mrs and see if she can pick my work or any others that need doing. I use an ice cube tray (small half sphere 'cubes') as my mixing palette. Same as everyone, I let it dry and work from that.
 

PVia

Member
Joined
Oct 3, 2006
Messages
1,057
Location
Pasadena, CA
Format
Multi Format
I haven't done much spotting, but when I have I've used India ink. I read that Weston used this (as mentioned above by Ralph). Disguising rather than correcting is the approach to use...

I'll have to look into the gum arabic, though...come to think of it there might be something in Ansel's book, The Print, if I recall...
 

Monophoto

Member
Joined
Aug 27, 2004
Messages
1,689
Location
Saratoga Spr
Format
Multi Format
*******
Spotone and spit.

I was taught that some of the components in spotone are not good for the liver. I'm not always that thoughtful of my liver, but there are other ways to damage it that are more enjoyable that licking spotone - like Scotch.
:smile:
 

RalphLambrecht

Subscriber
Joined
Sep 19, 2003
Messages
14,641
Location
K,Germany
Format
Medium Format
I haven't done much spotting, but when I have I've used India ink. I read that Weston used this (as mentioned above by Ralph). Disguising rather than correcting is the approach to use...

I'll have to look into the gum arabic, though...come to think of it there might be something in Ansel's book, The Print, if I recall...

I checked, and fortunately, there is no gum arabic or any other powder in any of my Ansel Adams books. :smile:

However, he discusses the use of it in this book 'The Print' and shares Edward Weston's recipe. I tried it, and it works. The gum arabic supports the adhesion of dye to print, and can be used to adjust and match the gloss level. If you can't get your hands on Spotone, and don't wont to use SpotAll (don't see why, by the way), it the way to go.
 
Photrio.com contains affiliate links to products. We may receive a commission for purchases made through these links.
To read our full affiliate disclosure statement please click Here.

PHOTRIO PARTNERS EQUALLY FUNDING OUR COMMUNITY:


Ilford ADOX Freestyle Photographic Stearman Press Weldon Color Lab Blue Moon Camera & Machine
Top Bottom