splitgrade vs. single filter

Peaceful

D
Peaceful

  • 2
  • 9
  • 73
Cycling with wife #2

D
Cycling with wife #2

  • 1
  • 2
  • 45
Time's up!

D
Time's up!

  • 0
  • 0
  • 47
Green room

A
Green room

  • 4
  • 2
  • 94
On The Mound

A
On The Mound

  • 6
  • 0
  • 98

Recent Classifieds

Forum statistics

Threads
198,243
Messages
2,771,547
Members
99,579
Latest member
Estherson
Recent bookmarks
0

MattKing

Moderator
Moderator
Joined
Apr 24, 2005
Messages
52,468
Location
Delta, BC Canada
Format
Medium Format
I'm just going to guess about this, but I think the guess is informative in its own way.

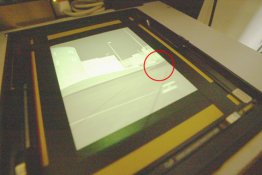
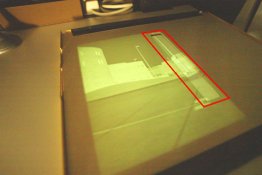
Les and jstraw, I think your differences of "opinion" relate to your choices of what constitutes a "highlight". jstraw is limiting his analysis to the handle, whereas Les is, I would guess, taking his "reading" from the light area along the gap between the panels.

This, I think, is one of the challenges that only resolves itself through experience.

It may be the case with this image that the bright area on the handle is specular, and therefore will not reveal any detail in any appropriate print. As a result, it shouldn't be used for this analysis. Les is looking near the gap between the panels, because (again I'm guessing) that is the lightest part of the subject where he expects to be able to observe detail.

If I am guessing correctly, Les and jstraw are comparing apples and oranges (or maybe Spartans and McIntosh's).

How is my guess?

Matt
 

lee

Member
Joined
Nov 23, 2002
Messages
2,911
Location
Fort Worth T
Format
8x10 Format
actually I am sorta amused that the increments of the strips are in units of 2 and not in f/stops. Any reason for that Les?

lee\c
 

Les McLean

Subscriber
Joined
Oct 18, 2002
Messages
1,606
Location
Northern Eng
Format
Multi Format
I feel compelled to observe that you're not contradicting me, though you may have misread me. I didn't say anything about the quantity of information contained in the 14 second exposure. I merely observed that the test strip gives no information about what that area of the handle would look like with an exposure exceeding 14 seconds. I also said nothing about making a choice for 16, 18 or 20 seconds.

The fact is, if the purpose of the test strip was to determine a soft exposure for the highlights on the handle, the test strip *ends* at 14 seconds and effectively, there is no test for a longer exposure. I'm not arguing that 14 seconds is not the right exposure. You're an experienced printer and recognized that 14 seconds gave that area the tonality that you were looking for and you didn't need to see that area with too much exposure in order to know it would *be* too much exposure. I'm new at this and it's useful to me to see a range from too little to too much. I'm just saying that the test strip doesn't tell you anything about the appearance of that area for longer exposures.

I pointed this out only to illustrate my thinking about needing to see the exposure options for the same, local highlight and that once a test strip is dealing with a different area of the enlargement, that's not what one gets.


jstraw, that's a very valid point that you make about seeing more exposure in the chosen highlight. I am an experienced printer and knew from the amount of tonality in the exposures before the chosen 14 second step that any more exposure would result in muddy highlights. Many thanks for your logical and courteous reply.

Matt, sorry mate, you guessed wrong, the highlight exposure was based on the information in the 14 second step of the very bright chrome handle.

Lee, I used linear timing for this example as it is an article about split grade printing and many people are not familiar with fstop printing. I did not wish to add further confusion by using an unfamiliar timing method.
 

jstraw

Member
Joined
Aug 27, 2006
Messages
2,699
Location
Topeka, Kans
Format
Multi Format
jstraw, that's a very valid point that you make about seeing more exposure in the chosen highlight. I am an experienced printer and knew from the amount of tonality in the exposures before the chosen 14 second step that any more exposure would result in muddy highlights. Many thanks for your logical and courteous reply.

Matt, sorry mate, you guessed wrong, the highlight exposure was based on the information in the 14 second step of the very bright chrome handle.

Lee, I used linear timing for this example as it is an article about split grade printing and many people are not familiar with fstop printing. I did not wish to add further confusion by using an unfamiliar timing method.

Courtesy is the least that I owe you Les. I've learned a lot from your writings and I have nothing but respect for you. I do a lot of training and write a lot of documentation in my day job. I am constantly relearning that I can take nothing for granted and that I can never dumb it down too much.

I used your test strip as a handy example of why I make sure all of my test times are for the same highlight. That you were fortunate to see the tone you were looking for at the same point in the test print where you last *could* see it, the far right portion of the highlight, works for you because your experience allows you to proceed without the confirming visual that any more exposure would be too much.

If I could offer you one piece of respectful criticism it is that the person learning from you may not have that ability yet and for that person, the useful test includes a range of tones stretching from too little to too much. For that person, I would dumb down the example and choose something like an image with sky running the full width of the enlargement so that I was seeing incremental increases in tone in a similar highlight all the way across.

As a practical example, the image you did choose is analogous to a lot of images we all confront. In images where the highlight area is more localized, I have developed my method for achieving the same sort of testing when a normal test strip method can't provide it.

I hope I haven't offended you. That wasnt my intent.
 

MattKing

Moderator
Moderator
Joined
Apr 24, 2005
Messages
52,468
Location
Delta, BC Canada
Format
Medium Format
Darn, guessed wrong again. Might explain my luck with lotteries!

I too am trying to learn what I can about this new-fangled splitgrade idea! And I think it is a really good idea indeed.

From what I've picked up from Les and others, I think I've learned the following:

1) I'd really, really, like to take one of Les' workshops; and
2) It is really hard to get what you need from an internet posting.

jstraw's suggestion to Les is really good - if followed, it would help eliminate one of the area of uncertainties that plague those who are less experienced or who (like me) are less recently experienced than jstraw and Les are.

I think my original guess had some relevance - just like when metering, it is important to learn the difference between a highlight with important detail, and a highlight where detail is unnecessary (or even unwelcome). It just didn't apply to the example in question.

Matt

Thanks for all your help jstraw and Les.
 

jstraw

Member
Joined
Aug 27, 2006
Messages
2,699
Location
Topeka, Kans
Format
Multi Format
jstraw's suggestion to Les is really good - if followed, it would help eliminate one of the area of uncertainties that plague those who are less experienced or who (like me) are less recently experienced than jstraw and Les are.

I just want to put to rest any notion that I was putting myself in Les' league. I can measure my use of split-grade in weeks. I believe my observations are sound but I made them to make a very specific point and chose a handy image that came to mind. Les is a printer of the caliber I one day hope to be.
 

pentaxuser

Member
Joined
May 9, 2005
Messages
19,764
Location
Daventry, No
Format
35mm
I think somebody mentioned that it would be useful to use the same highlight each time. Well there is a way of doing this with a Paterson test strip print easel.

Each strip can be raised individually and replaced. If the red filter is placed over the lens then the Paterson test strip easel can be moved into position each time so you end up with 5 strips for the same section of the neg. If more are needed then a second test strip is required of course.

However there are, I think, test strip print easels which will do more than 5 strips at a time.

Does anyone remember an earlier thread on split grade printing which erupted into a war, unlike the civilised and informative nature of this one?

This was when I came into APUG. A sign of how far we've come despite some thinking that that an edge has crept into APUG threads recently.

Mind you, if I recall correctly one of the main offenders was subsequently banished. Still it goes to show that the "old days" weren't always all sweetness and light either.

pentaxuser
 

jstraw

Member
Joined
Aug 27, 2006
Messages
2,699
Location
Topeka, Kans
Format
Multi Format
I just finished making a test-strip easel from the baseboard of an old, rusted Saunders easel that is the same model as my shiny, new Saunders easel. The obvious advantage is that they both have the non-slip backing and both have the same focal plane.

I made this based on my own intuition, having never seen any other test strip easels so I'll be curious to know how its design is different or similar to other easels. I will post pictures of it in a little bit.

As this is the first prototype and I can make as many variations on the old baseboard as I choose, I don't imagine the first effort will be the last.
 

srs5694

Member
Joined
May 18, 2005
Messages
2,718
Location
Woonsocket,
Format
35mm
I just finished making a test-strip easel
...
I made this based on my own intuition, having never seen any other test strip easels so I'll be curious to know how its design is different or similar to other easels. I will post pictures of it in a little bit.

Your description of your desired easel in an earlier post struck me at closely matching color test-printing easels. I've posted a photo of the box of one I bought on eBay a while back:

http://www.rodsbooks.com/easel.jpg

The box has a photo of the easel. One detail that's not visible in the box photo: Each of the removable squares has a white side and a black side, with the plastic frame of the square being thicker on the black side. This makes it easy to flip the squares over in the dark and tell which ones you've exposed. Because one side is white, you can turn on the enlarger to position the easel. (The squares have some depth, so the projected image will be slightly smaller than it will be on the paper, but it's close enough for this purpose.)

The easel can make a single 8x10(-inch) or 7x10 print, two 5x7 prints, four 3.5x5 prints, eight 3.5x2.5 prints, or any combination of these that will fit on a single sheet of paper. I generally use mine for color printing; I use two 3.5x2.5 squares to test for exposure and the remaining six to adjust cyan, magenta, and yellow filtration up and down. You could use the same easel to create up to eight rectangular test exposures of the same 4x3 section of a B&W print for either split-grade or conventional printing, if you think this would work better for a particular print than conventional strips. When making prints, there's enough positioning "slop" and leakage around the corners of the blocks to reduce the easel's value for making small final prints, but this isn't a concern for making exposure or color tests.

I've got another test-print easel that's less flexible; as designed, it can only do four 4x5 prints on an 8x10 sheet (although some cardboard could extend this substantially). It has the advantage that you don't have to move the easel around; it's designed so that you lift the cover and move the sheet of paper around, so you don't need to turn on the enlarger to find the proper position to get a second test print.

Keep an eye on eBay, even if you don't intend to buy an easel. You'll spot quite a few different test-print easel designs. Some are easy to figure out from the photos, others are almost inscrutable. Any of them could give you ideas for a home-built easel, or you might decide you want to buy one.
 

jstraw

Member
Joined
Aug 27, 2006
Messages
2,699
Location
Topeka, Kans
Format
Multi Format
Here's the prototype:

Ok the sequence of images show the following:

  1. The finished easel showing the 8"x1" opening in the mat board.
  2. With the mask lifted, you can see the guide (which needs to be redone). The paper is butted up to it.
  3. The first exposure is made with the right edge lined up to the "0" mark.
  4. The second, with the edge lined up to the "1" mark (and so on till you have made an exposure at the "5" mark.
  5. Exposures "6," "7" "8" and "9" are made with the LEFT edge aligned with those marks.
  6. So, you set up your regular easel and focus under the enlarger and identifiy the relevent highlight area.
  7. Then switch easels, aligning the mask with that area of the print.
 

Attachments

  • ts1.jpg
    ts1.jpg
    129.5 KB · Views: 123
  • ts2.jpg
    ts2.jpg
    92.6 KB · Views: 97
  • ts3.jpg
    ts3.jpg
    128 KB · Views: 105
  • ts4.jpg
    ts4.jpg
    101.3 KB · Views: 99
  • ts5.jpg
    ts5.jpg
    93.3 KB · Views: 97
  • easel.jpg
    easel.jpg
    193 KB · Views: 128
  • tseasel.jpg
    tseasel.jpg
    182.8 KB · Views: 113
OP
OP

anyhuus

Member
Joined
Dec 19, 2005
Messages
50
Location
Bergen, Norw
Format
35mm RF
Collective Thanks

I take the chance of reiterating once more on the subject of split-grade printing, because I’d like to extend a collective Thank You to all of you. First of all because your contribution has been very informative and valuable to me as a beginner, and secondly – which actually already has been pointed out – the civilized tone in the thread. The latter is especially encouraging for a darkroom beginner whose command of English could be better.

Since the the last posting in the thread, I have become the happy owner of a StopClock Pro from RHDesigns and Les McLeans book that was recommended.
I concider both purchases to be worth every penny. The functionality of the StopClock Pro actually clarified some of earlier questions in this thread.
The timer has two channels that can be set independently, but can also be “coupled” in a split-grade sequence. When making this coupling, the timer actually displays a conversion of splitgrade times into a single grade. Also, the coupling of the two channels partially solves the problem of f-stop split-grade printing. If you change the base time of the first channel with any number of stop (fraction of stops), the second channel follows automatically! I do realise that one normally burn with the soft grade, but if one need to change the timing because of e.g. changed enlargement or lens aperture, then the timer handles the exposure change for you – keeping the contrast.

Kudos to LesMcLean for his book and to RHDesign for their amazing darkroom timer!
 

Lemon Frosted

Member
Joined
Sep 9, 2006
Messages
9
Format
35mm
I have in front of me the results of my first well-informed split-grade printing effort, and I must say I'm pleased. Regardless of achieving something you can't do with single filtration, determining the optimal contrast for a given print has always frustrated me. I find it a pain in the ass to have to shut off the enlarger, swap filters, and move masks around several times for one test strip, so I took to estimating, approximating, and settling.

I can second the feelings about having localized highlights. Several of the prints I was working on tonight had highlights concentrated in one area. I worked around it by placing them at the longest-exposure end of my test strip, so at the very least I'd get to see them over-exposed instead of lost in a sea of white, then from adjacent mid-tones I could judge how many strips down would be needed.

Just for personal comparison I took one of my split-filtered shots and then gave it an equal final exposure at my normally preferred #3. The end results are fairly similar, but the split filtered print feels more controlled.

Oh, Les, I certainly appreciate your tutorial using second-based increments instead of f-stops. I work off a clock, so it saved me some math.
 

jstraw

Member
Joined
Aug 27, 2006
Messages
2,699
Location
Topeka, Kans
Format
Multi Format
Charts are easy to use and f-stop printing has been as great a boon to me as split-grade has. 10 linear steps at two second intervals gives me just over 4 stops of differentiation and a diminishing increase in density as I go. 10 logarhythmic steps at 1/2 stop increments beginning with 2 seconds gives me 5 stops of differentiation at a glance with even increases in density from one exposure to the next. Much more useful and for me, worth the timer adjustment that it requires of me, till I get a proper f-stop timer.
 
Photrio.com contains affiliate links to products. We may receive a commission for purchases made through these links.
To read our full affiliate disclosure statement please click Here.

PHOTRIO PARTNERS EQUALLY FUNDING OUR COMMUNITY:


Ilford ADOX Freestyle Photographic Stearman Press Weldon Color Lab Blue Moon Camera & Machine
Top Bottom