Self-masking processes and the affect of exposure time

Cliché

D
Cliché

  • 0
  • 0
  • 32
Leaving Kefalonia

H
Leaving Kefalonia

  • 0
  • 0
  • 91
Lightning Strike

A
Lightning Strike

  • 2
  • 2
  • 116

Forum statistics

Threads
199,087
Messages
2,786,029
Members
99,803
Latest member
Charlie Methley
Recent bookmarks
0

Vaughn

Subscriber
Joined
Dec 13, 2006
Messages
10,108
Location
Humboldt Co.
Format
Large Format
Reading some posts on UV light sources and short exposure times people are getting LEDs got me thinking. I have heard, and found thru experience, that longer exposure times for process that are self-masking can yield prints of smoother tonality than the same amount of exposure over a very short period of time.

As I understand it, the visual image forms during exposure proportionally affects the exposure -- it forms strongest in areas of high exposure (shadows), and blocks some UV there while the mid-tones and highlights continue on. As the mask continues to form, it starts masking the mid-tones, etc.

I believe the formation of the mask lags behind the actual exposure, and that during short exposures it does not have a chance to fully form and have maximum effect. I also think it is subtle. How short is short -- my guess just a few minutes. Long exposure -- my guess is 15 minutes at least.

Am I full of it? Quite possibly. Has anyone seen a difference between short and long exposures in terms of tonality? Is it significant enough to design ones UV light system around? Am I a complete nut for putting my contact frame under the lights for 3 minutes and then letting it rest for 10 minutes out of the light, then finishing the last 3 minutes of the exposure? This is with 120 negatives. (I thought the prints looked better) Usually I do not worry about it with LF negatives as they need a long exposure time anyway.
 

pschwart

Subscriber
Joined
Jul 15, 2005
Messages
1,147
Location
San Francisco, CA
Format
Multi Format
You can test this, but I suspect that any differences will get masked by other process variables, at least when making carbon transfers.
In that process, don't forget that the sensitizer is actinic in proportion to the concentration. The image will also continue to change during that 10 minute rest (continuing effect) so this step should probably be eliminated when testing.
 
OP
OP
Vaughn

Vaughn

Subscriber
Joined
Dec 13, 2006
Messages
10,108
Location
Humboldt Co.
Format
Large Format
Carbon printing does yield a slight printing-out image (as per Sandy King), but I have assumed it was miminal. All my carbon exposures are very long, 30+ minutes, so I have never worried about it. Very strong printing out images in cyanotypes and platinum printing. I hate opening the contact printing frame and seeing too much of a printed out platinum image -- means that I over-exposed.
 

Tom Taylor

Member
Joined
Jul 10, 2005
Messages
578
Location
California
Format
Multi Format
My salt, cyanotypes, kallitypes and van dyke brownprints showed a marked improvement when I switched from a quick print-out in the open sun to a slow print-out by exposing first in the open shade for 22 minutes and then finishing it off in the open sun. A further improvement was realized when I began incorporating a few drops of 5% Tween 20 in the sensitizer. Here is an example of an untoned kallitype printed in this manner:

http://spiritsofsilver.com/yahoo_site_admin/assets/images/Methodists_Church_Untoned_Kallitype.338144732_large.jpg

Thomas
 

pschwart

Subscriber
Joined
Jul 15, 2005
Messages
1,147
Location
San Francisco, CA
Format
Multi Format
Carbon printing does yield a slight printing-out image (as per Sandy King), but I have assumed it was miminal. All my carbon exposures are very long, 30+ minutes, so I have never worried about it. Very strong printing out images in cyanotypes and platinum printing. I hate opening the contact printing frame and seeing too much of a printed out platinum image -- means that I over-exposed.
Carbon does print out with dichromate, but it can be difficult to see because the tissue is typically black. If you pour gelatin with no pigment, as you would for an oil print, then sensitize and expose, there is a very visible provisional image that will vary in intensity with the sensitizer concentration. The printout is actually much stronger using DAS.
 

doughowk

Member
Joined
Feb 11, 2003
Messages
1,809
Location
Kalamazoo, MI
Format
Large Format
On occasion, I've reduced a negative that was very dense to get shorter printing times (eg, from 45 mins to 5-10 mins). The Palladium print with the shorter time has better detail while the longer timed print was less sharp and lower contrast. Would this difference be due to self-masking?
 
Last edited by a moderator:
OP
OP
Vaughn

Vaughn

Subscriber
Joined
Dec 13, 2006
Messages
10,108
Location
Humboldt Co.
Format
Large Format
Tom, that is what I have heard of and thought I had observed. That is a great image!

Doug -- bleaching would change the curve of the film -- the shadow areas are proportionally greater reduced by the bleach than highlights. I have used bleaching to increase contrast (coupled with selenium toning)...so this is the effect of the bleach, not exposure length. Sharpness might seem to increase with the increased contrast. I do not know any other reason sharpness might increase with bleaching, unless thinner negatives are sharper than dense. Not a function of exposure length as far as I know.
 

timparkin

Member
Joined
Sep 2, 2006
Messages
212
Format
35mm
My salt, cyanotypes, kallitypes and van dyke brownprints showed a marked improvement when I switched from a quick print-out in the open sun to a slow print-out by exposing first in the open shade for 22 minutes and then finishing it off in the open sun. A further improvement was realized when I began incorporating a few drops of 5% Tween 20 in the sensitizer. Here is an example of an untoned kallitype printed in this manner:

http://spiritsofsilver.com/yahoo_site_admin/assets/images/Methodists_Church_Untoned_Kallitype.338144732_large.jpg

Thomas

Wouldn't this be influenced by the difference between point source and diffuse source?

I'm currently building an LED array - When I go to a friends house who has a very slow flourescent array I'll mask off half the frame and do it on hers and then mask the other half off and do it on mine. Be interesting to see the difference (and I'll also swap order if people think it may affect things - does anybody think that the image continues processing when removed from the UV?)

Tim
 
OP
OP
Vaughn

Vaughn

Subscriber
Joined
Dec 13, 2006
Messages
10,108
Location
Humboldt Co.
Format
Large Format
The length of time between exposing and developing might introduce a new factor. Perhaps better off just cutting a coated piece of paper in half, exposing each half to the same negative and process together as quickly as possible.

The effect of point-source vs diffuse light is greatly reduced when contacting most alt processes, as most alt processes have no emulsion and the film emulsion is tight against the coated paper. There is no distance for light to diffuse after it passes by the negative's emulsion. Carbon printing has an emulsion (can have a much much thicker emulsion than a silver gelatin print), so I have noticed a loss of sharpness when printing with a diffused light source...but no difference in the smoothness of the tonality.
 
OP
OP
Vaughn

Vaughn

Subscriber
Joined
Dec 13, 2006
Messages
10,108
Location
Humboldt Co.
Format
Large Format
What would be an interesting experiment is to compare the actual printed-out image. Expose two pieces of coated paper to the same amount of exposure...one long, one short...to the kind light source (using distance to reduce exposure?). Time it so that each is done at the same time and compare the strength of each printing out image. But someone else besides me! LOL!
 

calebarchie

Member
Joined
Jul 25, 2014
Messages
682
Location
Australia 2680
Format
Hybrid
Regarding your prompt for this thread, LED light sources are used mainly for energy efficiency, high wattage arrays can give faster times but they can also be dimmed accordingly. When designing a LED light source the more important factor is placement.
 
OP
OP
Vaughn

Vaughn

Subscriber
Joined
Dec 13, 2006
Messages
10,108
Location
Humboldt Co.
Format
Large Format
Great point! With BL (and BLB) tubes, placement seems not to be so critical (varying the distance between the tubes and the tube-to-negative distance).
 

NedL

Subscriber
Joined
Aug 23, 2012
Messages
3,389
Location
Sonoma County, California
Format
Multi Format
I'm no expert, but my guess is that it is more than the length of exposure that matters. Probably the spectrum of the source matters a lot, the relative number of higher or lower energy photons. Not the same process, but with salt prints, it's not just the contrast that changes when you aim your printing frame at open North sky vs. straight at the sun. The contrast does change, but the rate at which the shadow and highlight details fill in changes too. Varying the way you expose the print give a lot of control.

I only print paper negatives, but here's my normal routine:

1) North ( or in open shade ) with a paper diffusor.
2) North open sky, no diffusor.
3) Directly at the sun.

During 1) only the darkest parts print in. Could leave it hours and never see any highlights or even any high midtones, but you can build up a good base of density in darkest parts.
During 2) shadow details emerge, the darkest areas continue to build up, but at a slower rate than during 1) This is because of the self-masking.
If this exposure continues, eventually highlights will start to emerge, including some tone in the highest values if you go long enough. The main thing to watch during this exposure is the detail in the shadow areas, and make sure you don't get tone in the brightest highlights yet. You need to leave some "headroom" for exposure 3).
During 3) The darkest areas really get a boost, and the highlights print in at a faster rate. During this part of the exposure, delicate highlight details emerge.

You will not achieve as much contrast with only 2) because the darkest parts won't be "locked in", and you won't achieve as much contrast with only 3) because the highlights will finish printing before the darks are far enough along, and you'd lose the details in the shadows that built up during 2).

It's a little bit like split-grade printing, at least in the intuitive way you can decide when to go from one to the next. Not really the same, but that last "blast" of sunlight is a bit like hitting a print with grade 5, in that it locks in the darks, and brings out details in the clouds. The analogy only goes so far, but it's not too bad. The main thing is to gauge the shade exposure so that the darks will be as far as you want after you put it in the sun and build up highlights.

Anyway, I don't know if this is right, but I figure when it's diffused or aimed north, most of the UV photos are lower energy and just blocked. The only part of the print where anything can happen is where the negative is more translucent. When you aim it at the sun, there are more high-energy photons that can blast through and expose even the highlights, so all parts of the print expose.

The relative amount of time needed for 1) 2) and 3) depend on the paper, the negative itself, time of year, time of day, clouds, etc. etc... but typically the exposures get shorter from 1 to 2 to 3. With a negative on translucent vellum, it might be something like 20 minutes, 10 minutes and 2 minutes. With a photopaper negative, you probably skip 1) and go 1 or 2 hours aimed north followed by 30 to 60 minutes at the sun....

P.S. I guess if you UV source has some spread in it's spectral output, a diffusor would act the same as what I was describing. But if it is monochromatic, maybe a short or long exposure wouldn't make as much difference?
 
Last edited by a moderator:

timparkin

Member
Joined
Sep 2, 2006
Messages
212
Format
35mm
Would a dimmer switch on an LED panel provide similar control to your 3 step method?

The frequency of the light changes with voltage (I think). But you could definitely reduce the brightness with a regulated voltage

Tim
 

timparkin

Member
Joined
Sep 2, 2006
Messages
212
Format
35mm
I'm no expert, but my guess is that it is more than the length of exposure that matters. Probably the spectrum of the source matters a lot, the relative number of higher or lower energy photons. Not the same process, but with salt prints, it's not just the contrast that changes when you aim your printing frame at open North sky vs. straight at the sun. The contrast does change, but the rate at which the shadow and highlight details fill in changes too. Varying the way you expose the print give a lot of control.

I only print paper negatives, but here's my normal routine:

1) North ( or in open shade ) with a paper diffusor.
2) North open sky, no diffusor.
3) Directly at the sun.

...


That sounds interesting. It's worth knowing that the spectral distribution of light changes between direct sunlight and blue sky etc

https://en.wiki2.org/wiki/Sunlight#/media/File:Spectrum_of_Sunlight_en.svg

Photon energy is directly related to the frequency of light and so it might be that you are just seeing the print reacting to differences in UV.

However from the chemistry I've seen for platinum palladium, the reaction is the same regardless of the frequency of light - you just get a change in the amount of reaction.

Hence I would have to guess that the differences you are seeing are a combination of self masking and diffuse/direct light...

I know nothing though :smile:

Tim
 

NedL

Subscriber
Joined
Aug 23, 2012
Messages
3,389
Location
Sonoma County, California
Format
Multi Format
That sounds interesting. It's worth knowing that the spectral distribution of light changes between direct sunlight and blue sky etc

https://en.wiki2.org/wiki/Sunlight#/media/File:Spectrum_of_Sunlight_en.svg

Photon energy is directly related to the frequency of light and so it might be that you are just seeing the print reacting to differences in UV.

Yes, that's what I'm speculating: that the difference is due to differences in the spectrum of UV. And I suspect that different wavelengths of UV or maybe high blue/violet have differing abilities to pass through the self masking as well as differing abilities to pass through the density on the negative. Playing them against each other by altering the UV spectrum allows control of the printing.

However from the chemistry I've seen for platinum palladium, the reaction is the same regardless of the frequency of light - you just get a change in the amount of reaction.

Yes exactly. Presumably the chemical reaction requires some quanta of energy, and the byproduct will be the desired chemical change + an extra photon with the residual energy ( i.e. heat ). Light at wavelengths above some critical value will not be able to initiate the reaction at all. But I don't think this is directly relevant to the problem we're thinking about. I think what matters is how much actinic light reaches the chemistry in order to initiate the reaction. It has to get through the glass of your contact printing frame, the negative, and the self masking that builds up. So my guess is that the spectrum of UV light determines its ability to get through the different layers, and that by varying the spectrum ( by pointing at different parts of the sky, or inserting a diffusor, etc ) you can vary this.

Now different UV sources have different spectra. A fluorescent tube has hot gas inside it that will emit at many specific UV wavelengths, which would be more or less filtered by the coating that fluoresces or the glass. I think LEDs also usually emit light only at certain particular energy levels... the output is not a continuous spectrum like the sun. The sun also has spikes of energy at levels that correspond to different elements giving up a quanta of energy. If that's right ( I'm not sure ), then a "dimmer switch" on a bank of LEDS would not change the frequency of the light, or even change the spectral distribution very much, but just the total energy. So assuming the self masking builds up fast enough, I'd think that moving your contact frame further from the lights or "dimming" your source should not have too much affect on the final result except making it take longer. It would matter if there is a delay in the self masking, like Vaughn mentioned... and I have no idea about that.


Hence I would have to guess that the differences you are seeing are a combination of self masking and diffuse/direct light...

I know nothing though :smile:

I think you're right, but the reason is that the self-masking, and amount of diffusion change the spectrum at the photo-sensitive layer. So I think we actually agree on all points, it's just that I'm guessing about the "why" of it. I actually do have a degree in physics, but it was 30+years ago and I have not sat down to think about this carefully or read about it. So I'm very much just guessing too! :smile:
 

NedL

Subscriber
Joined
Aug 23, 2012
Messages
3,389
Location
Sonoma County, California
Format
Multi Format
P.S. I don't have a desire to understand this too much more. I want to have a strong intuitive sense about how different exposures will change my print... if it gets too scientific and technical it might drain the art out of it...

I was having an awful time printing my vellum calotypes. When someone suggested using a paper diffusor, I was thrilled when suddenly they started behaving like "regular" paper negatives again. My control and intuition came back! That's the fun and magic of it, rather than understanding the atomic physics involved :smile:
 
OP
OP
Vaughn

Vaughn

Subscriber
Joined
Dec 13, 2006
Messages
10,108
Location
Humboldt Co.
Format
Large Format
From the linked chart, there seems to be no great difference in the relative amounts of UV wavelengths at different sky conditions. All UV wavelengths seem to behave the same in the different sky conditions -- open shade vs direct sunlight seems to have the same proportion of individual UV wavelenghts -- just all in greater or lesser amounts based on the sky conditions.

To clarify -- there does not seem to be a significant difference in the make-up of UV wavelengths in different sky conditions.

So for now I am still going with the theory that the self-masking is allowed to form and have greater effect during long exposures vs short exposures.
 

cliveh

Subscriber
Joined
Oct 9, 2010
Messages
7,550
Format
35mm RF
It depends if you are printing wet or dry.
 

timparkin

Member
Joined
Sep 2, 2006
Messages
212
Format
35mm
P.S. I don't have a desire to understand this too much more. I want to have a strong intuitive sense about how different exposures will change my print... if it gets too scientific and technical it might drain the art out of it...

I was having an awful time printing my vellum calotypes. When someone suggested using a paper diffusor, I was thrilled when suddenly they started behaving like "regular" paper negatives again. My control and intuition came back! That's the fun and magic of it, rather than understanding the atomic physics involved :smile:

It's fun to know the variables you can 'art' with though :smile:
 

timparkin

Member
Joined
Sep 2, 2006
Messages
212
Format
35mm
From the linked chart, there seems to be no great difference in the relative amounts of UV wavelengths at different sky conditions. All UV wavelengths seem to behave the same in the different sky conditions -- open shade vs direct sunlight seems to have the same proportion of individual UV wavelenghts -- just all in greater or lesser amounts based on the sky conditions.

To clarify -- there does not seem to be a significant difference in the make-up of UV wavelengths in different sky conditions.

So for now I am still going with the theory that the self-masking is allowed to form and have greater effect during long exposures vs short exposures.

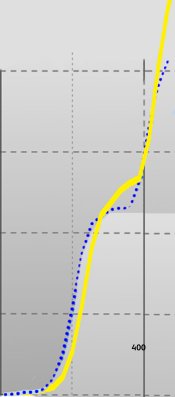
Here's the UV section of the graph above with the blue sky and direct sunlight sections. I've eye balled the equal area under curve and it shows that the lower frequencies in the direct sunlight curve dominate. I don't think it's hugely significant though..

x.jpg
 
Photrio.com contains affiliate links to products. We may receive a commission for purchases made through these links.
To read our full affiliate disclosure statement please click Here.

PHOTRIO PARTNERS EQUALLY FUNDING OUR COMMUNITY:


Ilford ADOX Freestyle Photographic Stearman Press Weldon Color Lab Blue Moon Camera & Machine
Top Bottom