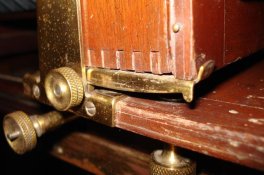
screw hole repair/handle 2D -Ideas/solutions needed

first-church.jpg

D
first-church.jpg

  • 5
  • 2
  • 61
Grape Vines

A
Grape Vines

  • sly
  • May 31, 2025
  • 7
  • 1
  • 59
Plot Foiled

H
Plot Foiled

  • 2
  • 0
  • 54
FedEx Bread

H
FedEx Bread

  • 1
  • 0
  • 43
Unusual House Design

D
Unusual House Design

  • 5
  • 2
  • 84

Forum statistics

Threads
197,975
Messages
2,767,594
Members
99,521
Latest member
OM-MSR
Recent bookmarks
0

gordrob

Subscriber
Joined
Jan 29, 2005
Messages
990
Location
Western Cana
Format
Multi Format
Jim Jones said:
Until researching this I never noticed those tiny split rivits. It was a cheap and easy way to make the 2D. I'll have to look over a Deardorff at the next opportunity to see how it should be done.

Hi Jim

Information I have on the replacement of the strap refers to the early Deardorffs using "bifurcated (split) rivets" on the nickle-plated strap loops. I don't know if this changed over time or not but apparently they were used on the ealry ones because of their holding ability

I now have the strap for my 2D but am in need of the strap loops and the method of securing it all - so for me this thread is timely.

Gord
 

photomc

Member
Joined
Jul 20, 2003
Messages
3,575
Location
Texas
Format
Multi Format
Just replace the bellows on a Eastman No. 2 (pre 2D) in 7x11 format. While replacing the bellows I discovered that the brass bracket that functions for both the camera back to sit on and functions as a guide for tilt has work loose on one side. The screw holes are somewhat enlarged, which explains why the back did not fit snug. See photo below for the part I am talking about...anyway the screws go through the "box" that the is the back of the camera and looks like when mfg. the screws just missed going into the side of the camera, which may be why after all the years it has worked loose.

Question: Is wood expoy a good choice here, since it will have some pressure from the camera back? Or would I be better off to drill the holes (3) out and plug with wood and epoxy?

Thanks for the help.
 

Attachments

  • DSC00242.JPG
    DSC00242.JPG
    52.2 KB · Views: 87
  • DSC00240.JPG
    DSC00240.JPG
    125.8 KB · Views: 87
Last edited by a moderator:

Greg_E

Member
Joined
May 17, 2006
Messages
948
Format
Medium Format
Drill it out and insert a dowel (snug fit). Glue the dowel in place and let it dry. Then drill the dowel for the screw, hole should be approximately the same size as the diameter of the screw at the bottom of the V that the threads form (slightly larger is OK, but only slightly).
 

Curt

Member
Joined
Sep 22, 2005
Messages
4,618
Location
Pacific Nort
Format
Multi Format
I didn't read any of the replies but I repaired my, which is like yours a 2D, with small brass bolts and nuts in stead of going into a wood repair. There is enough room on the inside for the nut, just make sure that the bold is not so long that it punctures the bellows. Hobby shops have them, I keep a drawer full of small things for photo repairs and building.

Curt
 
Photrio.com contains affiliate links to products. We may receive a commission for purchases made through these links.
To read our full affiliate disclosure statement please click Here.

PHOTRIO PARTNERS EQUALLY FUNDING OUR COMMUNITY:


Ilford ADOX Freestyle Photographic Stearman Press Weldon Color Lab Blue Moon Camera & Machine
Top Bottom