Rolleiflex lens board wobbly

Lacock Abbey detail

A
Lacock Abbey detail

  • 0
  • 1
  • 10
Tyndall Bruce

A
Tyndall Bruce

  • 0
  • 0
  • 35
TEXTURES

A
TEXTURES

  • 4
  • 0
  • 61
Small Craft Club

A
Small Craft Club

  • 2
  • 0
  • 55
RED FILTER

A
RED FILTER

  • 1
  • 0
  • 47

Recent Classifieds

Forum statistics

Threads
198,904
Messages
2,782,805
Members
99,743
Latest member
HypnoRospo
Recent bookmarks
0

Kevographic

Member
Joined
Jan 25, 2022
Messages
14
Location
Vancouver
Format
Medium Format
So I have a Rolleiflex that works and looks great, but the lens board has a bit of a wobble to it.

As I move it in and out, it seems to not move parallel which I feel causes some missed focus and possibly some shift effects.

Has anyone experienced this?
 
OP
OP

Kevographic

Member
Joined
Jan 25, 2022
Messages
14
Location
Vancouver
Format
Medium Format
It's a 3.5e, late 50s I believe. I am pretty good with fixing things if there is a reference, but I haven't seen any related to focus arms/rails.
I know many people will say to not touch it and have an expert handle it, but really I enjoy the process.

I suspect you are right in that it was bumped/dropped at some point. No evidence on the outside, but the aluminum? collar around the lens board had a slight bend. Camera didn't appear to have been worked on prior to me opening it.
 

shutterfinger

Member
Joined
Feb 25, 2013
Messages
5,020
Location
San Jose, Ca.
Format
4x5 Format
Download:
https://learncamerarepair.com/product.php?product=21&category=2&secondary=15

3 5 focus arm.jpeg
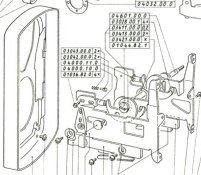
04000.10.0 and 04000.11.0 may be sticky or dislodged. 03411.00.0 is the cams.
There are shims that look like brass washers between the front cover plate and the lens mounting plate that may fall out or stick to the plate. Position is critical for proper squareness to the body.
 

Dan Daniel

Subscriber
Joined
Jul 4, 2009
Messages
2,885
Location
upstate New York
Format
Medium Format
It's a 3.5e, late 50s I believe. I am pretty good with fixing things if there is a reference, but I haven't seen any related to focus arms/rails.
I know many people will say to not touch it and have an expert handle it, but really I enjoy the process.

I suspect you are right in that it was bumped/dropped at some point. No evidence on the outside, but the aluminum? collar around the lens board had a slight bend. Camera didn't appear to have been worked on prior to me opening it.

So you have opened it already? In what way? Not sure what part you mean when you say the collar around the lens board. For the following, I am assuming that the lens board is still attached to the focus rails on each side (three screws per side, including one under the self timer gearing; go ahead and make sure each one is snug). With or without the lens shroud in place, you can do these tests-

Move the lens board out about midway. Now grab it by the left and right side and give a tug out on each side, and push it back on each side. Ideally there will be a little travel, you'll feel springs, on the outward pull. By 'little' I mean a millimeter or less. It should take some force but certainly not a lot! You are not trying to get a lid off of the pickle jar.

The other test is to see if the wobble is backlash, or possibly indicative of a bent part. So move the focus in and out. Stop and start. See if one side moves before the other. If at either end of travel one side seems to move after the other one or before it when starting up. Or is the wobbling always in the same place?

I'd discourage going into the body or removing the lens board unless you are prepared to lose the camera or have to pay someone to rebuild it. This is not an easy system to deal with. Three basic adjustment issues. And to get to the wind side of the focus system you need to remove the wining system itself so you have to learn all the quirks of that, also. Of course it is possible to learn by doing, but you had better be very attentive, very deliberate and slow, and very generous with taking photos every step, from 8 different angles because you never know what you'll need to see on reassembly. The reason that there are not many discussions of working on the focus system is because it isn't simple at all and trying to explain it can create worse problems.

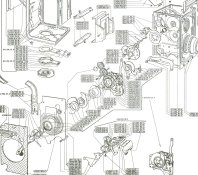
Factory repair guide here. Well, more schematics and cryptic reminders of techniques taught in factory training, I guess- https://learncamerarepair.com/productlist.php?category=2&secondary=15
 
OP
OP

Kevographic

Member
Joined
Jan 25, 2022
Messages
14
Location
Vancouver
Format
Medium Format
Thanks guys. The wobble occurs when I start to focus seemingly at any point. At close focus (fully extended) it is a little worse and the focus wheel feels a bit rough.

I see now how complex the focus system is to repair. . . I think I will shelf it for now. At least I fixed the self timer in the inspection!
 
OP
OP

Kevographic

Member
Joined
Jan 25, 2022
Messages
14
Location
Vancouver
Format
Medium Format
Thought I would update this.

I managed to get in through the winding mechanism. I don't know the proper names of the parts but the part that is pushed by the part numbered 3411.00 in the above picture of the focus system was slightly bent. There is also a plastic piece that wedges between the two that had slipped out.

I am happy to report it is not wobbly left and right anymore (hopefully no more lens shift effects) and seems much more rigid. It is not perfect, but I feel comfortable getting in there to fix anything again.

Thanks for the tips!
 

shutterfinger

Member
Joined
Feb 25, 2013
Messages
5,020
Location
San Jose, Ca.
Format
4x5 Format
3411.00 is a focus cam so the part it pushes is a focusing arm and the plastic piece a bushing. It can also be called lens standard arm but focusing arm matches what it does.
Now have you measured from the edge of the standard to the body at all 4 corners and verified the distances to be exact?
 
OP
OP

Kevographic

Member
Joined
Jan 25, 2022
Messages
14
Location
Vancouver
Format
Medium Format
I didn't measure the 4 corners. I don't have a precise enough ruler or calipers, but now I know what tool I should be buying next!

One of the issues I had was removing the rear lens retaining ring to observe the lens standard arm movements better. I couldn't get it off with my spanner.

I think I am just happy that I figured out the bushing (thanks for the lingo) and was able to get it back together and still work. Took me a few days to get the courage.
 

Dan Daniel

Subscriber
Joined
Jul 4, 2009
Messages
2,885
Location
upstate New York
Format
Medium Format
I didn't measure the 4 corners. I don't have a precise enough ruler or calipers, but now I know what tool I should be buying next!

One of the issues I had was removing the rear lens retaining ring to observe the lens standard arm movements better. I couldn't get it off with my spanner.

I think I am just happy that I figured out the bushing (thanks for the lingo) and was able to get it back together and still work. Took me a few days to get the courage.

Great. Did you remove the winding mechanism panel, or is there a secret passage that I don't know of to get access to the cam follower mechanism? I'd love to know.

For measuring the lens alignment to the film plane, the outer lens shroud is not accurate. With the shroud off, be certain to use similar surfaces for measurement. Even there, ideally it isn't how you align the lens. BUt for now, anything that stops your Lensbaby effect is a win.
 
OP
OP

Kevographic

Member
Joined
Jan 25, 2022
Messages
14
Location
Vancouver
Format
Medium Format
I had the winding mechanism removed. There was no secret passage. It was scary fun.

Unfortunately, I was making a video and not taking many pictures otherwise I would show the issue I found.

I did check the viewing and taking lens focus at infinity and close distance and they both look good. They also match the distance scale more closely which was previously off by a bit.

I'll test a roll before going in again.
 

Dan Daniel

Subscriber
Joined
Jul 4, 2009
Messages
2,885
Location
upstate New York
Format
Medium Format
If one side is moving before the other side, often that is ebcause the cam followers are not equal in the spring pressure that they are applying. You might go in the focus side to adjust that side rather than the wind side to avoid having to pull the wind mechanism. Of course you then deal with the depth of field indicator mechanism and re-installing things properly for that to work, but it's mainly just annoying not difficult. Or you disable the thing and walk away....
 
OP
OP

Kevographic

Member
Joined
Jan 25, 2022
Messages
14
Location
Vancouver
Format
Medium Format
Thanks. Does that apply to if the viewing lens moves before the taking? I do notice when I focus near and the lenses move outwards, they stay fairly level in bot directions of the plane. When I move it back in, the viewing lens moves first slightly. I wonder if this is due to both cam follower springs being too loose? At any rate, I appreciate the tips.

Hope is not science, but it is what I am going for with my next roll of film. If things look better, I'll leave it alone.
 

Dan Daniel

Subscriber
Joined
Jul 4, 2009
Messages
2,885
Location
upstate New York
Format
Medium Format
Rotation in that direction would be a different issue. Each side, the focus rail plate is held stable vertically by the body casting at top and a plate on the bottom. The bottom plate is adjustable. So this gets pressed lightly upwards to capture the up/down movement of the rail. I've seen the bottom adjustable plate need to be tightened. But all in all, this is a non-moving stable system.

But in your case, I bet that one of the tabs on the rail itself at the top is bent. Considering that the cam follower bushing had popped out of place, I bet the the focus rail took a hit. This could force a tab, most likely the front one, to be bent down and allow for vertical motion. or it could loosen the lower plate.

You can test pretty easily. Try to move the lens board up and down on each side. Hard to say is this is a bent rail or a moved bottom adjustment plate.

Do some testing to see if turning the focus knob in one direction always reduces this motion. Depending on where the issue is, it could be that simply always finishing focusing with a very small wiggle of the knob in one direction to take up the looseness would give you workable results.
 

shutterfinger

Member
Joined
Feb 25, 2013
Messages
5,020
Location
San Jose, Ca.
Format
4x5 Format
I usually measure from the lens mount frame to the body at various distances before final assembly. if the front cover is in place I measure from the back edge of the cover to the body not the front of the camera. A quick test is to focus until the back edge of the front cover is tangent to the body edge, it should be within 1 millimeter all around.
 
OP
OP

Kevographic

Member
Joined
Jan 25, 2022
Messages
14
Location
Vancouver
Format
Medium Format
Great information. If the images are still not as sharp as this camera is known to produce, or if there is still shift effects going on, I will definitely take a more calibrated approach and jump back into it.

I was quite intimidated to go into this camera because of the name. Procrastination got the better of me and I'm glad it did. Rolleiflex is just a thing (a thing of beauty for sure), and things can be replaced.
 
OP
OP

Kevographic

Member
Joined
Jan 25, 2022
Messages
14
Location
Vancouver
Format
Medium Format
I want to actually go back and say that Rolleiflex and other well made "things" shouldn't need replacement if taken care of. I didn't mean to make it sound like these cameras, or any well made camera, should be disposable and replaced. I just meant that I, and others surely, shouldn't be too caught up in the branding if we are familiar with taken apart "lesser" cameras. Had I destroyed my Rolleiflex, I know it wouldn't be the end of the world. And that was what my previous thought was intended to mean.

Furthermore, I appreciate the skills you guys and others have to revive non-functioning cameras. These are the skills and materials we need in our future to mitigate the plethora of disposable goods.
 

Dan Daniel

Subscriber
Joined
Jul 4, 2009
Messages
2,885
Location
upstate New York
Format
Medium Format
I was quite intimidated to go into this camera because of the name. Procrastination got the better of me and I'm glad it did. Rolleiflex is just a thing (a thing of beauty for sure), and things can be replaced.

Yep, it's a tool, made by humans. Humans put it together, humans can take it apart, that's my motto!! And I have a box full of cadaver cameras to prove it :smile:

Rolleis were BUILT to be serviced. This is something that separates them from most other cameras. I like to point to the assorted service manuals for three different TLRs. The Yashicamats have two or so exploded drawings; I have never seen sign of any written directions from the factory. The Minolta Autocord has a 24 page service manual with drawings and written directions. The Rolleiflex has a 300+ page service manual with drawings, directions, lubrication schedules, etc.

And this matches my experience working on all three. I have come to dread working on YashicaMats in many ways. I think it was a forerunner of 'plug and play' systems: people installed parts, if it worked it went down the line and if it didn't work it went in the parts bin. Autocords are simpler than Rolleis, but also have fewer adjustment points. And Rolleis were made to be taken apart. The finish of parts also matches this- Yashica is rough, Minolta is competent, Rollei is smooth.

An interesting thing I've noticed with Rolleis: screws tend to be very specific for each assembly. Lens shroud screws aren't interchangeable with focus rail screws, or even side panel screws. On the wind mechanism, of the maybe 10 different screw uses, each one is unique. I think that this was more than a mechanical engineering issue. I think that this was a production/service issue so that you could assemble quickly and smoothly with less worry about using the wrong screw. All in all, more than most cameras, the Rollei parts tell you where they belong.

People are scared of Rolleis, but in practice they are easy to work on because they were made to be worked on. Industrial design and machining at its peak. You have some of the best machinist in the world talking to you, all you need to do is listen to the parts they made.
 
Last edited:
Photrio.com contains affiliate links to products. We may receive a commission for purchases made through these links.
To read our full affiliate disclosure statement please click Here.

PHOTRIO PARTNERS EQUALLY FUNDING OUR COMMUNITY:


Ilford ADOX Freestyle Photographic Stearman Press Weldon Color Lab Blue Moon Camera & Machine
Top Bottom