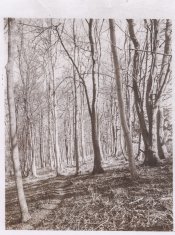
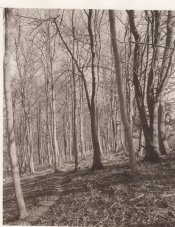
Rodolfo Namias' Sepiaprint

Recent Classifieds

Forum statistics

Threads
199,141
Messages
2,786,911
Members
99,821
Latest member
Sibir
Recent bookmarks
0

NedL

Subscriber
Joined
Aug 23, 2012
Messages
3,390
Location
Sonoma County, California
Format
Multi Format
I usually put this sort of thing over at f295, but with that site going away soon, I thought I'd put a copy here too, where it can safely wait in case someone in the future is interested in this process. I'm not aware of anyone making these today, although the formula is on the brown print page at unblinking eye.

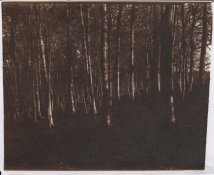
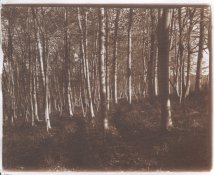
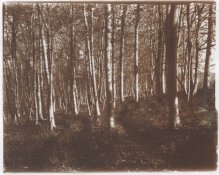
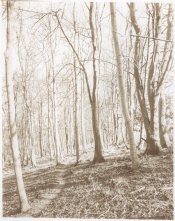
It might suffer a little from something that Blansky and others have noticed: sometimes people focus so much on the process that they forget to try to make a good picture! It's not the greatest pinhole tree, but I guess it's not terrible :smile: I actually chose this negative because I thought it would be difficult to print and I wanted it to reveal weaknesses in the process. I think it displayed the strengths instead!


Namias' Sepiaprint
par Ned, on ipernity

Rodolfo Namias' Sepiaprint

Pinhole paper negative, heritage oak at Finley Community Center in Santa Rosa, California

Left: still wet after fixing. According to Namias, the browns would get much darker if allowed to dry.

Right: final dry print after toning.

I read Namias' 1901 article describing an iron-silver process. It is somewhat like a so-called “Van Dyke Brown” print, but uses citric acid instead of tartaric acid. It is not one of the historic processes that has remained popular today. I can't find much record of its use, except in “sepia paper” used for copying technical drawings, similar to the way blueprints were used. Since I had all the needed supplies, I thought I'd try it.

I followed the directions in the article and made this print from a pinhole paper negative. Everything went just as Namias described, which in itself is a refreshing change from usual. Usually there are all sorts of things that can go wrong, but it made a nice print on the first try.

This must be the simplest and easiest printing process I've ever tried:
  • brush on the senistizer, let dry
  • expose the print
  • wash for 2- 3 minutes
  • fix for 2-3 minutes
optional: tone after fixing
then wash.

Everything was done as simply as possible. I already had eyedropper bottles of

24% silver nitrate
12% citiric acid​

that I use to make salt prints. I made another eyedropper bottle with:

25% ammonium ferric citrate​

A drop ratio of 1:2:2 is close to the formula in Namias' article. I used:

6 drops silver nitrate + 12 drops citric acid + 12 drops ammonium ferric citrate​

This was much more than enough to coat a piece of 5x7 inch paper.

I used Canson Universal Sketch paper, which does have an alkaline buffer, but it worked just fine.
You can see the highlights are perfectly clear white with no fogging and no hint of yellow.

Brushed on with an inexpensive foam brush, no brush marks or uneven areas are visible.
Exposed it for ½ hour under BLB compact fluorescent lamps, it did not look done, so exposed for ½ hour more. Then it was time for dinner so I just turned the lamps off.

After dinner, it was interesting to see the image intensify in the wash, just as Namias described. Then it intensified again and changed color in the hypo. I used a heaping ½ teaspoon of sodium thiosulfate in about 60ml water to fix the image.

Namias recommended gold thiocyanate toner after fixing, so I mixed a weak toning solution of:

2.5 ml 0.2% gold chloride + 2.5ml 2% ammonium thiocyante in about 70ml distilled water.​

Toned in this for about 10 minutes, until it did not seem to be changing much.

Washed for an hour then dried on a sheet of glass overnight.

I think it is remarkable how there is detail in the deepest shadows ( on the tree and in the background on the right ) and in the most extreme highlights ( bulletin boards on the building in the background ). Also the sky is perfectly paper white. On the negative, the building is blown out and the shadows on the tree and leaves in the near foreground are deep; it's impressive to see tone and detail in both places. There's also a sense of light in the shadow areas. I was tempted to look again and make sure I printed the right negative.

This is a fun and interesting process, and particularly simple. Next time I will let one dry down without toning and see what it looks like. With the right negative, it might make a nice print!
 
Last edited:

pdeeh

Member
Joined
Jun 8, 2012
Messages
4,765
Location
UK
Format
Multi Format
teehee ...

The day brightened after all, and as I had all the materials to hand and already made up for salts and cyanos (well, my Ferric Ammonium citrate solution is 20% not 25%, but I thought, what's 5% between friends?), I coated some paper, grabbed one my "usual suspect for testing" negatives and a frame and got on with it.

Wow this is fast! The exposure times, even under an overcast March sky at 51°N, were small numbers of minutes. Judging exposure was tricky - a print that looked very overexposed after processing looked rather anaemic in the frame. Plus they seemed to get even darker in the wash, which was weird.

My test triad is hanging to dry right now, and I'll scan and post them a bit later on, probably this evening.

thanks for posting this here and at Ip, Ned - it's definitely something to play with a lot more.
 
OP
OP
NedL

NedL

Subscriber
Joined
Aug 23, 2012
Messages
3,390
Location
Sonoma County, California
Format
Multi Format

Attachments

  • NamiasSepia.pdf
    571.3 KB · Views: 442

pdeeh

Member
Joined
Jun 8, 2012
Messages
4,765
Location
UK
Format
Multi Format
That's a delight to read, Ned, and some of the apparently odd behaviour as you wash and fix becomes clearer and more understandable from the explanation he gives of the chemistry.

Here are my three test prints from today.

They're on some Daler mixed media paper which I'd acidified and washed previously for cyanotypes. (This is a lovely paper to work with - it's robust and washes very quickly, doesn't really require any sizing - but isn't the most "aesthetic" of papers)

The first was give about 12 minutes under overcast midday-ish skies, the second about 6 and the third about 4.

When wet, the first was dark though atmospheric, but has dried down to a thorough murk !

The third is probably the best of the three in terms of exposure, though it lacks a little sharpness thanks to me putting the negative in the wrong way round :sad: (flipped it after scanning)

20160303-1.jpg 20160303-2.jpg 20160303-3.jpg
 

pdeeh

Member
Joined
Jun 8, 2012
Messages
4,765
Location
UK
Format
Multi Format
thanks.
well, 4 minutes of course, but even so a very quick exposure for a printing-out process like this.
 
OP
OP
NedL

NedL

Subscriber
Joined
Aug 23, 2012
Messages
3,390
Location
Sonoma County, California
Format
Multi Format
Look at the color, that's great! Was it a more yellow light brown before it dried down?
I'll guess this will have a different final color on different types of paper.
And it's interesting that even the first one seems to have clean highlights... I think that makes this process easier to control than some others. I can see the "open shadows" or "sense of light in the shady areas" on your prints too. I don't know what to call that exactly, but it seems to be a feature of this process and not just a fluke from the negative I used.

I also think that since the sensitizer is simply brushed onto the paper ( not reacting with anything already on the paper ) it is less prone to streaks or brush marks. I know there was some unevenness in how thickly the coating was applied on mine, but I could see no hint of that in the resulting print. I think this might be a good process to quickly print big paper negatives... also it uses less silver, so it's not much of a waste if something goes wrong.
 
Last edited:

MDR

Member
Joined
Sep 1, 2006
Messages
1,402
Location
Austria
Format
Multi Format
24% Silver nitrate for Salt prints isn't that twice the usual concentration?
 

pdeeh

Member
Joined
Jun 8, 2012
Messages
4,765
Location
UK
Format
Multi Format
Ned, Yes it had that unpleasant "baby poo" colour in the wash to begin with :smile:, then gradually got richer. They look a bit better in the hand than the scan of course because the paper texture never scans very well.

Quite a few of my salt prints have come out in similar tones in the past, interestingly.

I'm sure you're right about the paper affecting colour, and sizing too of course would have an impact on that. I've been wondering about albumen sizing recently, because I think the surface effect would be very much to my taste, but I haven't got a use for all those spare yolks ...

I coat just about everything using little squares of foam cut from a car-washing sponge, and never get streaks expect when I've tried to use quite heavy (10%+) gelatin sizes , but what I noticed was how "thin" the sensitiser seemed, at least compared to cyanotype anyway.

MDR: That's correct, but if you are diluting it 1+1 with a 12% solution of Citric acid before coating (as Ned does and as he has persuaded me to do for salt prints) you end up with a 12% nitrate solution on your paper.
 
Last edited:
OP
OP
NedL

NedL

Subscriber
Joined
Aug 23, 2012
Messages
3,390
Location
Sonoma County, California
Format
Multi Format
24% Silver nitrate for Salt prints isn't that twice the usual concentration?
Yes, that's just my eyedropper bottle. It is mixed with varying amounts of citric acid solution or distilled water just prior to coating. 24% is convenient because it will be 1/2 of the "drop count", leaving room for other adjustments as desired.
 

MDR

Member
Joined
Sep 1, 2006
Messages
1,402
Location
Austria
Format
Multi Format
Thanks for the info, also is there any advantage in keeping the silver nitrate and citric acid in different Solutions. Citric acid is sometimes considered a preservative for the Silver nitrate solution?
 

pdeeh

Member
Joined
Jun 8, 2012
Messages
4,765
Location
UK
Format
Multi Format
There are always a dozen different reasons for doing alt- things :wink:

but my understanding is that Citric acid has the effect of both reducing fog and of altering image colour.

although I have seen it written that it is a "preservative", AGNO3 solution doesn't need "preserving". What can happen though is that premixing it with Citric acid might (or will ?- we need a proper chemist like PE or Gerald K) form Silver citrate in the solution. Whether that is actually a problem I have no idea ...
 
OP
OP
NedL

NedL

Subscriber
Joined
Aug 23, 2012
Messages
3,390
Location
Sonoma County, California
Format
Multi Format
I think pdeeh has it right. I keep them separate because that's what another APUG member recommended ( and it allows for nice flexibility.. on some papers I use less CA, on some papers more ) I've read that if you mix the CA and AgNO3, over time some of the citric acid can precipitate out, which leaves the mixture in an uncertain state as to how much CA it contains. I've never mixed them so I don't have personal experience with that :smile:
 

jeffreythree

Member
Joined
Jul 6, 2015
Messages
309
Location
DFW, Texas
Format
Multi Format
Thanks for posting this. It looks like a simple method to try for an alt process novice like me. Does anyone plan to try adding the ferric oxalate to the solution shown at the end of the article?
 

pdeeh

Member
Joined
Jun 8, 2012
Messages
4,765
Location
UK
Format
Multi Format
I'm like a dog with a bone now ...

Here's today's effort, this time somewhat underexposed, quite nice in a soft dreamy pictorialist sort of way I suppose.

Different negative, same paper, but not acidified - hence, I think, the different colour, rather than just being a result of the underexposure.

20160304-1-2.jpg
 

pentaxuser

Member
Joined
May 9, 2005
Messages
20,006
Location
Daventry, No
Format
35mm
thanks.
well, 4 minutes of course, but even so a very quick exposure for a printing-out process like this.
I need to read more accurately and stop consorting with the generation that expects things to be done instantly :D

pentaxuser
 
OP
OP
NedL

NedL

Subscriber
Joined
Aug 23, 2012
Messages
3,390
Location
Sonoma County, California
Format
Multi Format
I'm like a dog with a bone now ...
Here's today's effort, this time somewhat underexposed, quite nice in a soft dreamy pictorialist sort of way I suppose.

NIce! See that sense of light again? It's not my imagination.

I might make another today too.... I want to see one dry down w/o toning.

Edit: Just coated another paper. Drop count of 3:6:6 is about right for a 5x7 inch paper.
Someone needs to coat several sheets of paper and let some of them sit. Namias says the paper will store well after coating, but it may depend on whether the paper has an alkali buffer.

I forgot to mention something in my description: if you add the silver nitrate last, you will see a precipitate form and then it will dissolve back in.

Thanks for posting this. It looks like a simple method to try for an alt process novice like me. Does anyone plan to try adding the ferric oxalate to the solution shown at the end of the article?

I don't have any ferric oxalate... seems like that would make it more like a kalitype? It sure seems like a simple and inexpensive method to me :smile:
 
Last edited:

pdeeh

Member
Joined
Jun 8, 2012
Messages
4,765
Location
UK
Format
Multi Format
If I can nail the right paper and exposure with this process, I could see myself using it a lot.

What I'd like to be able to do is shift the tones towards a cooler "blacker" colour, but gold toner is out of the question for me (cost).

I might try very dilute selenium at some stage as that I do have to hand.
 
OP
OP
NedL

NedL

Subscriber
Joined
Aug 23, 2012
Messages
3,390
Location
Sonoma County, California
Format
Multi Format
Pdeeh: I'm thinking the same. I like the way the shadows are "open", and I like how simple and fast the process is ( 5 minutes after the exposure is done, it's in the wash ) The one I made last night did not have as much "dry down" darkening as I was hoping... the final color is not unpleasant and I like it, but cooler and blacker would be great. Gold doesn't really do that anyway, it made more of a purplish grey.

What jefferythree mentioned about adding ferric oxalate might be worth exploring. Also double coating would be worth a try.

Also, it might be interesting to put this into a camera and see what kind of paper negative it makes.... Namias says it makes great negatives for blueprint copy work, it might make unique in-camera negatives too :smile:
 

pdeeh

Member
Joined
Jun 8, 2012
Messages
4,765
Location
UK
Format
Multi Format
I did wonder about in-camera but then I'd have thought it faces the same problem as cyano and salt - not enough UV getting through the lens. But I've got some acidified cheap cartridge paper lying about, I might try it tomorrow, just for LOLZ as I believe the young folk say.
 
OP
OP
NedL

NedL

Subscriber
Joined
Aug 23, 2012
Messages
3,390
Location
Sonoma County, California
Format
Multi Format
Yesterday I made one with double coating. The darkest areas are a little darker and the brown in them is a little blacker, but the difference is not dramatic. I had to hold two dry prints side by side to see the difference: it is real but subtle. Without the side to side comparison, my impression was that it was not different at all.
 

pdeeh

Member
Joined
Jun 8, 2012
Messages
4,765
Location
UK
Format
Multi Format
And here are my latest two.

The first is on Daler Mixed Media as before, the second on Fabriano Artistico HP 140lb.
Both were acidified with 2% citric acid and then washed and dried before coating.
Neither has been sized.
They also sat for a couple of days after coating before exposure.

I made the sensitiser up a couple of days beforehand too, storing it in a clean dark brown bottle well away from direct light of any kind.
And used a new (different) sponge with which to coat them.

5½ mins exposure for the Daler, 6 for the Fabriano.

There's a distinct mottling/fogging/staining visible on the unexposed border at the top of the Daler version. I think the highlights are less clear on the Fabriano too. Could be any number of culprits, including old fixer now I come to think about it.

Damn.

20160307-1.jpg


20160307-2.jpg
 
Photrio.com contains affiliate links to products. We may receive a commission for purchases made through these links.
To read our full affiliate disclosure statement please click Here.

PHOTRIO PARTNERS EQUALLY FUNDING OUR COMMUNITY:


Ilford ADOX Freestyle Photographic Stearman Press Weldon Color Lab Blue Moon Camera & Machine
Top Bottom