Rodolfo Namias' Sepiaprint

Recent Classifieds

Forum statistics

Threads
199,141
Messages
2,786,915
Members
99,821
Latest member
Sibir
Recent bookmarks
0
OP
OP
NedL

NedL

Subscriber
Joined
Aug 23, 2012
Messages
3,390
Location
Sonoma County, California
Format
Multi Format
Look what I just found. Sandy King tried this 10 years ago when he wanted to make a VDB and didn't have any tartaric acid. He used about the same amount of silver, a bit less citric acid, and less than 1/2 as much AFC.

Later in the same thread, someone noted slower printing speeds with double coating, and I noticed that last night. I was expecting my exposure to be about 60 or 70 minutes and it was 105.
 

pdeeh

Member
Joined
Jun 8, 2012
Messages
4,765
Location
UK
Format
Multi Format
Well I suppose if anyone was going to have done it, he'd be the man to have done so.

Next time I have a bit of time and the inclination, I'll try halving the Ferric Ammonium citrate concentration and see what it looks like.

Also, as I have a large stock of Tartaric acid (which I use for making lemon cordial :smile:) I might as well have a go at a "proper" VDB too!
 

pdeeh

Member
Joined
Jun 8, 2012
Messages
4,765
Location
UK
Format
Multi Format
Look what I just found. Sandy King tried this 10 years ago when he wanted to make a VDB and didn't have any tartaric acid. He used about the same amount of silver, a bit less citric acid, and less than 1/2 as much AFC.
.

I've just reread the formula he gives, and the numbers look quite odd to me compared to Namias' 20% Ferric Ammonium Citrate/5% AgNO3/5% Citric acid

Sandy King said:
... mix as follows.
Solution A
75 ml distilled water
10 grams ferric ammonium citrate
5 grams citric acid
Distilled water to 100ml
Solution B
40 ml distilled water
6 grams silver nitrate
Distilled water to 60 ml
When Solutions A and B are completely dissolved, just mix them
together for a stock solution ...

The total volume of the final mixture is 160ml, which brings the concentrations of each ingredient down really substantially compared to Namias' ... or am I missing something really obvious ? (the latter is perfectly likely, of course.)
 
OP
OP
NedL

NedL

Subscriber
Joined
Aug 23, 2012
Messages
3,390
Location
Sonoma County, California
Format
Multi Format
When I first read it, I didn't notice the "distilled water to 100ml" and "distilled water to 60ml". Just now I looked again and I still didn't notice! I was about to write and tell you the total volume is 115ml ( what are you on about? :smile: ). You are correct, his solutions are much weaker.

OK, I just compared it to the VDB formula in Sandy's article.
The amount of silver in the 160ml is the same as in the VDB formula at 3.8%. The amount of AFC is only a little less, 6.25% vs. 9%. So yes, much less than Namias' formula, but not all that much less than for VDB. Maybe it only matters that there is excess AFC+citric in the solution, so the amounts are not critical above some minimum.

By the way, I've been thinking about how this process works. I think the acidic coating helps break down the hypo so that silver sulfide forms. ( and I think I got a brief and slight whiff of hydrogen sulfide when I first put the print into the hypo, so maybe it should not be done in a darkroom with unexposed film and paper. ) If that's right, then there might be some interesting ways to enhance the toning:
  • old "ripened" hypo might work better ( and not bleach the print ), maybe followed by a short bath in fresh hypo to remove unconverted silver.
  • maybe the paper could be put into vinegar or CA after the first "toning in hypo", then put back into the hypo for further toning, repeating until desired tone.
  • maybe straight into hypo-alum toner for an overnight bath? ( outside? )
I was going to re-read Namias' article because I can't remember if he mentioned ripening the hypo.
Also interesting: the darker and less red tone on the one I double coated is more apparent now after several days drying than it was after drying overnight.
 

pdeeh

Member
Joined
Jun 8, 2012
Messages
4,765
Location
UK
Format
Multi Format
What little chemistry I've learned over the past couple of years is wafer thin so I can't begin to guess whether your reflections are correct!

Might be worth posting some of these and other musings over at LFPF as he seems to hang out a bit over there. (I note his profile here says "Restricted Access", whatever that means)
 
OP
OP
NedL

NedL

Subscriber
Joined
Aug 23, 2012
Messages
3,390
Location
Sonoma County, California
Format
Multi Format
I was reading about hypo alum toner, and so much of what I read reminded me of what happens when these go into the hypo.... this all got started because I asked my wife about alum and arrowroot the other day, and she dug around in the back of our kitchen cupboard... and the next time I looked alum and arrowroot were at the front!

I think I'll make some hypo alum toner and try it ( and trying the vinegar and "ripened hypo" ideas will be easy enough! ). I've read that it can stink, so I'll probably put it in a lightproof box in the garage. Good idea to try to contact Sandy King at LPPF.... I agree with you: a little darker and a little blacker and this process would be great.
 

pdeeh

Member
Joined
Jun 8, 2012
Messages
4,765
Location
UK
Format
Multi Format
I really like this process.

If it can be tweaked in some ways without resorting to expensive toners, so much the better.

It seems less finicky than salt prints, less prone to fogging and the tones and gradation are interesting and have a charm of their own.

Although having said that, since I mixed up a bottle of sensitiser i've had more veiled results than the first few goes where I mixed the sensitiser on the fly, so perhaps it'll turn out to have a finickyness all of it's own!
 
OP
OP
NedL

NedL

Subscriber
Joined
Aug 23, 2012
Messages
3,390
Location
Sonoma County, California
Format
Multi Format
I tried one using Sandy King's formula today. I coated an area a little bigger than 8x11 inches, with 50 drops:

13 drops 25% AFC
13 drops 12% CA
8 drops 24% AgNO3
16 drops distilled water.

It seemed to print nicely. It intensified in the wash ( with a pinch of CA in wash water ) then again in the hypo. But then I thought I'd try the vinegar idea I mentioned above to see if I could get it to go even darker. After the initial fast darkening in the hypo, I put it into vinegar, and the image bleached away: it was not even as dark as before the wash. Putting it back into the hypo didn't bring it back. So don't try that vinegar idea! Bad idea!

So I'm not going to get a chance to see what it would have looked like after drying but my impression was that the color was a little less red. I'll try again another day, but the weaker formula certainly does work.
 

pdeeh

Member
Joined
Jun 8, 2012
Messages
4,765
Location
UK
Format
Multi Format
Just a wee progress report - though, "progress" might not be quite the correct word ...

I've continued making prints using this process, trying various papers and sizes and whatnot, but am struggling to reproduce those lovely rich tones I got from the first couple! All a bit annoying, but I'll persevere. I might go back to mixing the sensitiser as I coat, rather than making up a batch and storing it

I coated a couple of sheets this morning (the sun has just come out again) and noticed my bottle of sensitiser, made a couple of weeks ago, seemed to be rattling - and sure enough, there were some large (little-fingernail-size) clumps of crystals on the bottom. I have certainly read reports of AgNO3 and Citric acid mixtures throwing Silver citrate precipitate, so perhaps it's that?

The solutions were prepared with DI water, and good photo-grade Ferric ammonium citrate and AgNO3, though the Citric acid was "food grade" off eBay. Stored in a dark brown bottle in a shady place too ...


I've also been trying out sizing paper with albumin (hardened after coating), prepared as if for albumin paper but without salt. The surface is lovely, but I'm struggling to get even coating and definitely struggling to get the sensitiser to coat evenly and not mostly wash off in the first rinse! However, that's a story for another thread perhaps.
 
OP
OP
NedL

NedL

Subscriber
Joined
Aug 23, 2012
Messages
3,390
Location
Sonoma County, California
Format
Multi Format
I made another 8x11 a few days ago using Sandy King's formula. Both of my S.K. versions so far had some "bleeding", a bit of blurriness especially from the dark edge around the print. I think I've read that this can happen if you coat VDB too thickly, and I did lay it on pretty thick. It looks like stains around the edges of the white sky. This one was exposed ( quickly... only 20 minutes for a paper negative! ) under bright afternoon sun, and it has less contrast in the shadow areas.... it could be that this process benefits from a little slower exposure. It was also much lighter than I expected after going through the hypo, and I was going to write here that it was not a success... but after 2 days of drying it got very noticeably darker. The tone is different, less reddish... I don't really have a preference but if you are looking for something a little darker or more brown, it might be worth playing with moving the formula this direction.

I start lots of vegetables under lights this time of year and had cannibalized a string of sockets to make my UV exposure unit. Tonight I had to take it apart because my eggplant ( I think you call them aubergine :smile: ) sprouted. So I'm back to only using the sun until I can build a new one. Honestly I prefer the sun anyway, so I'm not in a hurry, but my output will probably slow down. But I think it would be worth trying these on an overcast day with a longer exposure....
 

pdeeh

Member
Joined
Jun 8, 2012
Messages
4,765
Location
UK
Format
Multi Format
Some more thoughts and experiences with this nice process ...

1. During September this year, I found that I was suddenly struggling to make a technically decent print. Contrast was down, sometimes quite remarkably so, and there were stains appearing in the first wash. Printing times were all over the place, despite the beautiful sunny (but humid) weather we were having.

When taking a print from the frame just as it looked nicely cooked, and putting it into an mildly acidic wash produced almost no "development", and prints started to bleach away rather than intensifying in the fixer.

Exchanging notes with Ned via PM, we agreed that humidity might be the culprit, and as the end of the month rolled by and the humidity fell, I again was able to make good prints.

Yesterday I coated some paper and let it dry overnight. It seemed slightly (barely noticeably) "tacky" to the touch this morning, but nevertheless I made (or tried to make) three prints using my normal processing sequence, and all of them exhibited very low contrast, underdevelopment, stains, fogging and general lassitude.

So I've been thinking again about humidity and why this might be a problem. And my eye is drawn to the following few sentences from Namias' original paper:

... in the washing, which should take place immediately after printing, there is a further reduction of the silver citrate, which brings about a great increase in the vigor of the print. Exposure to light alone can never bring about this reaction between the ferrous salt and the silver citrate, on account of the absence of sufficient moisture in the sensitive paper to act as the vehicle by means of which the two salts are brought together. This washing may therefore be regarded as a partial development -- the ferrous citrate being completely restored to its condition of ferric citrate by reducing the silver salt to metallic silver.

Now, bearing those words in mind -- and also bearing in mind that I am almost entirely a chemistry ignoramus, and that I can easily get hold of the wrong end of the stick about things I only very partially understand -- I could infer from the above that a coated paper that is not entirely dry will undergo all or much of the reduction before going into the wash, and that this might indicate why my papers were not developing in the wash.

All speculation as to the whys and wherefores aside, it does seem - purely from my own experience and testing - that coated paper must be parchment-dry at the point of exposure. It doesn't seem to matter if the paper is dried, then gains moisture again (from ambient humidity) and is then dried fully again, but it must be fully dry when exposed.

2. Fixing in hypo. Ned speculated a bit in a post above about "ripened" hypo to produce the richest image colour, but having made several dozens of prints now, I'm inclined to suggest the opposite.

Prints of mine that show the richest colour and most definite colour change in the fixer are always those that go into freshly made fixer. I cannot begin to suggest why this should be from the chemistry point of view, because I know nuffink.

Namias speculates on the reason for colour change in the fixer as follows:

... I am inclined to attribute this to a slight sulphurization, facilitated probably by by traces of iron present in the image

I might also infer from that that a less fully washed image (and thus one retaining more iron) might show greater colour change, but then less perfectly washed images also run the risk of staining in the fixer due to too much iron, as we know from others' experience with kallitypes (if I remember correctly?)

My fixing regime has been to use 80g/l of Sodium thiosulfate (penta) with a rounded teaspoon of Sodium bicarbonate tossed in*. I've been fixing for about 90s in a single bath. Image colour definitely changes (weakens) after 3 or 4 10x8s. I'm now experimenting with a two-bath regime, using the same fixer recipe.

* The addition of bicarb to fixer is a hangover from when I was mostly doing salted-paper prints - a slightly alkaline fixer supposedly mitigating bleaching of the print. I tried carbonate in my Namias fixer but it didn't seem to produce such a good colour. I haven't tried borax, ammonia or potato water yet, but give me time.


pdeeh

Member
Joined
Jun 8, 2012
Messages
4,765
Location
UK
Format
Multi Format
And now, some thoughts after chasing wild geese ...

Knowing that Talbot used salt to fix his salted-paper prints at one time, and knowing that there is definitely silver nitrate in a sepiaprint as there is in a salted-paper print, I thought ... what happens if I try to fix a sepiaprint in brine? Mostly I was interested to see what the colour change might be.

So today I made two prints.

One I washed as usual in mildly acidic water to remove as much of the surplus salts as possible (it "developed" as expected) then immersed in an 18% solution of cooking salt in water. The image bleached to an unpleasant foggy low-contrast mess. Ned had predicted in a PM that the image colour would be yellow, and it was, pretty much, though not the unpleasant "baby poo" yellow one sometimes sees in these prints. Instead it was rather a gorgeous golden yellow. With a sufficiently strong print (yes, Ned, you were right about that too :wink:) and the right subject, it might make for a lovely effect.
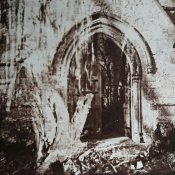
The other one, I took straight from the frame into the brine bath (fresh). Anyone care to predict the outcome? I was a bit surprised.

Two things happened:

First, the heavily overexposed areas from the print margins bleached away to nothing, and some parts of them actually floated free of the surface of the print as a "skin" (this is unsized paper remember)

Second, the image area did not develop at all. Now as we saw in my post above, Namias says that water is essential to the reduction taking place, and there's still plenty of water in the brine, so why no development? (yes, because chemicals of course)

Of course there is plenty of scope for my having made a dumb mistake, and I'm not jumping to any conclusions (for, as we knows, I knows nuffink), but I thought I'd relate the tale, for LOLZ - as I believe the young folk say - if nothing else.
 

pdeeh

Member
Joined
Jun 8, 2012
Messages
4,765
Location
UK
Format
Multi Format
A run of fails again this week nearly had me giving it all up as a bad job, but then when one popped out exactly as envisaged, I get cheered up again ...
_20161024_140645.JPG
 
OP
OP
NedL

NedL

Subscriber
Joined
Aug 23, 2012
Messages
3,390
Location
Sonoma County, California
Format
Multi Format
Was that made with 2 negatives? It's spooky. And excellent!

I've tried a could quirky things after I heard about you getting a yellow-gold color.

Last night I tried to make one on black construction paper... it was a failure. I exposed through a positive print. After 1/2 hour I could see nothing at all ( a paper negative of about the same density would take 30 to 45 minutes to expose ). After 3 hours I could see dark areas corresponding to the highlights in the print. When I put it into the wash, the dye or color in the paper came out making the water black. Then I "fixed" in 2 changes of 20% salt solution. I couldn't see much of an image on it last night but this morning after it dried I can see a sort of golden-yellow color on the surface ( the paper was nearly destroyed by getting wet ). The color is an attractive sort of "tarnished brass", but it's not light enough to contrast with the black background to give the impression of a positive image. I can see that it might be a nice color on white paper. This needs another test on a better support.

Last Friday, I coated a piece of exposed and developed black photopaper and let it dry overnight. Saturday I put it into a solargraphy can and stuck it in the backyard. I'm going to try "developing" it in a week, but now it's raining, so not sure if I'll get a good test or not -- it's probably getting wet.
 

pdeeh

Member
Joined
Jun 8, 2012
Messages
4,765
Location
UK
Format
Multi Format
Just one negative, Ned - an accidental double exposure from my £8 charity shop Ensign Selfix 6x6.

"construction paper" is the same as what we call "sugar paper" in the UK. I'm surprised it held together at all!
There are black printmaking papers I think, though given your experience with Rosaspina/Tiepolo that might not be very successful
either.

I've stopped with the two-bath fix. No doubt the pictures are properly fixed, but colour just isn't as good. So I'll have to resign myself to buying a thiosulfate in bulk and perhaps even going one-shot.
 

pdeeh

Member
Joined
Jun 8, 2012
Messages
4,765
Location
UK
Format
Multi Format
A couple more reflections.

First, coating; I usually coat half a dozen or so sheets at a time. I'd developed the habit of measuring the total amount of sensitiser I need for a batch into a small bowl, and then dunking my coating sponge into that to pick up sensitiser.

I don't think this works well - I think one of the problems I was having (with "tacky" paper & unevenness) is related to an overly thick coating of sensitiser. I expect the humidity issue is related to this too - it exacerbates the problem caused by too much sensitiser on the paper.

So I have now gone back to measuring the amount needed (about 2.5-3ml for a wholeplate sheet, the size I'm making at the moment) from the bowl using a disposable pipette, depositing it on the paper and then spreading it with the sponge to an even density.

My prints are now much better, have consistent contrast and colour change in wash and fix and I'm generally a happier bunny. At least with my prints.

This is how I'd previously done the coating for all my alt processes and it always worked really well. Why on earth did I change?

(As an aside, this paper keeps really really well - I've noticed hardly any deterioration in paper I coated even two or three months ago (if any at all)).

Second, fixing again. Or rather, washing, but the two are obviously related.

Fixing and washing generates endless discussion on APUG, but almost never relating to alt-prints. Fixing, washing and testing for archival permanence in conventional silver gelatin paper are known processes - with very few exceptions, silver gelatin enlarging paper is much of a muchness in how it responds to fixing & washing - and, however many times it gets asked about, we pretty much know the amount of washing that's required and we definitely know how to test for complete fixing and proper washing,

Alt prints by contrast are of course made on all sorts of papers, some sized (and with a great variety of sizes), some thick, some thin, some rag, some pulp, some a mixture, some hot pressed, some NOT ... and so on. One of the fascinating things for me about alt printing has been learning about all the different kinds of paper there are and how they are made and finished. And I've only scratched the surface.

When I read up about alt printing, I find the same or similar recommendations made all the time for washing, and I've never read anything about testing for "archival permanence". Which is interesting, as it seems to me a print made on a hard 90gsm paper and a print made on a NOT 400gsm paper are likely to wash at different rates. (I may be wrong, I so often am. And I don't have a copy of Richard James, so perhaps he discusses it?)

Water is expensive stuff these days.

My habitual "washing sequence" is to take my freshly fixed print and hold it under running water, turning it frequently in its plane under the stream, and flipping it to wash the back in the same way. I do this for about 2 minutes.

It then goes into a tray, with a tap running into the tray, and I leave it there for as long as I can stand the thought of money washing down the drain, or until I have finished making another print (usually about 10 mins), whichever is the longer.

Then it goes into another tray with water in. It gets agitated from time to time and the water changed. It might get 8 or so changes of water, usually over a 12ish hour period, and then hung to dry.

Prints washed in this way have sat in brightly illuminated windows (8 hour a day sunlight) for months on end now, and show no signs of fog, although there is a slight shift in colour in the printed parts in some.

Yesterday I found a bottle of HT-2 under the sink that I had almost forgotten I had made up.

So I thought I'd test a couple of prints that had been made the same day and were coming to the end of their "fill and dump" phases. I was pleased to find that there was no detectable stain from the test, and therefore that these were "properly washed" -- well, assuming that this test is applicable to alt prints.

(Two digressions:
1. "Archival permanence" seems an absolute obsession at APUG. Not an obsession I share, but nevertheless I suppose I don't want my prints fogging to death or silvering out on contact with a bit of sunlight. Sometimes though, it seems that people's aim making prints is "archival permanance" rather than making beautiful/moving/shocking/amazing pictures. ho hum.

2. "Alt". This prefix now carries the most unpleasant connotations. Thank you very much, 2016.
)
 

pdeeh

Member
Joined
Jun 8, 2012
Messages
4,765
Location
UK
Format
Multi Format
Just to relight this old thread, as I haven't really been doing much the past few months.

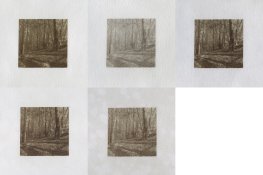
Here's a montage of scans of 5 6x6cm contacts (from HP5 in D23) I made yesterday.

They're on a paper that contains quite a lot of factory sizing (internal and external), also optical brighteners.

It was acidified with ~5% Citric acid & then dried before applying sensitiser.

Four were cut from a larger sheet sensitised and stored in the dark about 3 months ago, the fifth (the one which shows staining and mottling) I have no idea about, I just found it at the bottom of the same box.

All were fixed with a 1+9 solution of rapid fixer rather than the so-often recommended weak hypo.
Nevertheless, I can't see any bleaching or other image deterioration.

The very pale, apparently underexposed one (top row, 2nd from left) was actually well exposed, but it had its wash (the "development" stage of a Namias print) under the tap with water straight from the main supply; it bleached almost immediately after the initial development.

The others all had varying amounts of exposure (between 50s in direct sunlight to 5 minutes in open shade Northern sky light) but were first washed in three changes of acidified water (a "pinch" of Citric acid in 2 litres of water) and then a minute or so under the tap, before fixing.

As so often, the prints in the hand are sharper and more attractive than the scans, which in this case have suffered further from being montaged from 768x768 jpegs.

Enough words, here we go:

qc.jpg
 

removed account4

Subscriber
Joined
Jun 21, 2003
Messages
29,832
Format
Hybrid
wow pdeeh, beautiful stuff !

there used to be a sweet german photography website called the visual brothers years ago
i think i am going to start calling you and nedL the namias brothers :smile:
 

eddie

Member
Joined
Jul 24, 2005
Messages
3,259
Location
Northern Vir
Format
Multi Format
Just went through the entire "conversation". This thread, with its free sharing of information/experience, is APUG at its best. Thank you.
 
OP
OP
NedL

NedL

Subscriber
Joined
Aug 23, 2012
Messages
3,390
Location
Sonoma County, California
Format
Multi Format
Just to relight this old thread, as I haven't really been doing much the past few months.

I really like those!
I have a feeling that 1) and 3) would be considered the "strongest" print sand 4) might be the closest to "optimal exposure", but there's something about the second "bleached" one that I like. I don't know why but I like it a lot...
 

pdeeh

Member
Joined
Jun 8, 2012
Messages
4,765
Location
UK
Format
Multi Format
@jnanian, @eddie - thank you.
@NedL - "pale" ones often get a positive reaction from viewers - I remember the same from some early LF Namias prints I posted elsewhere, I think on Ipernity.
 

JPJackson

Member
Joined
Nov 23, 2014
Messages
174
Location
NE TN
Format
Large Format
IMG_1004.JPG
Thanks to Ned and pdeeh, who got me thinking about this last year. Yesterday was a first run at Namias paper sepia; FAC+FAO(part A) and 5gAg nitrate/20ml (part B) + H2O; this formula is near the end of the article Ned shared with us.
This is my first silver nitrate sensitizer.
The drop count was 5 drops part A; 4 drops part B and 6 drops of H2O. Paper is Cot320. 3 minutes spring water development and 2.5 minutes fix (1tbs/lt plain hypo).
The exposure needs to be reduced by half; this sensitizer is twice as fast as the Pd sensitizer I use.
Will rerun the test today and read the results tomorrow to see what the ES is; then to see if I have any negatives to match; if not will make some.
Have been reading "Out of the Shadows" and my wife and I have just returned from 3 weeks in lovely England.

Best regards,
J
 
OP
OP
NedL

NedL

Subscriber
Joined
Aug 23, 2012
Messages
3,390
Location
Sonoma County, California
Format
Multi Format
Cool! I was hoping someone would try that oxalate suggestion at the end of the article! Yes, exposure is fast with this process in general.
Have fun!
 
Photrio.com contains affiliate links to products. We may receive a commission for purchases made through these links.
To read our full affiliate disclosure statement please click Here.

PHOTRIO PARTNERS EQUALLY FUNDING OUR COMMUNITY:


Ilford ADOX Freestyle Photographic Stearman Press Weldon Color Lab Blue Moon Camera & Machine
Top Bottom