• Welcome to Photrio!
    Registration is fast and free. Join today to unlock search, see fewer ads, and access all forum features.
    Click here to sign up

Ricoh Diacord L Repair Notes

crossing the bridge

A
crossing the bridge

  • 0
  • 0
  • 19
Hooters gonna hoot

H
Hooters gonna hoot

  • 2
  • 0
  • 30

Recent Classifieds

Forum statistics

Threads
202,489
Messages
2,841,470
Members
101,351
Latest member
pavdee
Recent bookmarks
2

hospadar

Member
Joined
Jun 24, 2024
Messages
76
Location
Michigan, USA
Format
35mm
Recently rejuvenated a Ricoh Diacord L that I picked up a while back in a mixed lot that had a stuck shutter. Thought I would post some pics of the repair and a few notes for posterity in case anyone else is going down this road.

I didn't get into the film transport or anything, so no pics of that, but one suspects it's probably simple and very similar to all the other rolleicord clones.

The front covers pulled off, the attach by way of 7 little screws under the leatherette. You'll find them easily enough once you lift the leather. The shutter button comes off with the cover, but the flash sync is attached to the underlying plate. The self timer button/release is just a threaded screw although it doesn't have any holes or flats for a spanner. I just used some smooth pliers and it came off easily.
2026-02-19 19.46.34.jpg


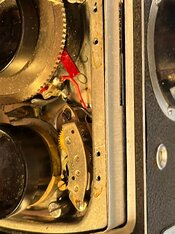
A couple shots showing the interesting self timer arrangement. The self timer is a separate escapement mounted next to the viewing lens. A collar around the viewing lens cocks the timer whenever the shutter is cocked (the timer remains cocked until released). Mine was a little sticky, it wasn't clear to me if I would be able to remove the collar for cleaning without messing up the focal setting of the viewing lens, so I just flushed the collar with naptha while working it then lubed slightly with oil. The escapement is easy to remove for cleaning with two screws on either end.

2026-02-19 19.46.37.jpg
2026-02-19 19.46.38.jpg
2026-02-19 19.46.40.jpg
2026-02-19 19.46.45.jpg
 

Attachments

  • 2026-02-19 19.46.42.jpg
    2026-02-19 19.46.42.jpg
    577.8 KB · Views: 3
The shutter can be released either by the button or by pushing the cocking lever to the far side of the camera. The cocking lever is part of a ring that goes around the shutter which has a tab that engages the shutter release as well as the cocking ring inside the shutter. When the self timer kicks off, it pushes the external cocking lever ring against the shutter release.

2026-02-19 19.46.54.jpg


The shutter is easily removed by undoing a collar inside the film chamber which also holds on a funnel-shaped baffle. As usual, there are several shims between the shutter and the front plate

2026-02-19 19.56.31.jpg


Innards of the seikosha MXV shutter (not sure if this is _really_ an mxv since the self timer is external?)
The cocking ring can be removed after unhooking the main spring from it's post which is at about 11:00 in this photo

2026-02-19 20.01.02.jpg


If you want to split the shutter for cleaning, as I did, I would gently lift out the shutter release but leave everything else in place. The main delay and flash sync delay escapements are not removable as separate units, if you unscrew them you'll merely remove their top plates and you'll have a pile of little gears to carefully track and reassemble. I also removed the y-shaped flash sync arm visible at 12:00 right under the 1/500 spring, but I don't think that was actually necessary to do.

Also visible in this photo at 7:00 is the aperture arm. It has a small tab on the inside which engages the notches on the shutter speed ring for the EV coupling. I find that to be annoying so I filed off the tab to decouple the aperture and shutter speed. Works like a charm.

2026-02-19 20.02.16.jpg


there are 3 or 4 obvious screws on the back of the shutter case which, once removed, allow separating the shutter from the diaphragm. The blades are all identical and go on in no special order (no bent tip on the front blade or anything) and have no spacers. I soaked the blades in naptha, then ultrasonic cleaned the blades with dish soap then an alcohol rinse. Wear gloves when reassembling to avoid finger oils on the blades. The shutter is pretty easy to reassemble, there's a small lever near the shutter release that has to be finessed into position but other than that nothing special.

2026-02-20 13.21.02.jpg


The faceplate with the shutter removed. I think there are screws (maybe?) beneath the cocking ring that separate the faceplate from the helicoid which would permit you to access that for cleaning if you were so inclined but I didn't go that far
2026-02-20 13.47.30.jpg


This photo is showing the stack order of the rings which indicate shutter speed and aperture. I took these off to see if replacing the yellowed plastic window seemed viable but it's A) riveted on and B) has the aperture numbers printed on it so for now I decided to just leave it. If I were you I'd scribe markings of where these engage the control rings in the cover, I didn't, reinstallation was fiddly but not terrible.

2026-02-20 17.52.12.jpg
 
A few other notes:

- The matte glass and fresnel are not fused together and are easy to take apart for cleaning. The fresnel is plastic and the usual advice is don't clean it or be very careful when doing so. I blew off all the dust and gave it a very light light wipe. The matte screen is glass and you can (and I did) go hard on it with alcohol or whatever. Combined with a new mirror from ebay I now have a much nicer viewfinder image.

- The meter on mine was functional, but reading about 4-6 stops fast (too much to compensate for with a simple ASA setting change). The selenium cell appears to be encased in resin so I bet they are more resilient to oxidation and degradation than most, but I decided to open up the cell housing and replace the cell with a silicon cell. I used an "Anysolar KXOB25-14X1F-TR" from digikey which is a small monocrystalline calculator-sized solar cell that I've used to replace other busted meters. They make several similar variants and for cameras with dual-range meters like this one, I like to use one that is just a single cell, not multiple cells in series. This isn't really advertised but it's evident if you look at the voltage ratings, they are all rated at some multiple of ~.6 volts but the same output power. For single range meters, it doesn't matter, and a higher voltage cell is probably better. If you use a multi-cell unit for dual range meters - when you close the lid, some of the cells on the panel will be shaded and prevent the cell from producing any voltage (unlike your rooftop solar panels which generally have diode bypasses on each cell to prevent a fallen leaf from shutting down an entire panel).

- I installed a small 10k trimpot in the mirror chamber to calibrate the cell to the meter movement, although in the end this wasn't necessary, I had it turned to 0 and got basically perfect readings. That's great but if the cell were even just a lil wimpier you wouldn't be able to get things calibrated to where they need to be.

- I positioned the cell so that it would be beneath one of the slits in the faceplate so that I could use both the upper and lower ranges of the meter. Because the cell is much smaller and more efficient than the original selenium meter, the slit is way too big. I got the meter calibrated for the low range (with the lid open), then closed the lid and covered up most of the slit from the inside with a piece of aluminum (lightproof) duct tape. By slightly changing the amount of open space on the slit while metering in a known bright setting you can get the high range of the meter calibrated as well. The cell only sits under one of the slits so I completely closed the other one to avoid any misreadings from stray light coming through the other slit although I think that's unlikely to be an issue due to the lens-and-grid structure of the meter.
 
The final product!

Also cut a new front leatherette from some nice camera leather I had in the bin. Some previous repair person had really slathered cement all over the original leatherette and it was pretty fubard, I think the contrast gives it a sexy lil pop.

signal-2026-02-26-202314.jpeg
 
Photrio.com contains affiliate links to products. We may receive a commission for purchases made through these links.
To read our full affiliate disclosure statement please click Here.

PHOTRIO PARTNERS EQUALLY FUNDING OUR COMMUNITY:


Ilford ADOX Freestyle Photographic Stearman Press Weldon Color Lab Blue Moon Camera & Machine
Top Bottom