Resetting a Compur Rapid Shutter

A window to art

D
A window to art

  • 0
  • 0
  • 17
Bushland Stairway

Bushland Stairway

  • 4
  • 1
  • 65
Rouse st

A
Rouse st

  • 6
  • 3
  • 105
Do-Over Decor

A
Do-Over Decor

  • 1
  • 1
  • 114

Recent Classifieds

Forum statistics

Threads
199,239
Messages
2,788,385
Members
99,840
Latest member
roshanm
Recent bookmarks
0
Joined
Nov 28, 2014
Messages
248
Location
Frederick MD
Format
Medium Format
Peeked through search results and found nothing, so here goes.

A few weeks ago, I picked up a cheap Welta Perle on ebay at the spur of the moment. When it arrived, I discovered it had a fouled shutter with a disconnected leaf.

I took the shutter apart to reach the leaves, and reset them around the perimeter of the diaphragm, but realize after cautious reassembly that I more than likely should have slid the leaves over to the CLOSED position prior to reassembly, as on further fiddling, the shutter leaves simply stay open. When I try to cock the shutter, the cocking arm doesn't lock, but immediately springs back, during which the leaves spring closed and then return to the open position.

Should I disassemble the rear of the shutter again and set the leaves to the closed position and then try to reassemble the shutter, thus hopefully reversing the motions of what it is doing now?

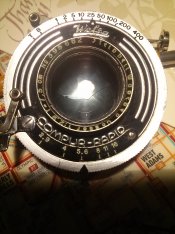
Attached is a photo showing the leaves closing as the cocking arm is sprung back towards the left.
 

Attachments

  • IMG_20150309_213254.jpg
    IMG_20150309_213254.jpg
    644.7 KB · Views: 311
OP
OP
Joined
Nov 28, 2014
Messages
248
Location
Frederick MD
Format
Medium Format
I would love be able to, though considering it is a $17 camera with a rather ordinary (though fast) Cassar Triplet and a few other issues such as a crusty film door latch to be worked out, it just in the cards.

Besides, I have gotten further along than I ever thought I would before I realized I may have needed to set the leaves differently before putting it back together.
 

shutterfinger

Member
Joined
Feb 25, 2013
Messages
5,020
Location
San Jose, Ca.
Format
4x5 Format
1. you are going to click on this link then download every page of the service manual
http://benoit.suaudeau.perso.neuf.fr/manuels_rep/obturateurs/compur-repair/01-03.html
1a. you may find http://benoit.suaudeau.perso.neuf.fr/manuels_rep/obturateurs/Compur-shutter-repair-manual.html in the second set of links easier to download and be sure to get the DJVU player also. there are some 50 to 60 pages to this manual.
2. now you are going to step through the manual until you reach section 4.
3. now you are going to look carefully at the diagrams until you find the shutter blade plate that most closely matches your shutter and install the shutter blades in their correct positions.
4. once you identify a shutter that matches yours then check the Repair instructions for that shutter number in section 6, the instructions will be only the special things you need to know for this shutter. It is assumed that you already know how to service a Compur shutter.
5. now you are going to go to Section 12 and lubricate the shutter according to the schemes.

I paid $40 for this manual many years ago, I wish this had been available then.

Now Compur, Compur-Rapid, and Synchro Compur are all very similar. There are only 3 or 4 base shutters and a lot of variants of the base for applications in various cameras.

I have repaired Compur shutters from the 1930's to 1940's with the aid of this manual. On one of the shutters one shutter number matched the bottom side of the main plate through the aperture and a different shutter number matched the top of the main plate to the front cover. If none match exactly one or two will be extremely close.

As stated in post #3 take it back apart and do it right.

6. go take some good pictures with it.:smile:
 
OP
OP
Joined
Nov 28, 2014
Messages
248
Location
Frederick MD
Format
Medium Format
Thanks for the replies. I took it apart this evening and realized my biggest error. I needed to FLIP the shutter leaves over so that they aligned towards the center, thus allowing them to do the typical motions when they spring back instead of the reverse as they were doing when I first reassembled.

I still need to work with it some more, but it is definitely making progress. At least it is usable at "B," which I certainly couldn't say before!
attachment.php
 

Attachments

  • IMG_20150310_210123.jpg
    IMG_20150310_210123.jpg
    1,022.3 KB · Views: 359

shutterfinger

Member
Joined
Feb 25, 2013
Messages
5,020
Location
San Jose, Ca.
Format
4x5 Format
There is a bend in the edge of a blade at the 9 o'clock position. This bend must be corrected before use as it will cause major problems if not corrected. As it currently is I suspect that there may be a light leak at the blade junction at the 2:30 position. Use smooth jaw needle nose pliers to press the bend back into shape or put the blade edge between two smooth pieces of wood and press together firmly to straighten the blade edge. At fast speeds it will catch and ruin 1 or 2 blades.
 
OP
OP
Joined
Nov 28, 2014
Messages
248
Location
Frederick MD
Format
Medium Format
Thanks for the pointers. I still have other tasks to do both with the camera and shutter, so I'll hopefully get to them. Trying to build on my progress to this point to see the job through, as it is much better than it was. Still not sure if this camera will ever become a shooter or a shelf piece. It shows some promise, and I'm quite tempted to see how the lens renders, but this has definitely been a dive in the deep end for me compared to what I'm used to.
 

AgX

Member
Joined
Apr 5, 2007
Messages
29,973
Location
Germany
Format
Multi Format
Use smooth jaw needle nose pliers to press the bend back into shape or put the blade edge between two smooth pieces of wood and press together firmly to straighten the blade edge.

Wouldn't it be better to grind off the whole edge, including that bent section?
Instead of trying to bent it back, likely never achieving a plane surface.
 

E. von Hoegh

Member
Joined
Sep 14, 2011
Messages
6,197
Location
Adirondacks
Format
Multi Format
Wouldn't it be better to grind off the whole edge, including that bent section?
Instead of trying to bent it back, likely never achieving a plane surface.

Sandwich it between two sheets of brass or aluminum (say two or three mm thick) and clamp it in a vise. This way you can apply as much pressure as you need with no risk of distorting the blade.
 
Photrio.com contains affiliate links to products. We may receive a commission for purchases made through these links.
To read our full affiliate disclosure statement please click Here.

PHOTRIO PARTNERS EQUALLY FUNDING OUR COMMUNITY:


Ilford ADOX Freestyle Photographic Stearman Press Weldon Color Lab Blue Moon Camera & Machine
Top Bottom